与 Check Point 防火墙建立 IPSec VPN
与 Check Point 防火墙建立 IPSec VPN
网络需求
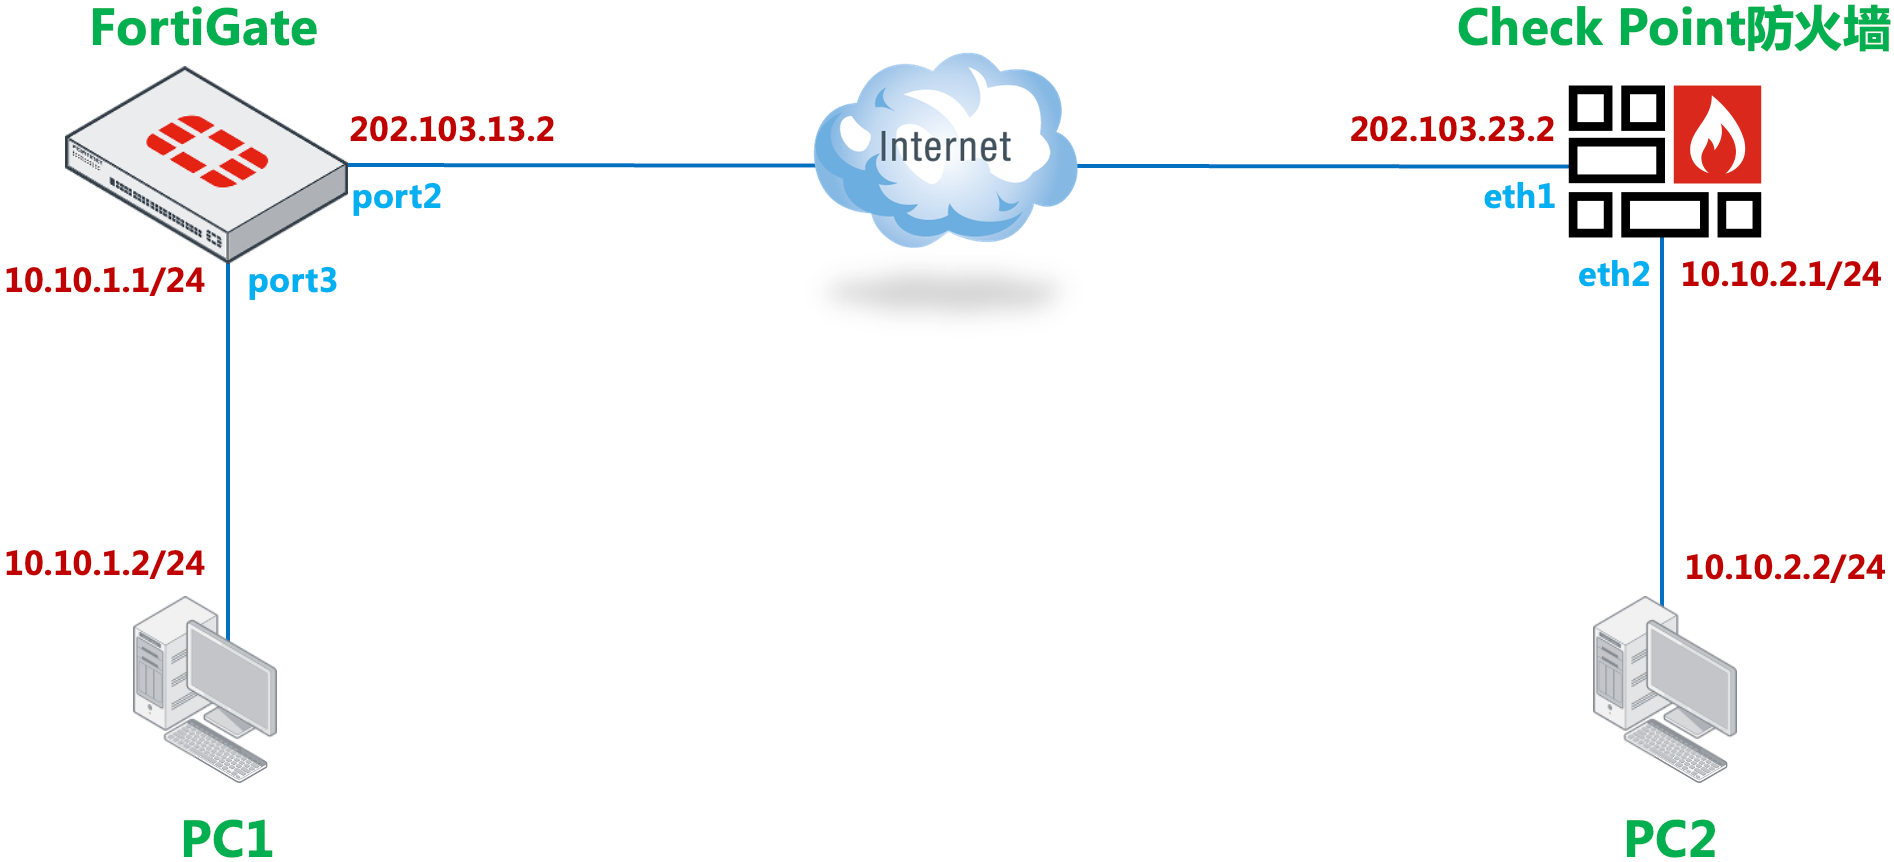
如图所示,通过 IPsec VPN(接口模式)将 2 个局域网连接起来,实现 10.10.1.0/24 与 10.10.2.0/24 两个网段的通信。与 Check Point 防火墙进行 IPsec VPN(IKE v1)对接。
Check Point 防火墙版本:
gw-000100> ver
Product version Check Point Gaia R81.10
OS build 335
OS kernel version 3.10.0-957.21.3cpx86_64
OS edition 64-bit
网络拓扑
配置要点
- 配置 FortiGate
- 基本上网配置
- 配置 IPsec VPN
- 配置 Check Point 防火墙
- 基本上网配置
- 配置 IPsec VPN
- 说明:如果要删除 IPSEC VPN 第一阶段、第二阶段时,需要先删除被调用的路由与防火墙安全策略。
配置步骤
FortiGate
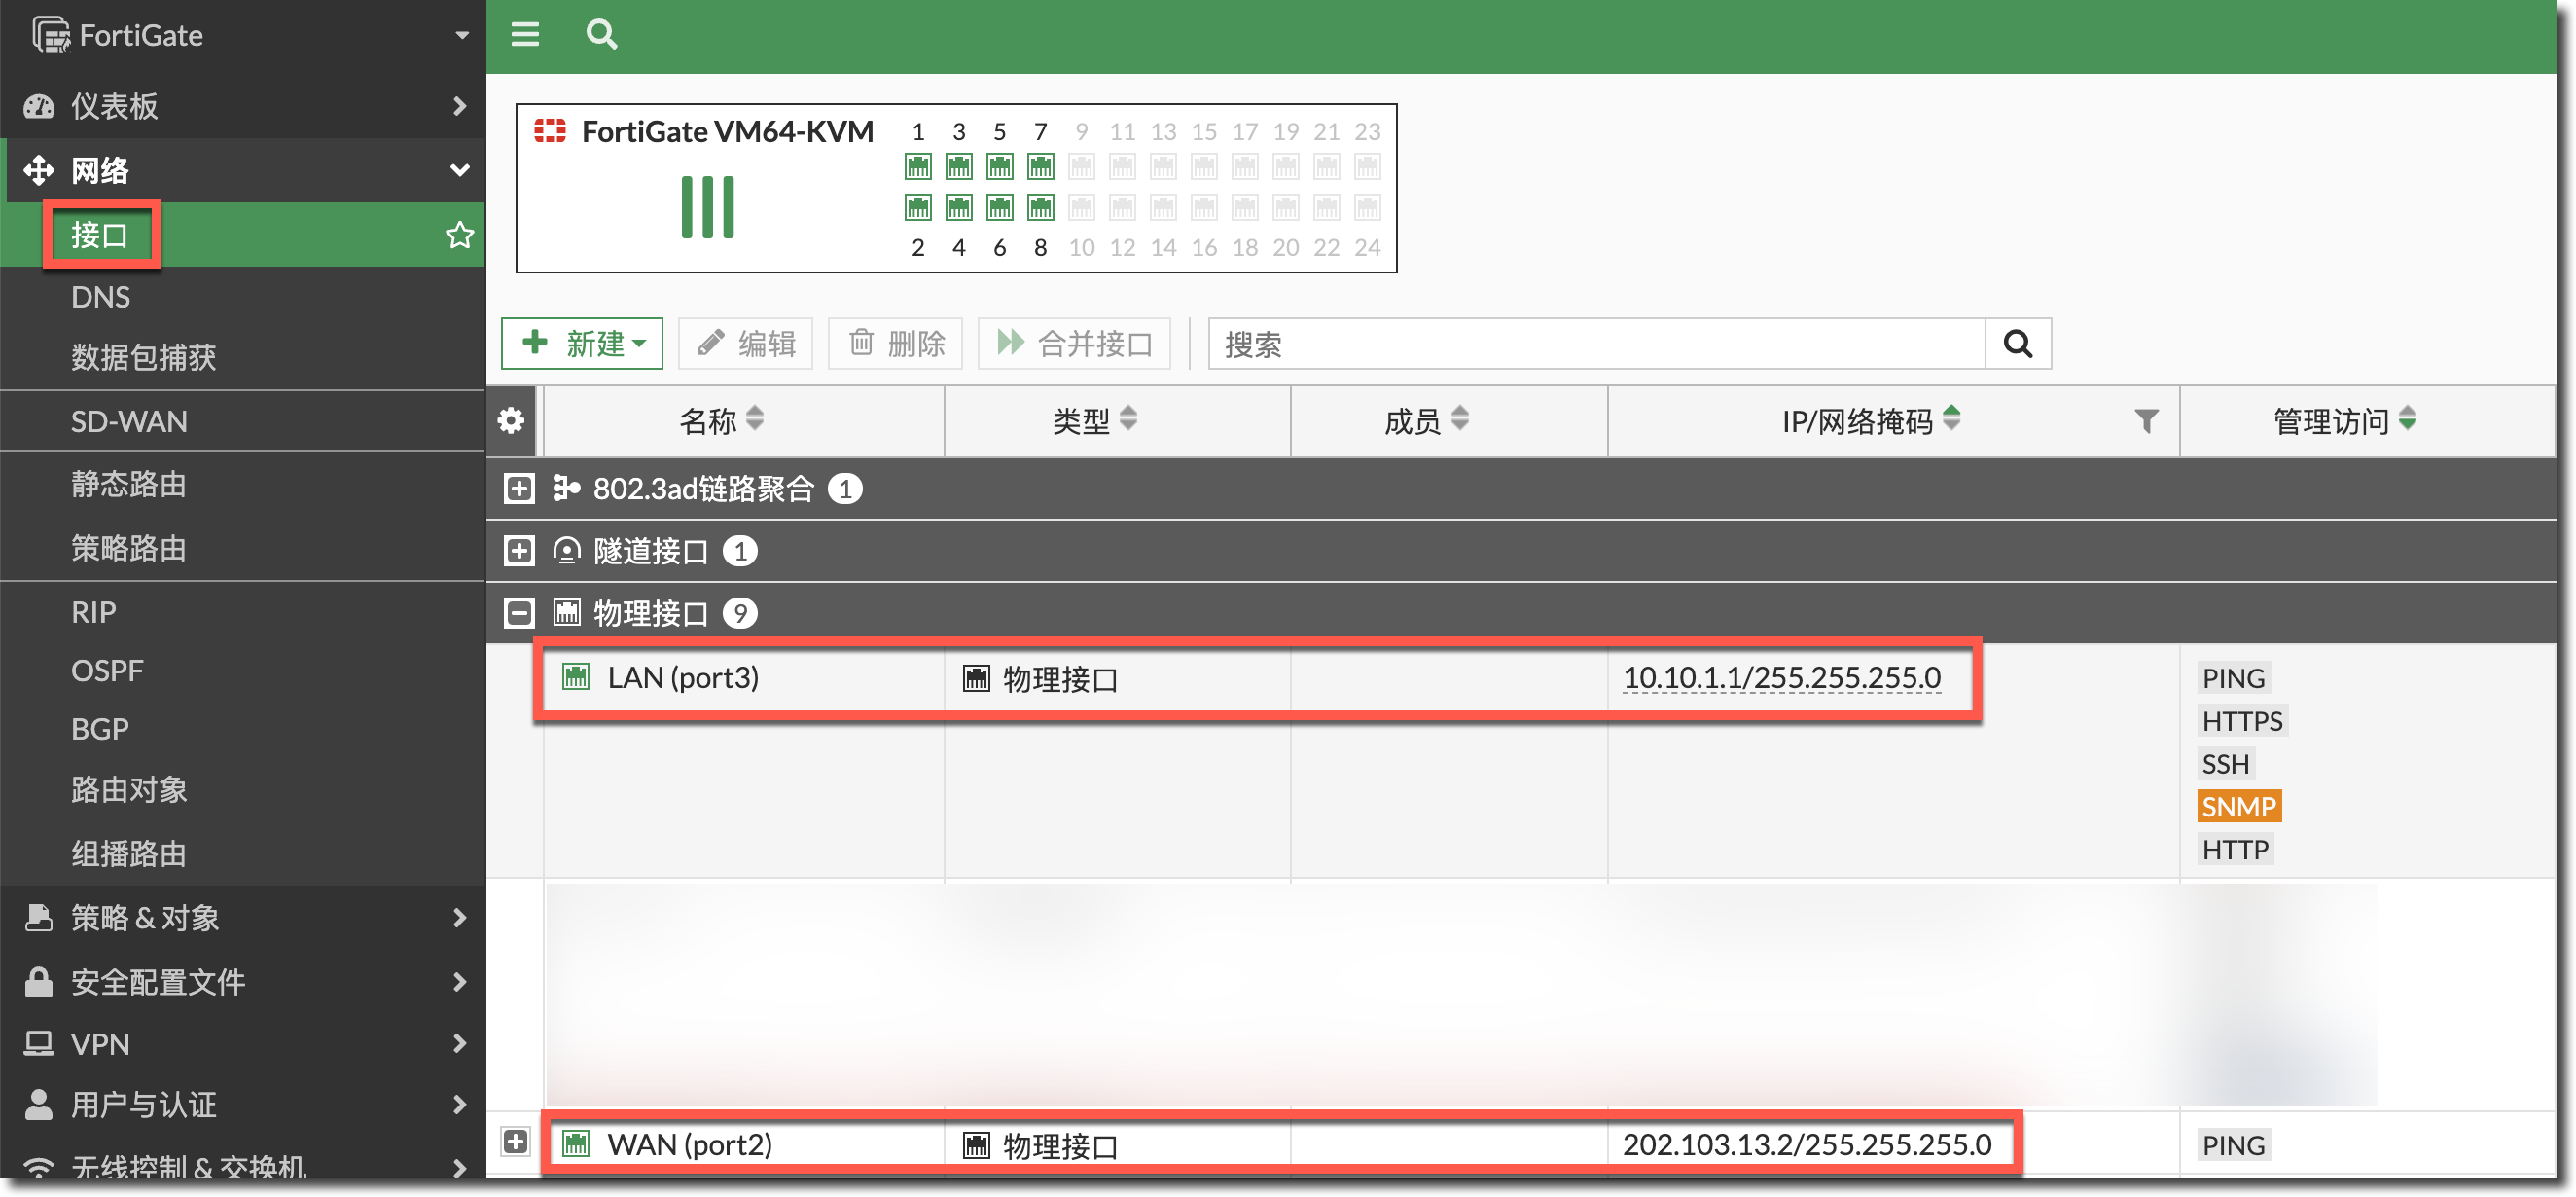
基本上网配置。


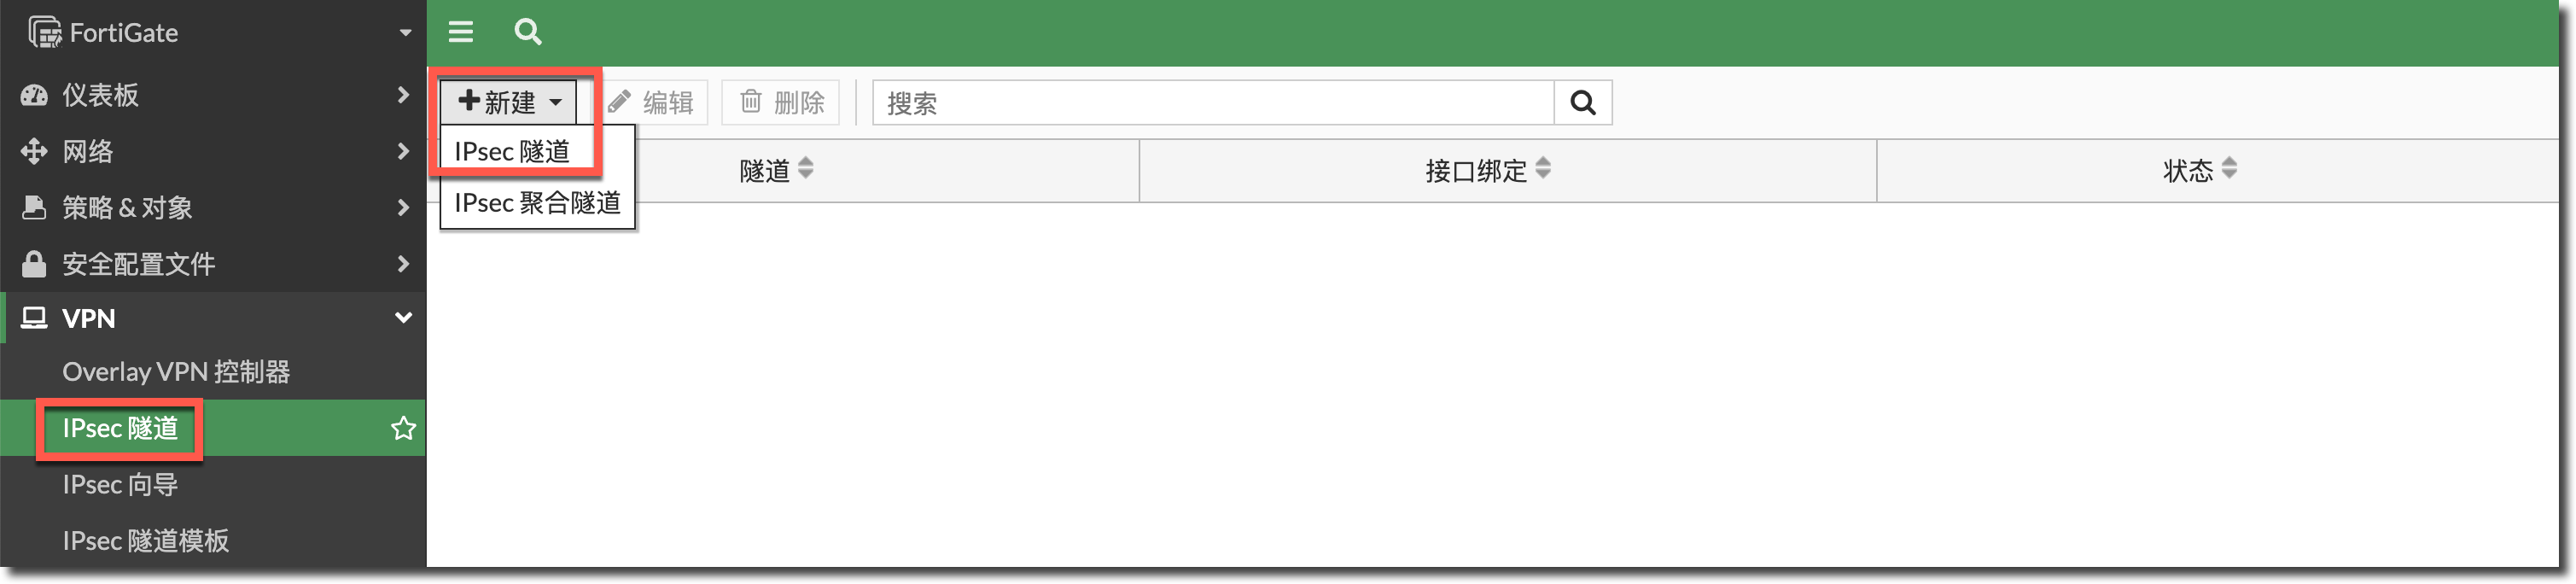
配置 IPSec VPN,进入 VPN → IPSec 隧道,点击新建 → IPSec 隧道按钮。
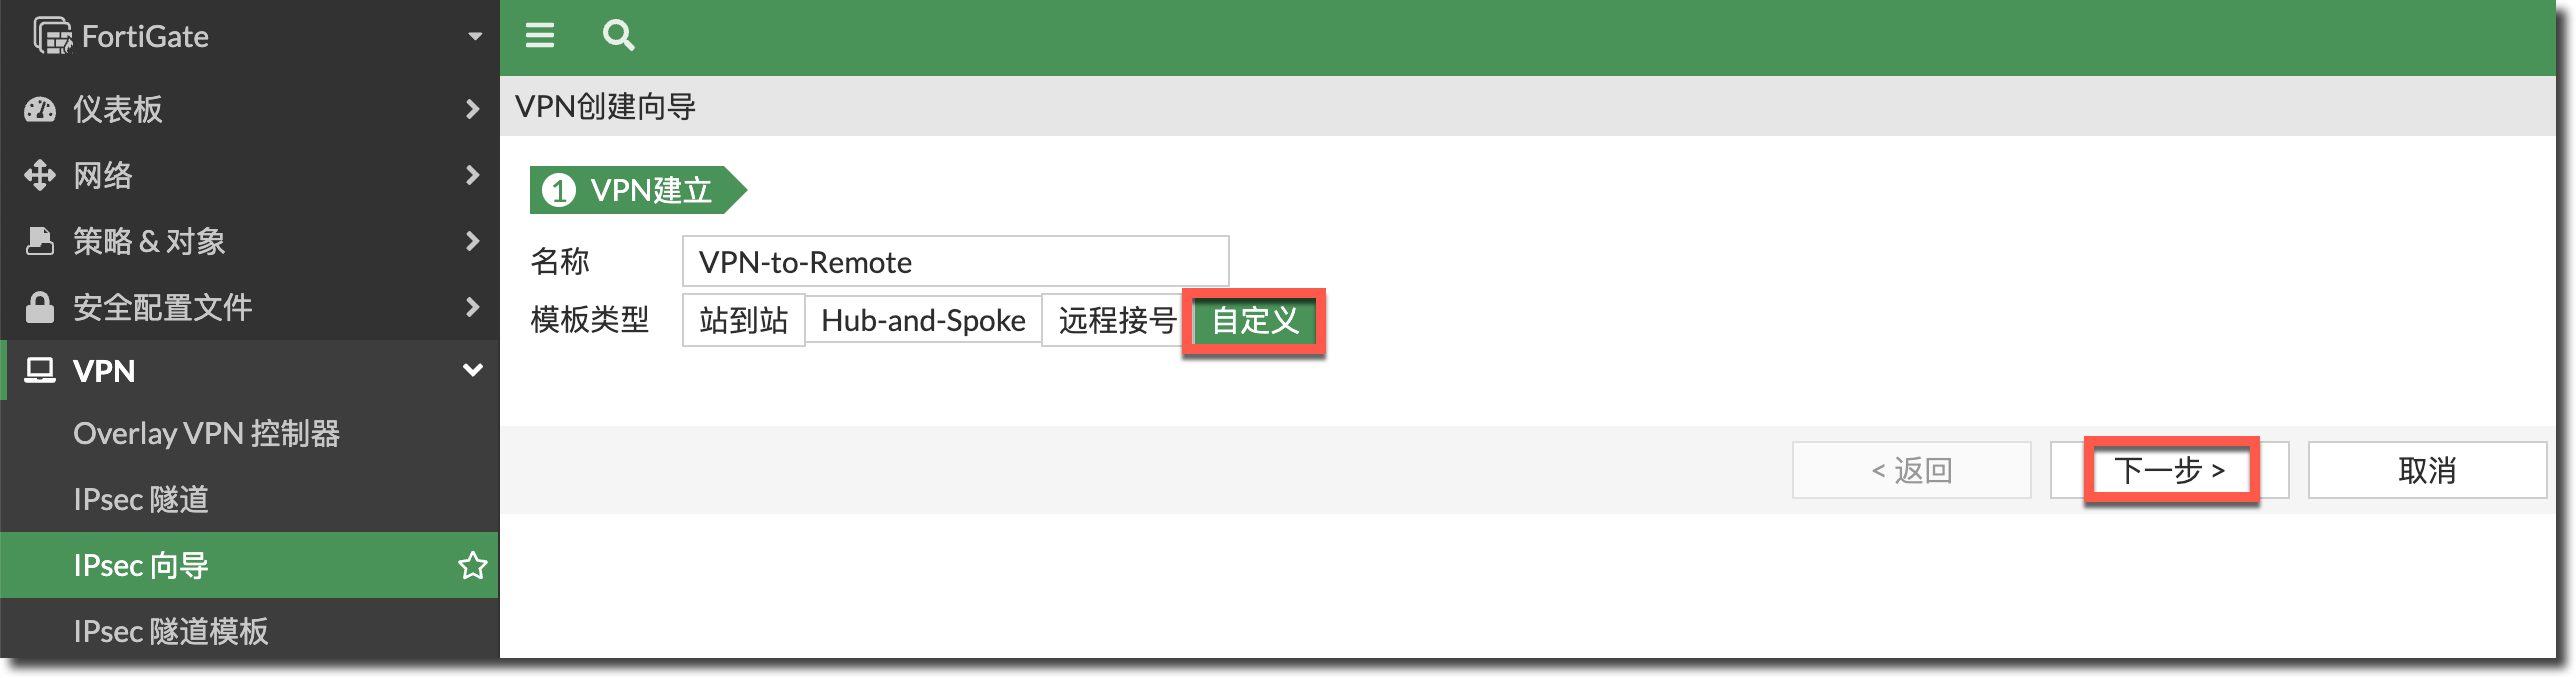
选择 IPsec VPN 自定义模板进行配置,点击下一步。
如图配置网络、认证、第一阶段、第二阶段。
重要
由于 Check Point 的 IPSec 配置需要配置明细的感兴趣流,FortiGate 与 Check Point 防火墙对接 IPSec 需要对应使用明细的感兴趣流。
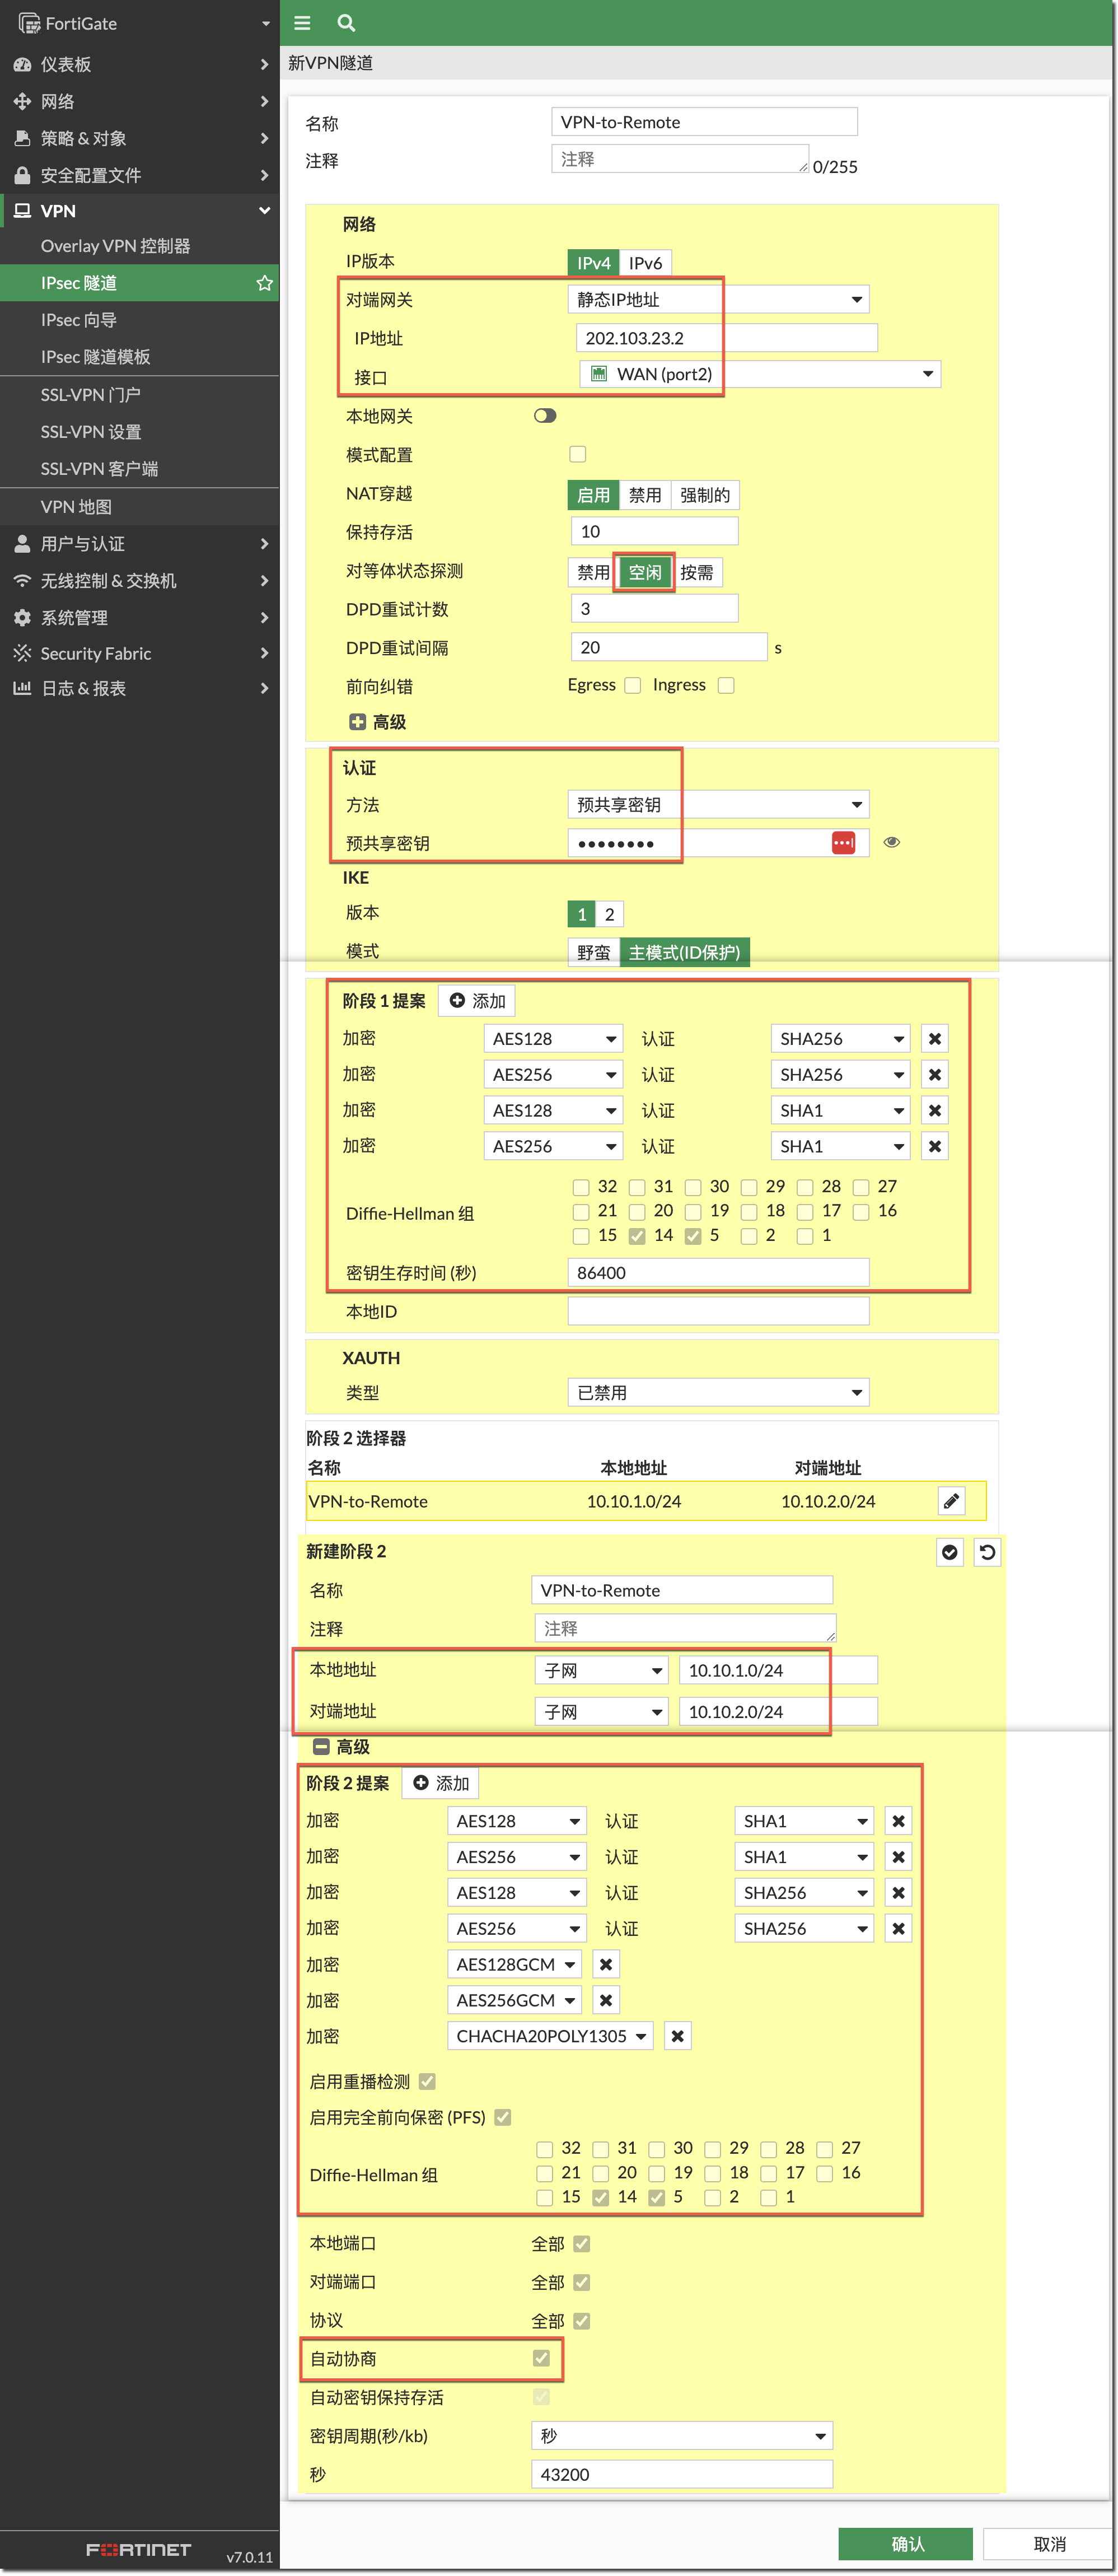
config vpn ipsec phase1-interface
    edit "VPN-to-Remote"
        set interface "port2"
        set peertype any
        set net-device disable
        set proposal aes128-sha256 aes256-sha256 aes128-sha1 aes256-sha1
        set dpd on-idle
        set dhgrp 14 5 2
        set remote-gw 202.103.23.2
        set psksecret xxxxxxxx
    next
end

config vpn ipsec phase2-interface
    edit "VPN-to-Remote"
        set phase1name "VPN-to-Remote"
        set proposal aes128-sha1 aes256-sha1 aes128-sha256 aes256-sha256 aes128gcm aes256gcm chacha20poly1305
        set dhgrp 14 5 2
        set auto-negotiate enable
    next
end
配置 VPN 相关的网段地址对象和防火墙策略。
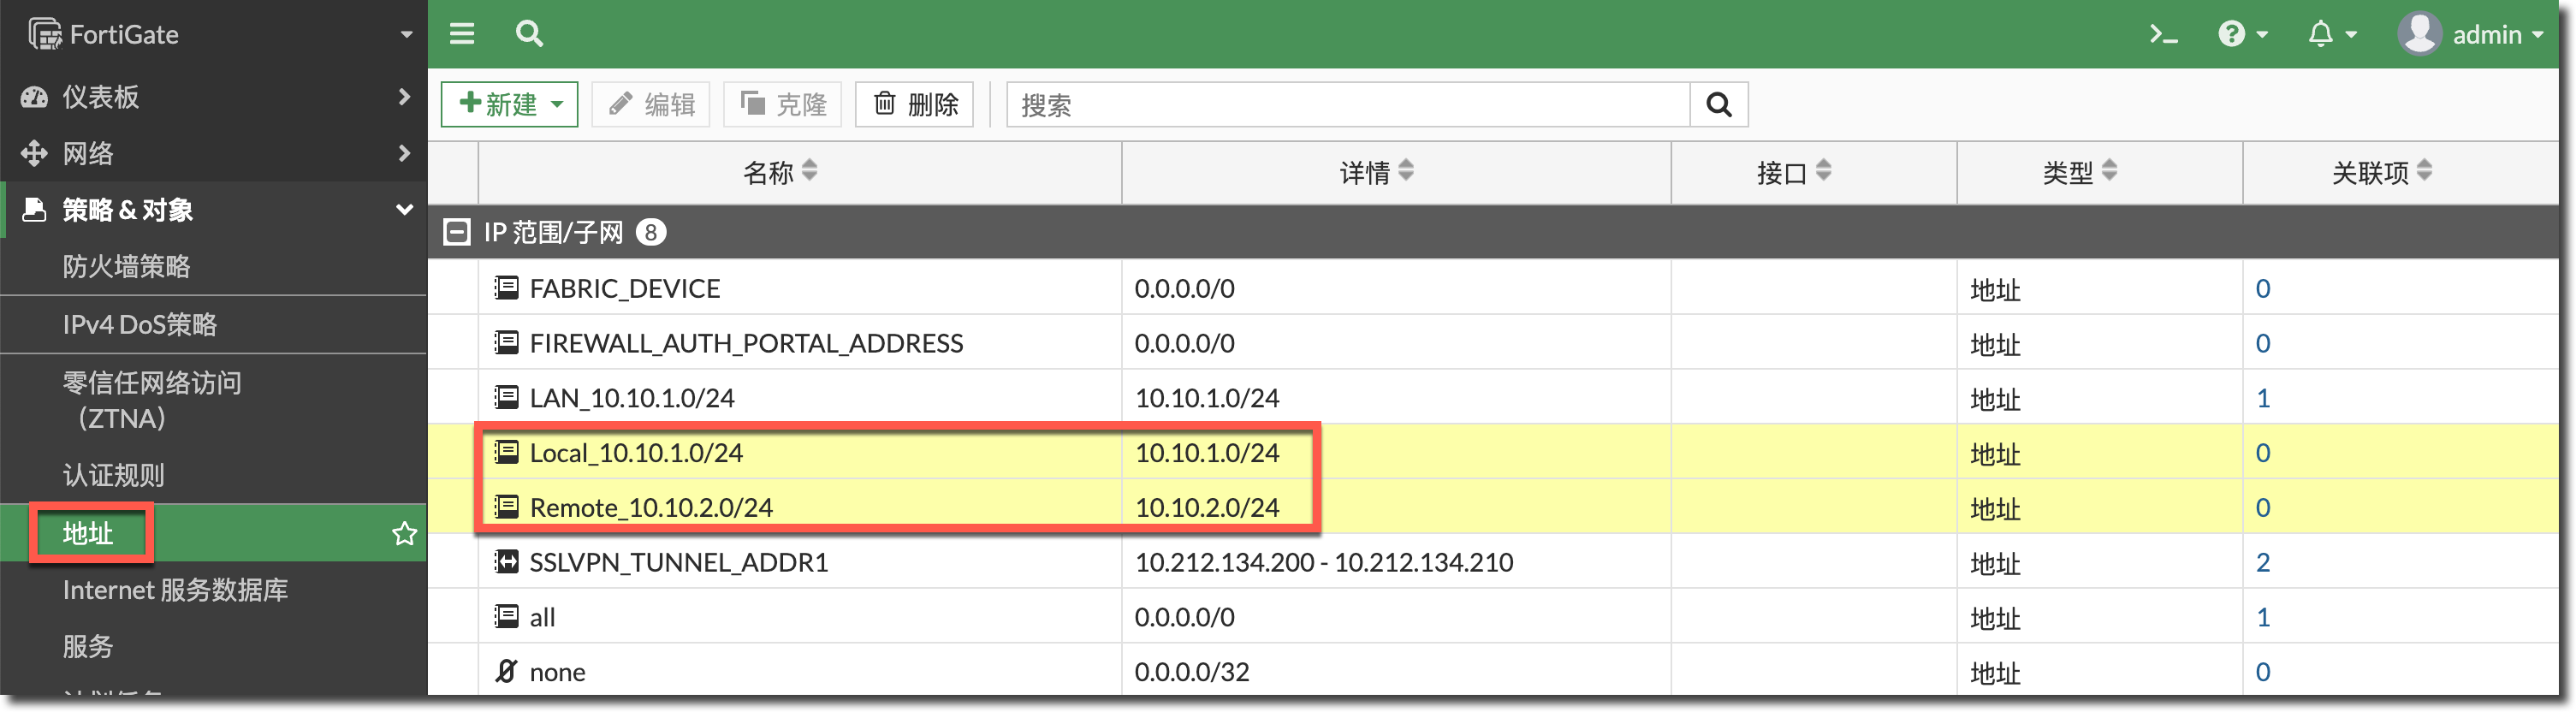
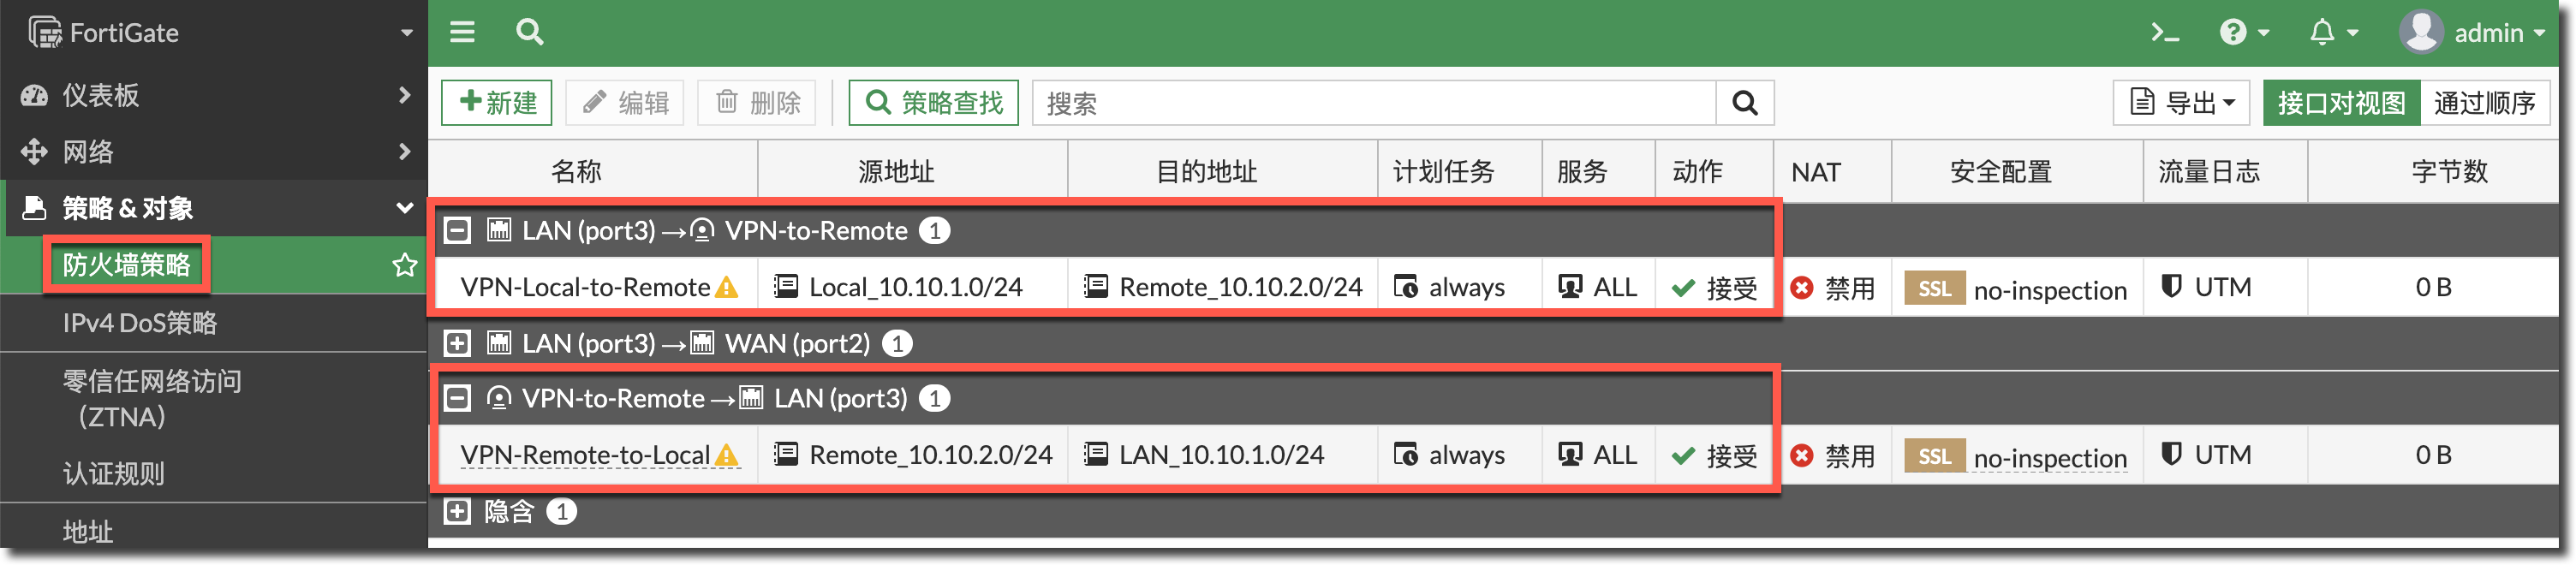
config firewall address
    edit "Local_10.10.1.0/24"
        set subnet 10.10.1.0 255.255.255.0
    next
    edit "Remote_10.10.2.0/24"
        set subnet 10.10.2.0 255.255.255.0
    next
end

config firewall policy
    edit 2
        set name "VPN-Local-to-Remote"
        set srcintf "port3"
        set dstintf "VPN-to-Remote"
        set action accept
        set srcaddr "Local_10.10.1.0/24"
        set dstaddr "Remote_10.10.2.0/24"
        set schedule "always"
        set service "ALL"
    next
    edit 3
        set name "VPN-Remote-to-Local"
        set srcintf "VPN-to-Remote"
        set dstintf "port3"
        set action accept
        set srcaddr "Remote_10.10.2.0/24"
        set dstaddr "LAN_10.10.1.0/24"
        set schedule "always"
        set service "ALL"
    next
end
配置 VPN 业务网段的静态路由。
重要
相关 VPN 的路由配置中“黑洞路由的意义:
你可能会遇到以下的 VPN 业务问题:通过 VPN 的 SIP 电话,时不时中断,无法向服务器成功注册 ?通过 VPN 的 Radius 认证无法经常会无法认证成功? 通过 VPN 的 AP 注册到总部时不时会中断?持续的 PRGT 监控 ping 总部的服务器,时不时会显示中断?
VPN 有时候会因为各种原因重新连接,比如互联网不稳定,PPPOE 重新连接更换公网 IP 地址等,VPN tunnel 此时会出现短暂的 DOWN,而去往对方的 VPN 业务网段的路由也会短暂消失,此时 VPN 的业务流量(SIP 注册请求/Radius/Capwap/ICMP)会因为查询到了默认路由而走向了 WAN(Internet),从而产生了错误的 UDP-NAT-Seesion,此时即便 VPN tunnel 再次 UP,VPN 业务网段的路由再次恢复,SIP 等 VPN 旧的业务流量依旧会走到错误的 Session 上去,从而引起该业务异常。
解决方法:
方法一:配置去往 VPN 业务网段的“黑洞路由”,管理距离为 254,VPN 正常的情况下此黑洞路由不生效,而当 VPN 中断的时候,黑洞路由浮起来并且生效,将 VPN 中断时候的 VPN 流量丢弃,避免将流量转发到互联网而产生错误的 session。配置 VPN 的备份黑洞路由的意义在此。
方法二:配置源接口:LAN,目的接口:WAN,源 IP:本地内网网段,目的 IP:对端内网网段,动作:丢包的策略。将此去往 Internet 的私网(无用的)流量丢弃掉,避免 FGT 产生这种错误的 session,从而避免了 UDP 业务时不时中断的问题。
方法三:在全局下开启“set snat-route-change enable”,一旦路由发生变化,将相关的会话 flag 置位为“Dirty”,清除路由缓存并重新查找目的 IP 的下一跳地址,这样 VPN 隧道恢复的时候,流量也会相应的切换到 VPN 隧道里面来。
FortiGate # config system global
FortiGate (global) # set snat-route-change enable
FortiGate (global) # end
三种方式任意选择一种即可。推荐使用黑洞路由方式。

config router static
    edit 1
        set gateway 202.103.12.1
        set device "port2"
    next
    edit 2
        set dst 10.10.2.0 255.255.255.0
        set device "VPN-to-Remote"
    next
    edit 3
        set dst 10.10.2.0 255.255.255.0
        set distance 254
        set blackhole enable
    next
end
Check Point 防火墙
进入 Check Point 防火墙的 Web 管理页面,配置基本 IP 与路由。
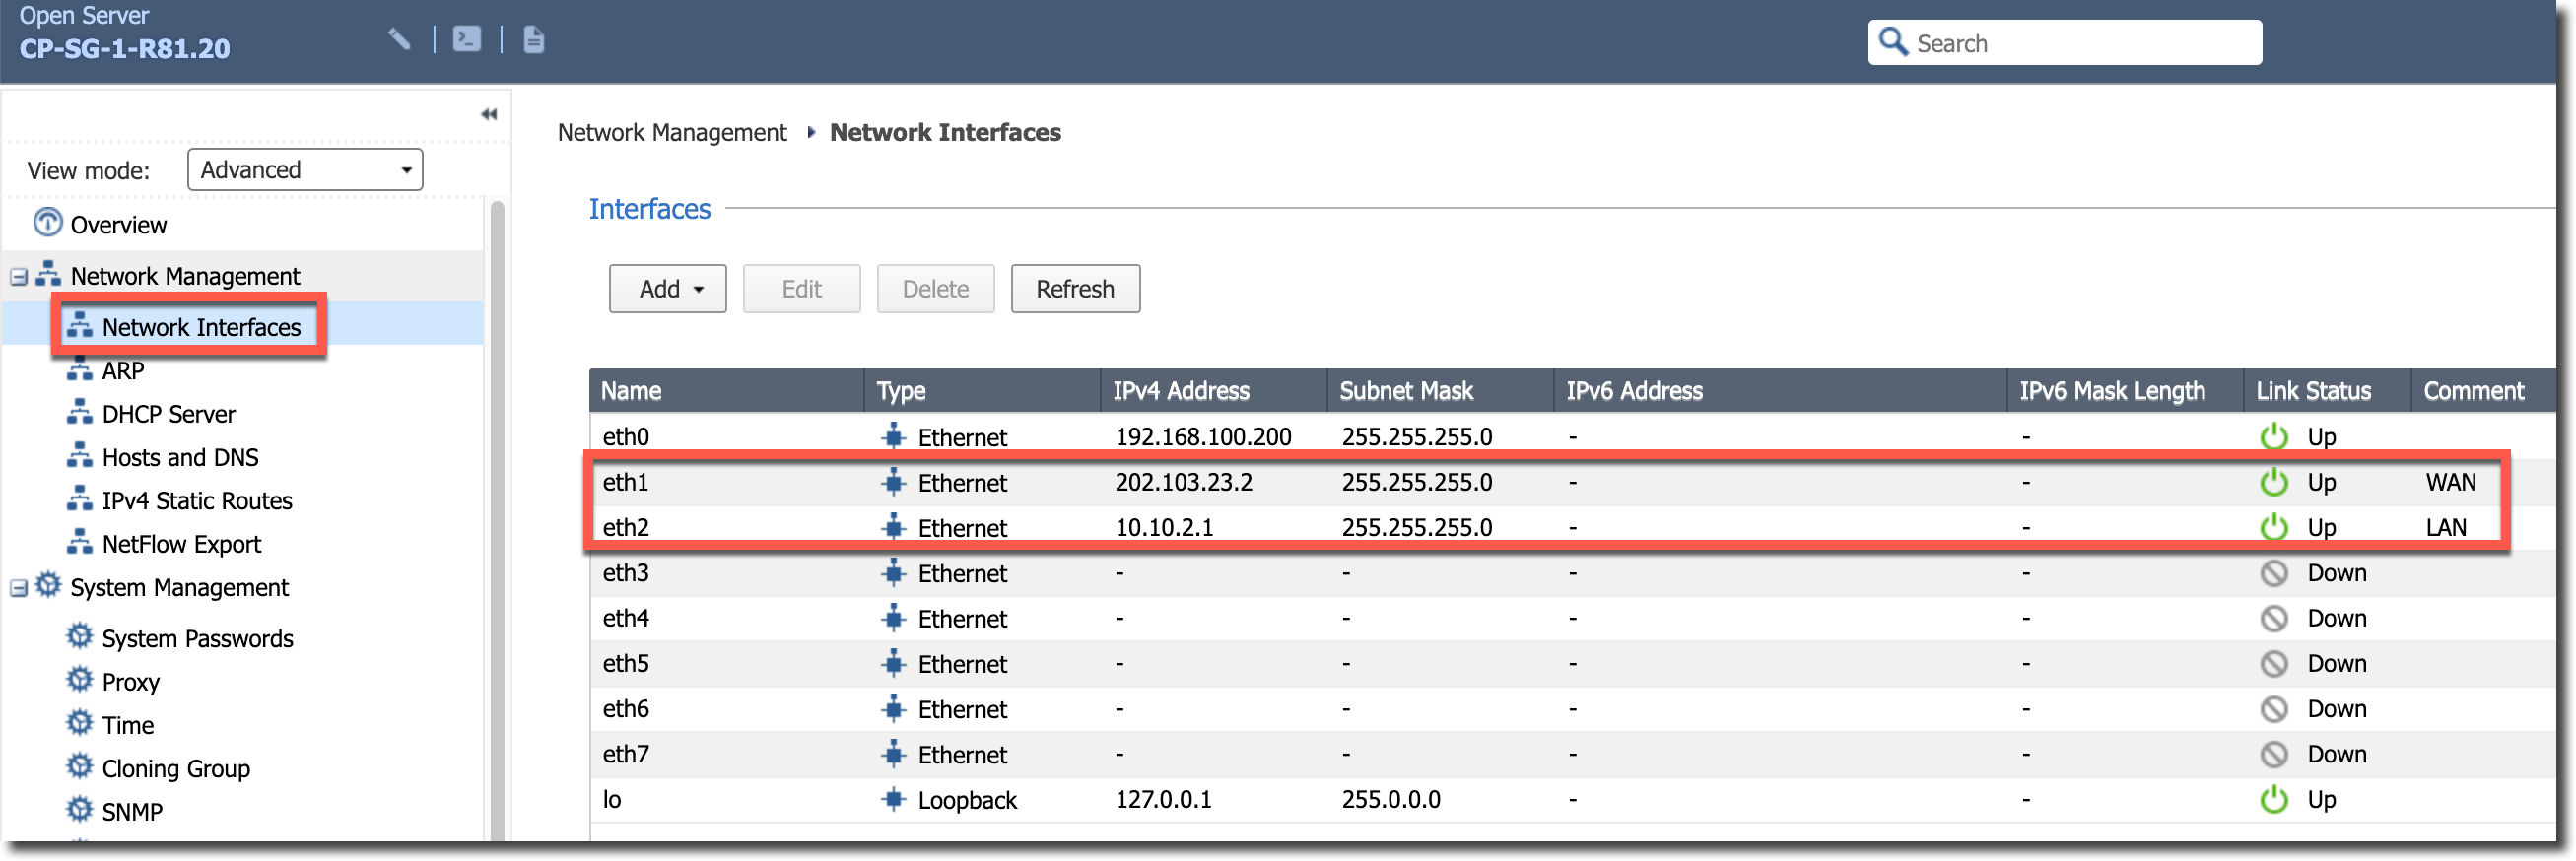
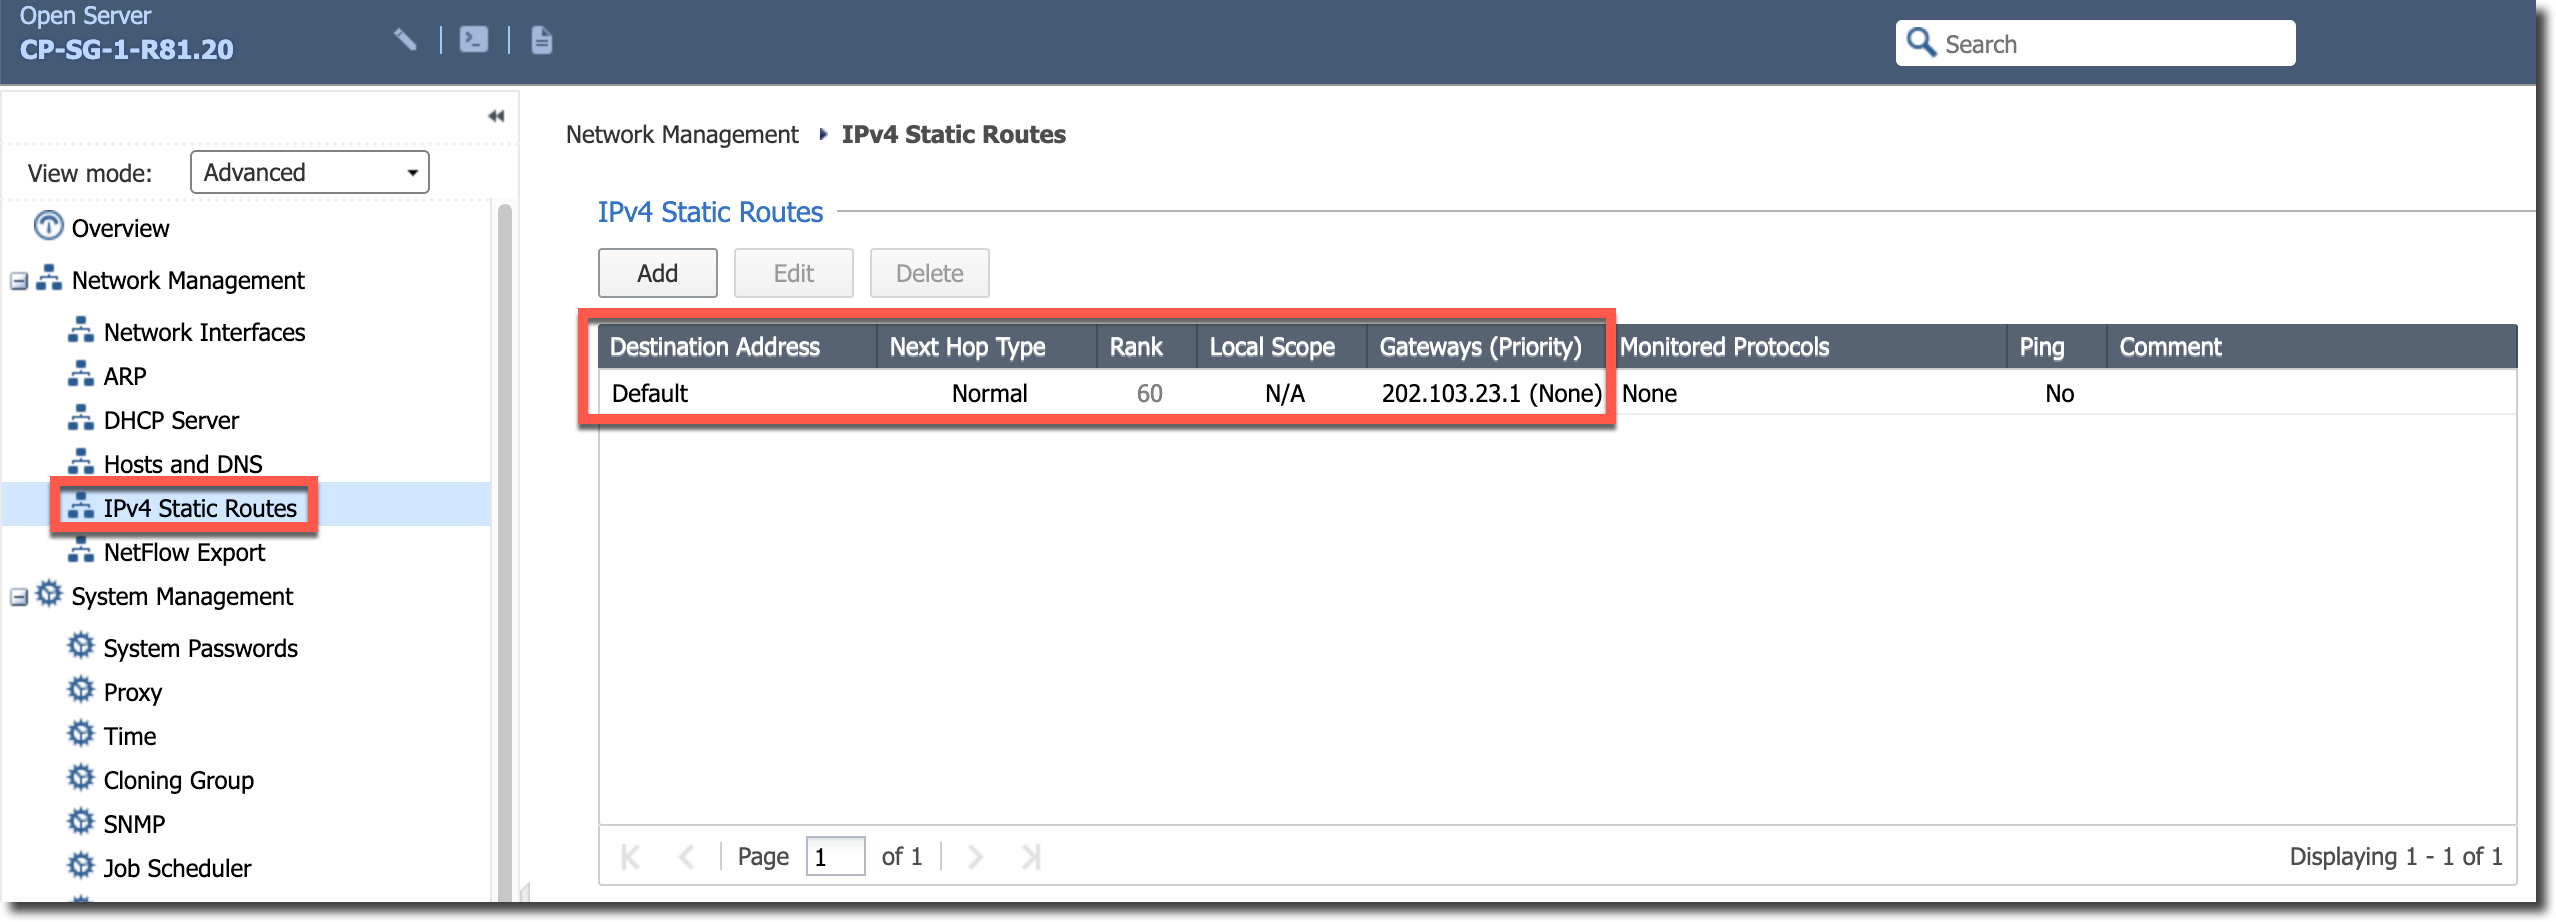
set interface eth1 comments "WAN"
set interface eth1 link-speed 1000M/full
set interface eth1 state on
set interface eth1 auto-negotiation on
set interface eth1 mtu 1500
set interface eth1 ipv4-address 202.103.23.2 mask-length 24
set interface eth2 comments "LAN"
set interface eth2 link-speed 1000M/full
set interface eth2 state on
set interface eth2 auto-negotiation on
set interface eth2 mtu 1500
set interface eth2 ipv4-address 10.10.2.1 mask-length 24

set static-route default nexthop gateway address 202.103.23.1 on
在 Check Point 防火墙的 CLI 下使用“save config”命令保存配置。
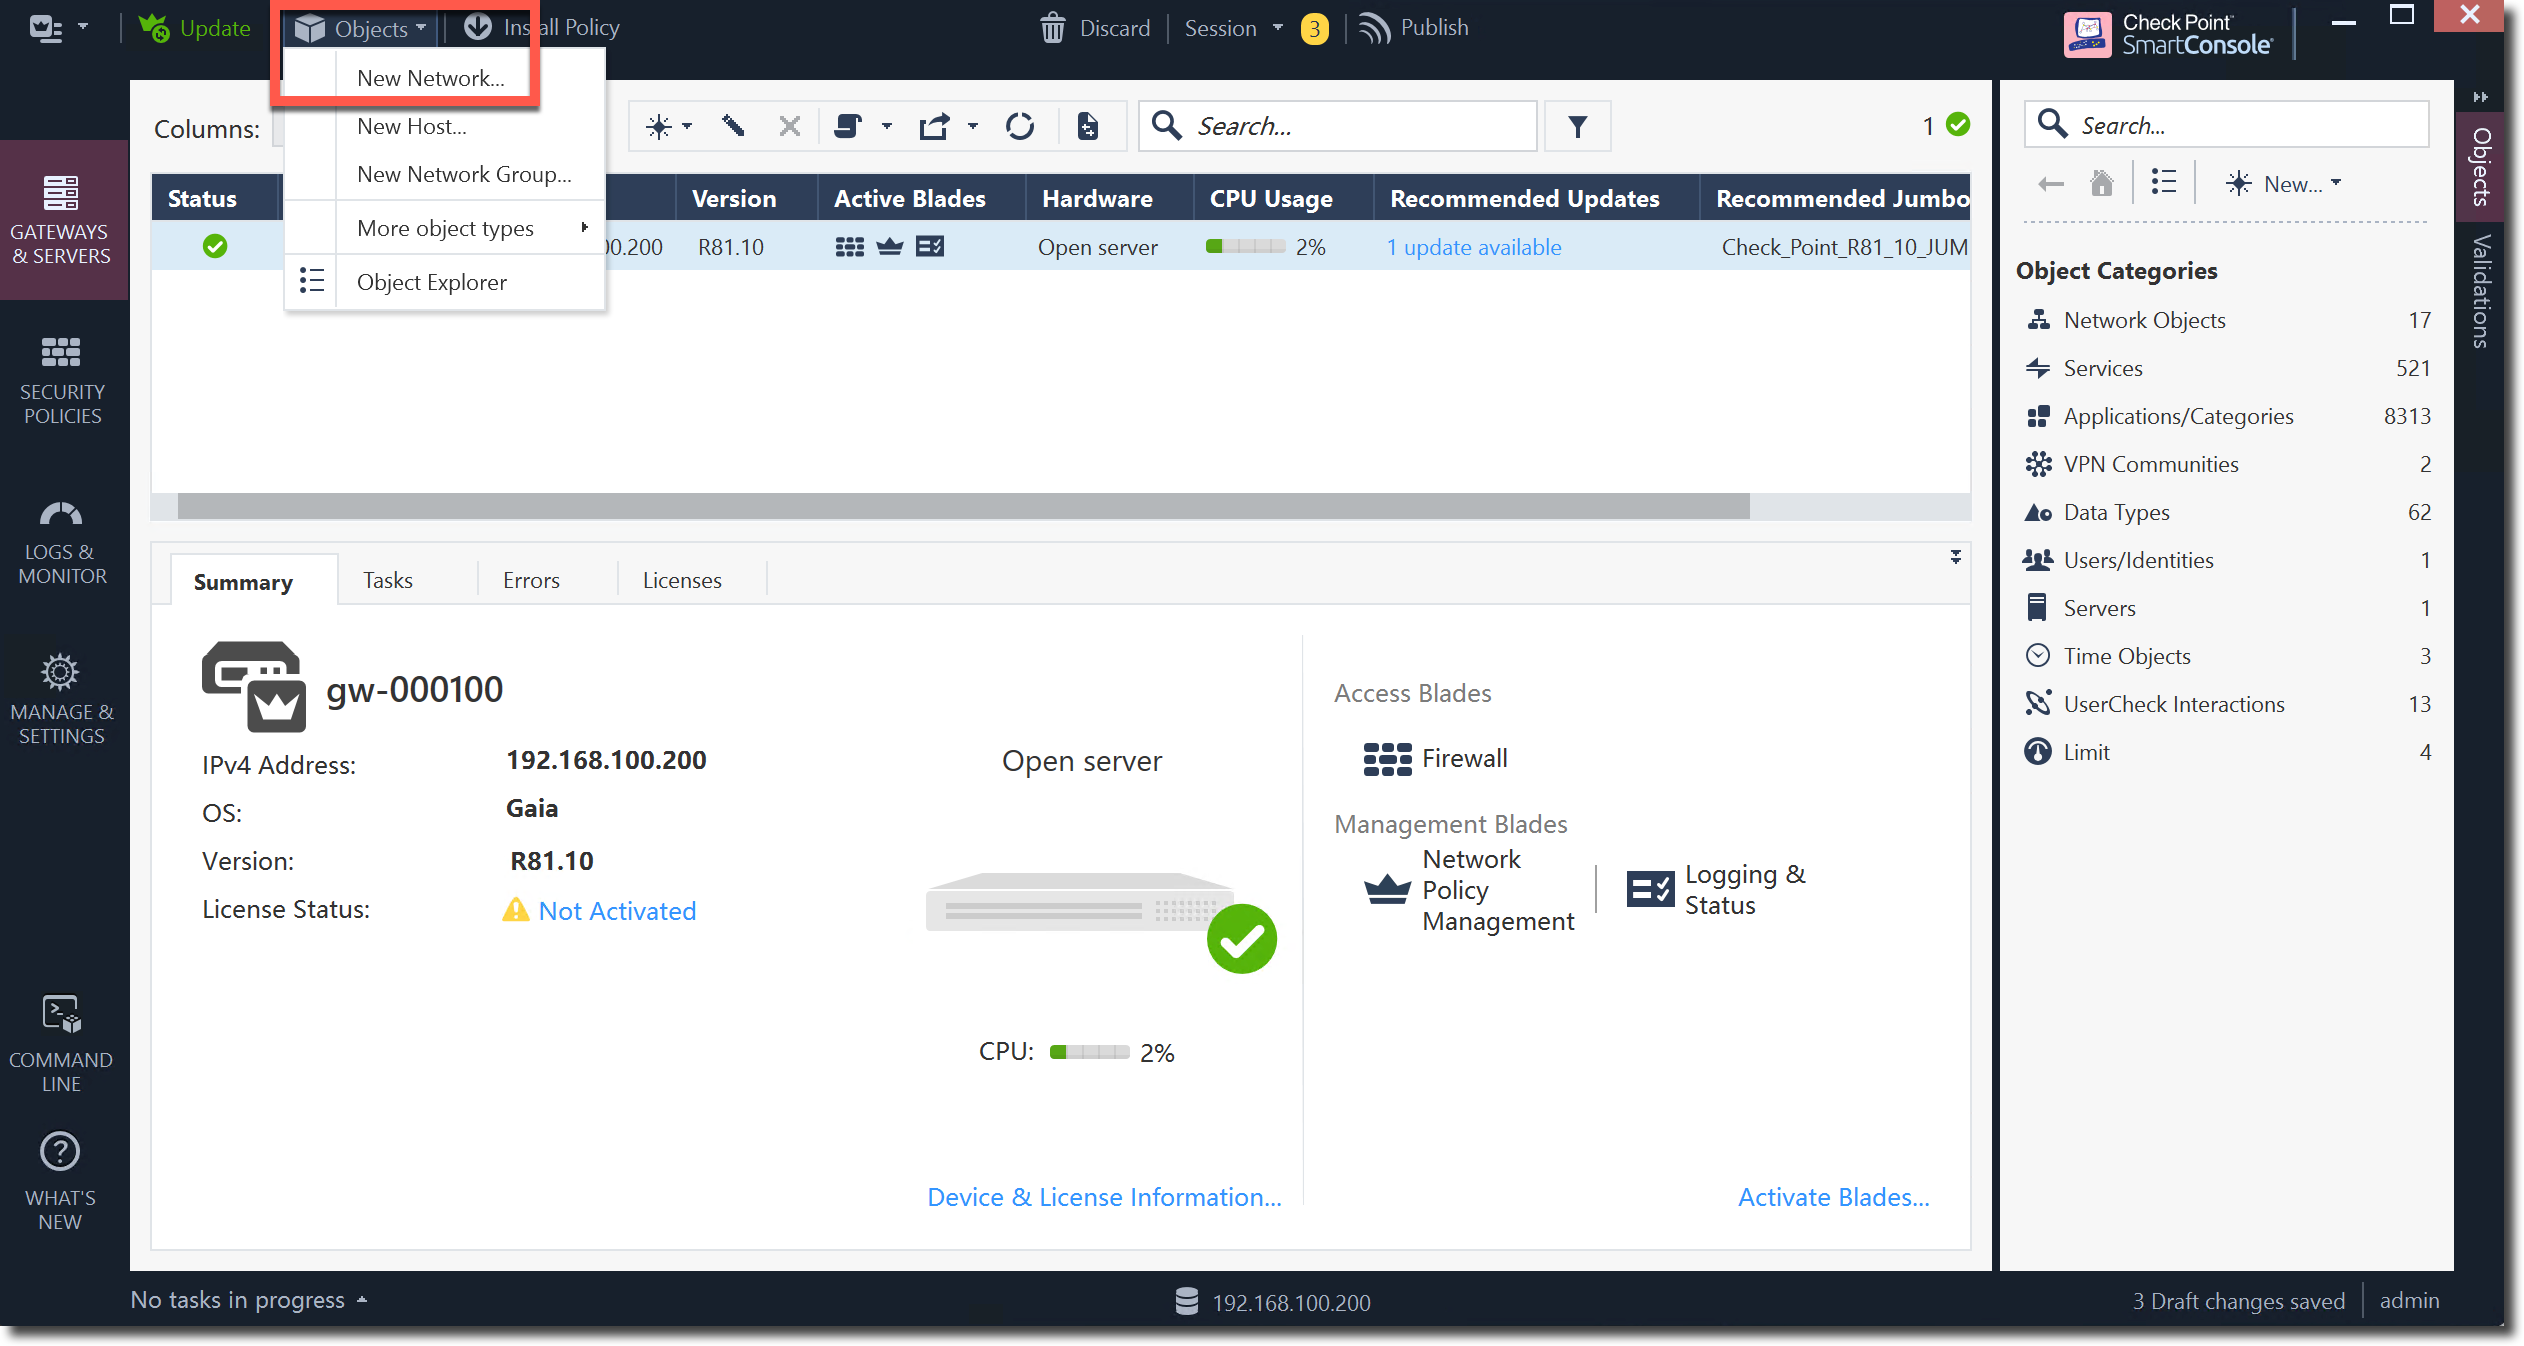
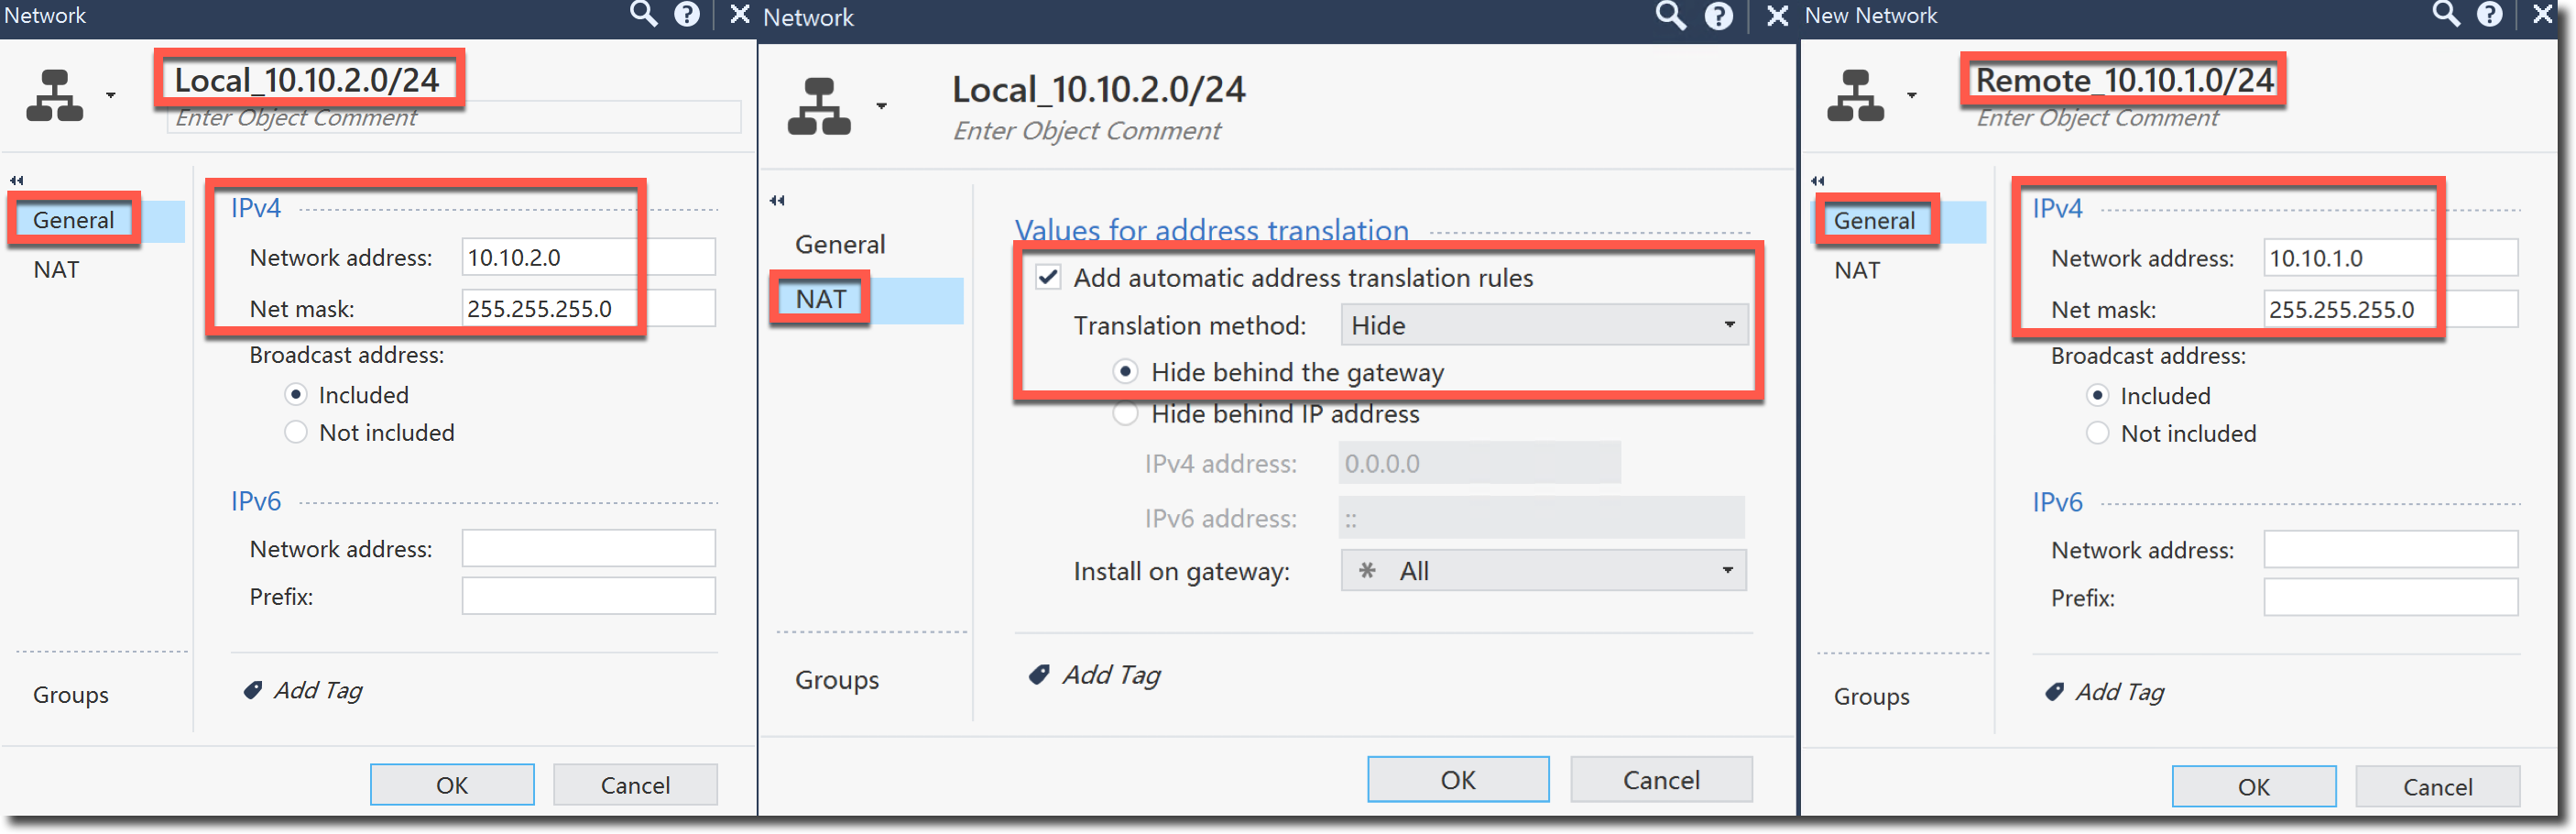
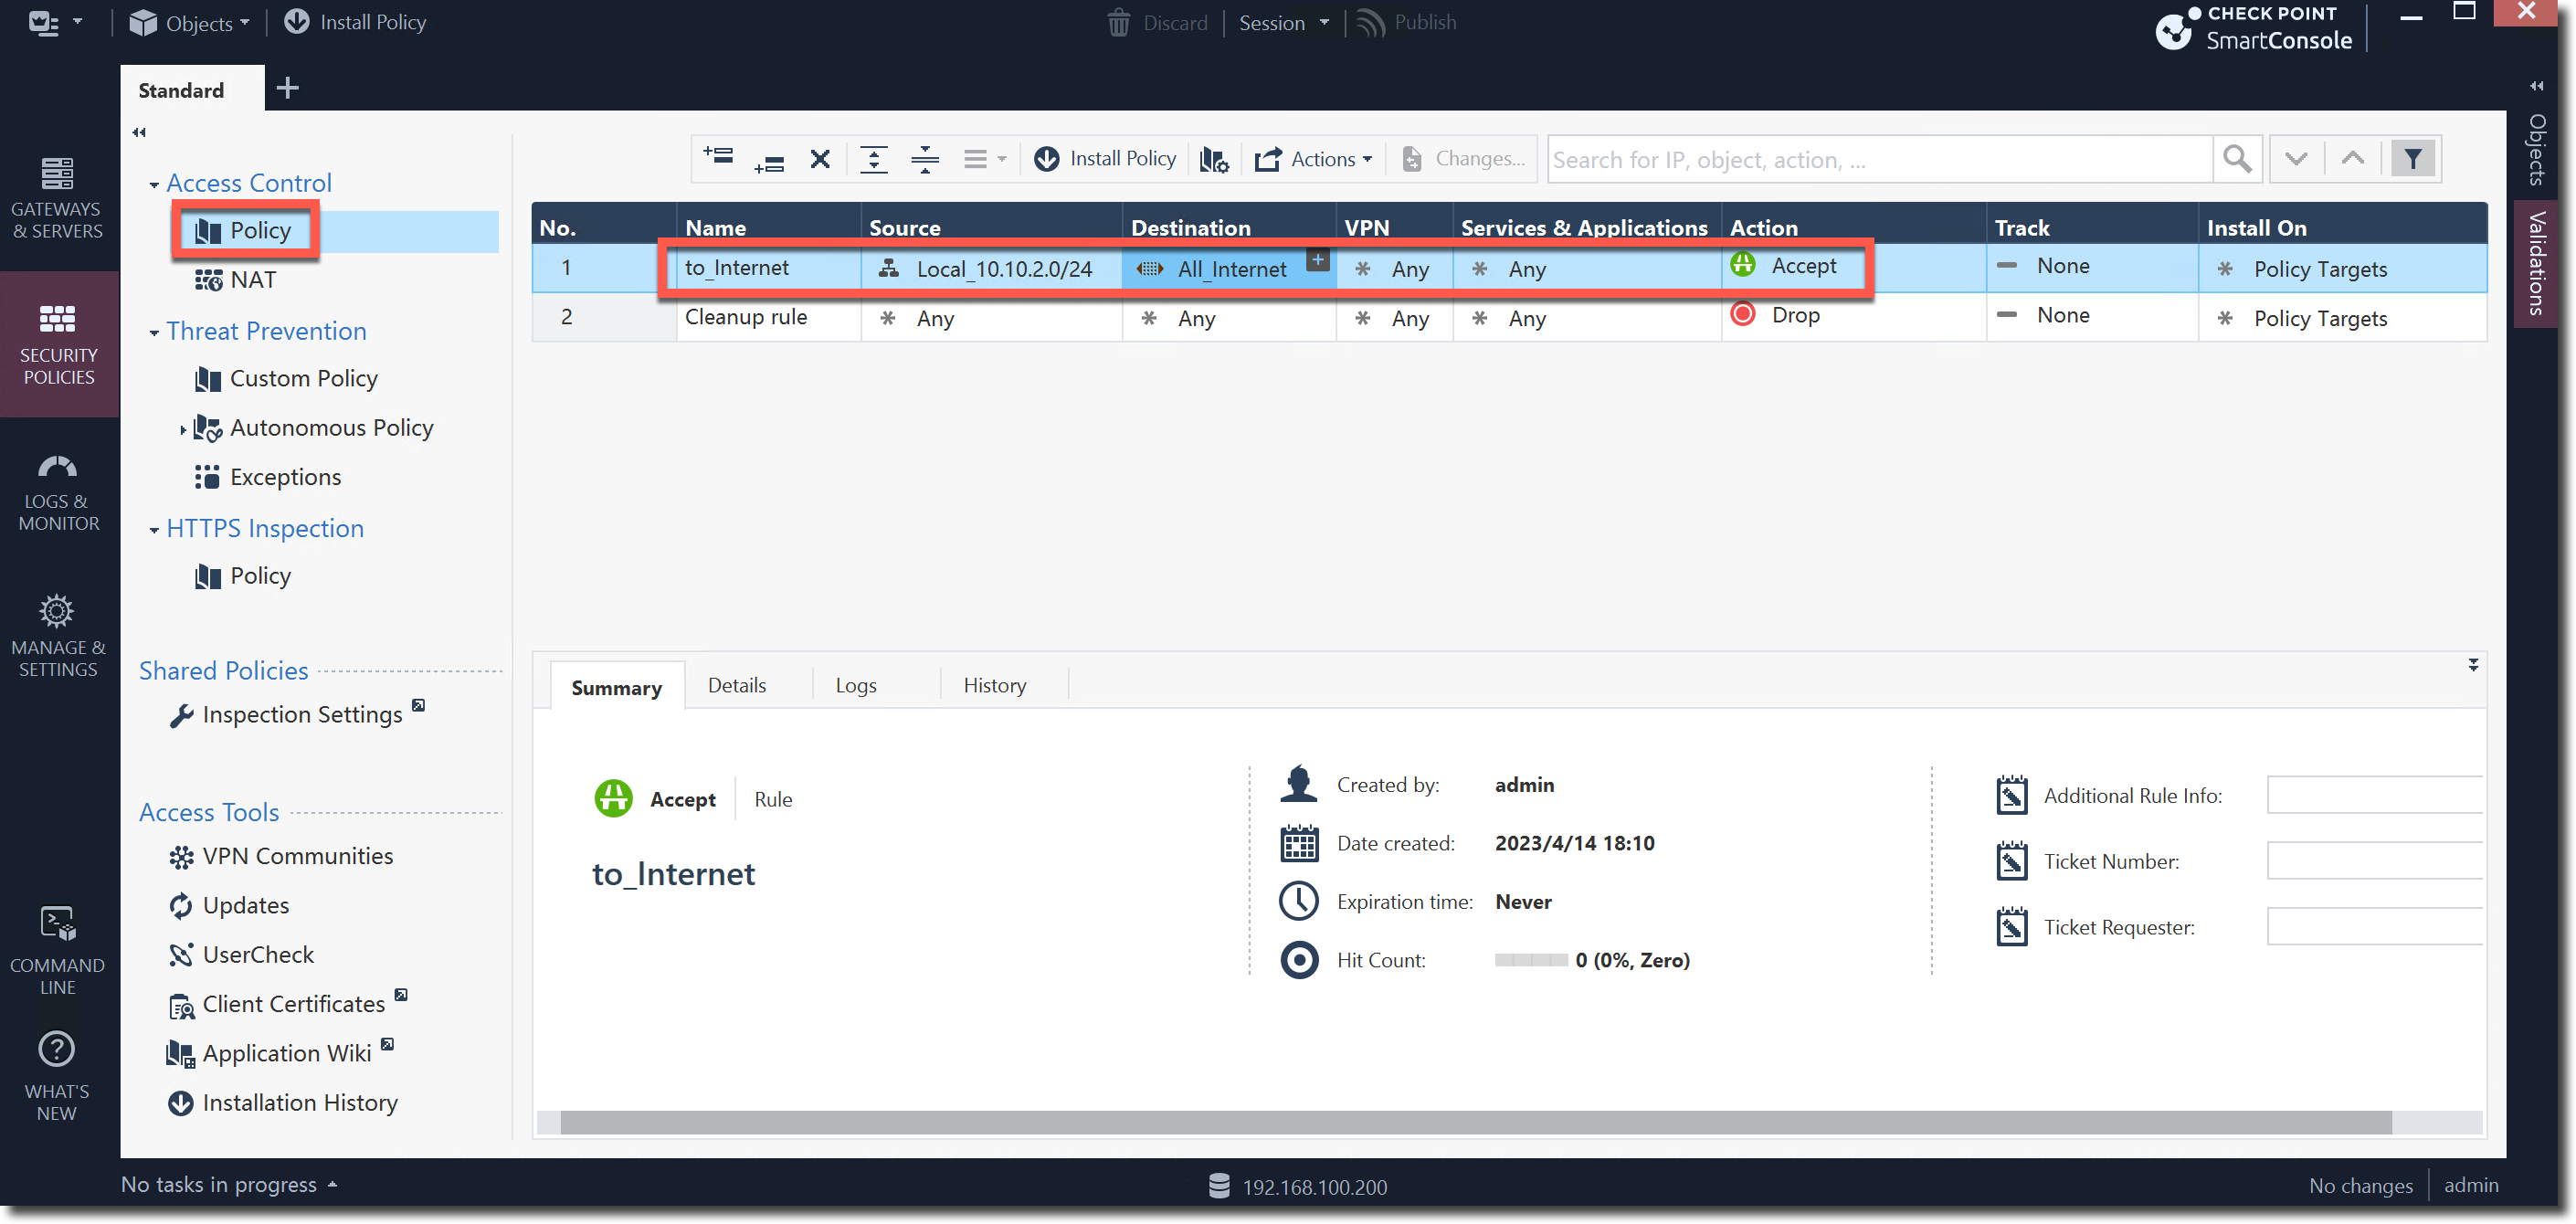
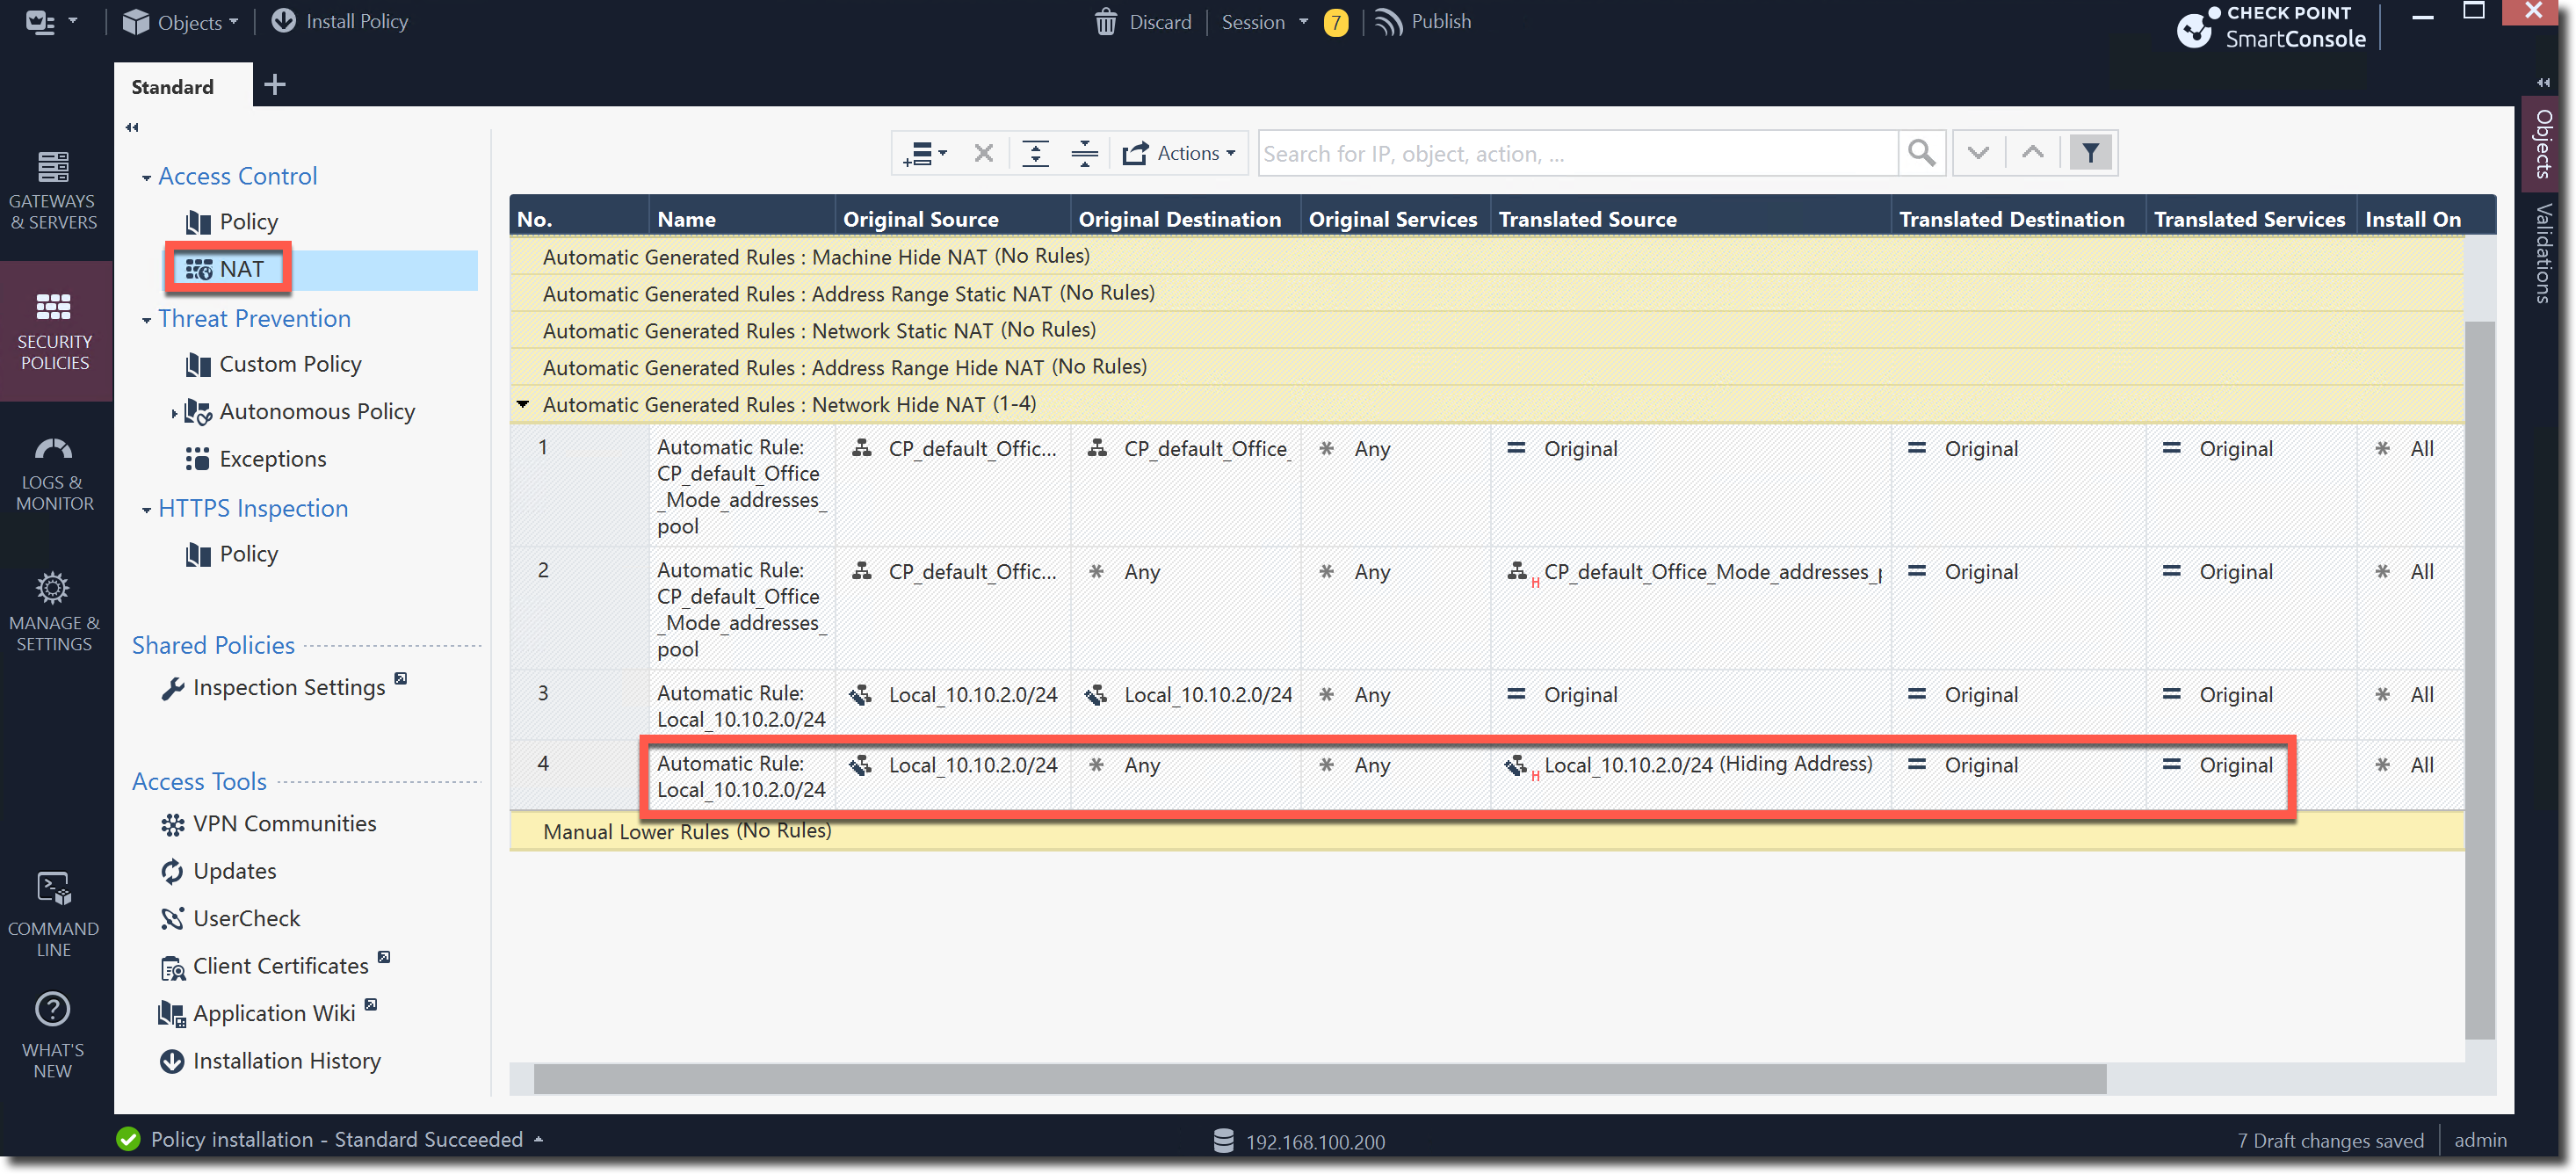
使用 SmartConsole 连接 Check Point 防火墙,配置地址对象(在本地网段的地址对象中开启 NAT,并选择 Hide 模式的 NAT,地址对象创建完成后会自动创建对应的 SNAT 策略),创建上网的安全策略。
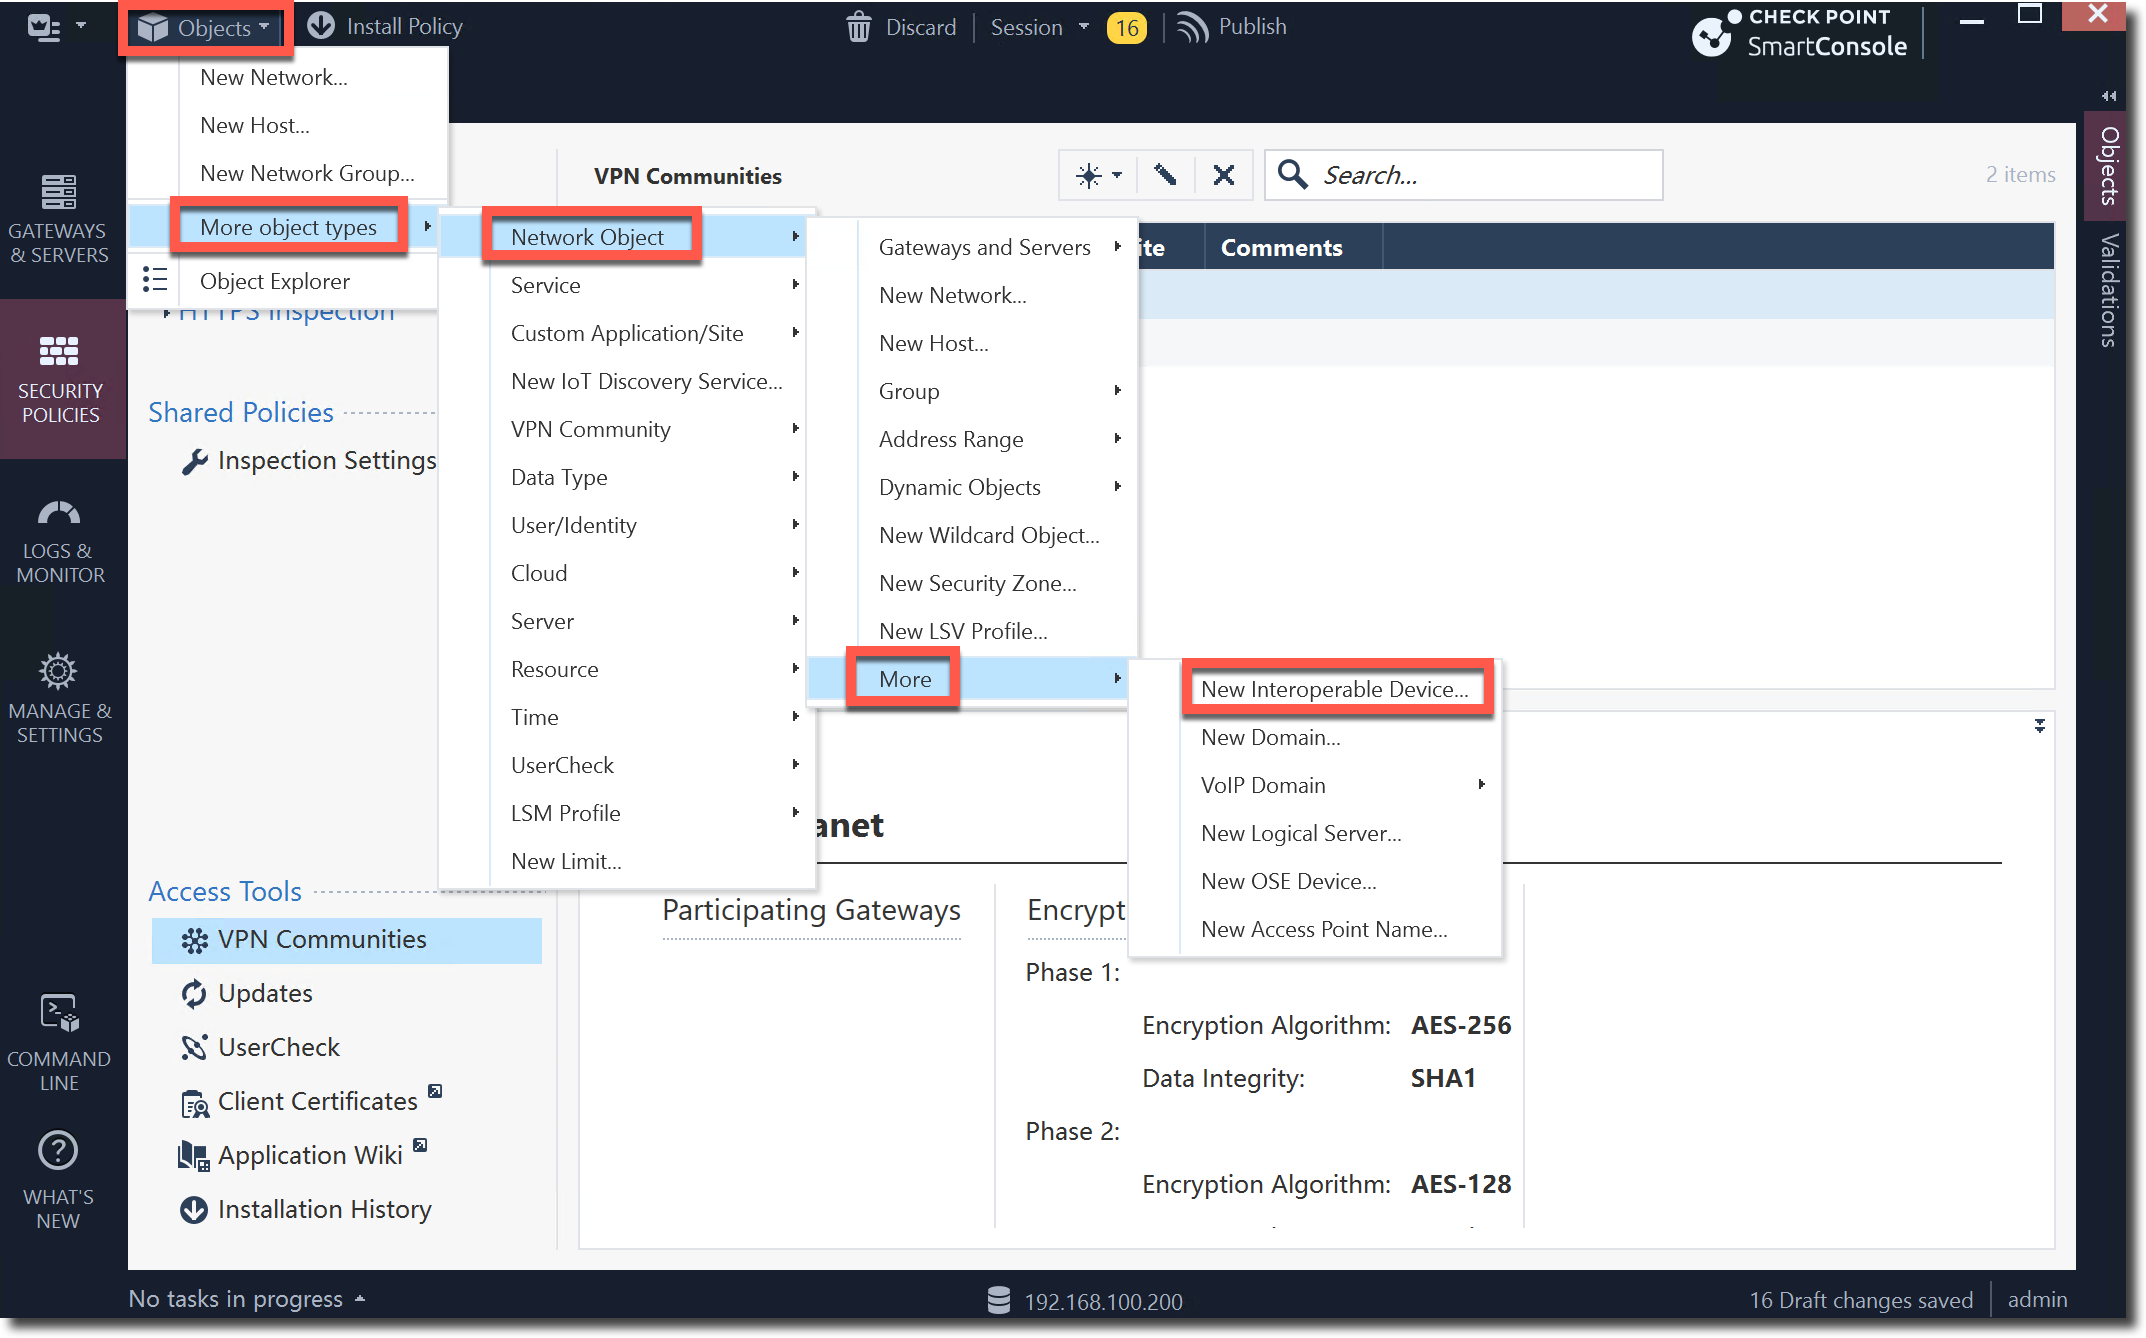
创建“Interoperable Device”对象(IPSec 远程网关)。
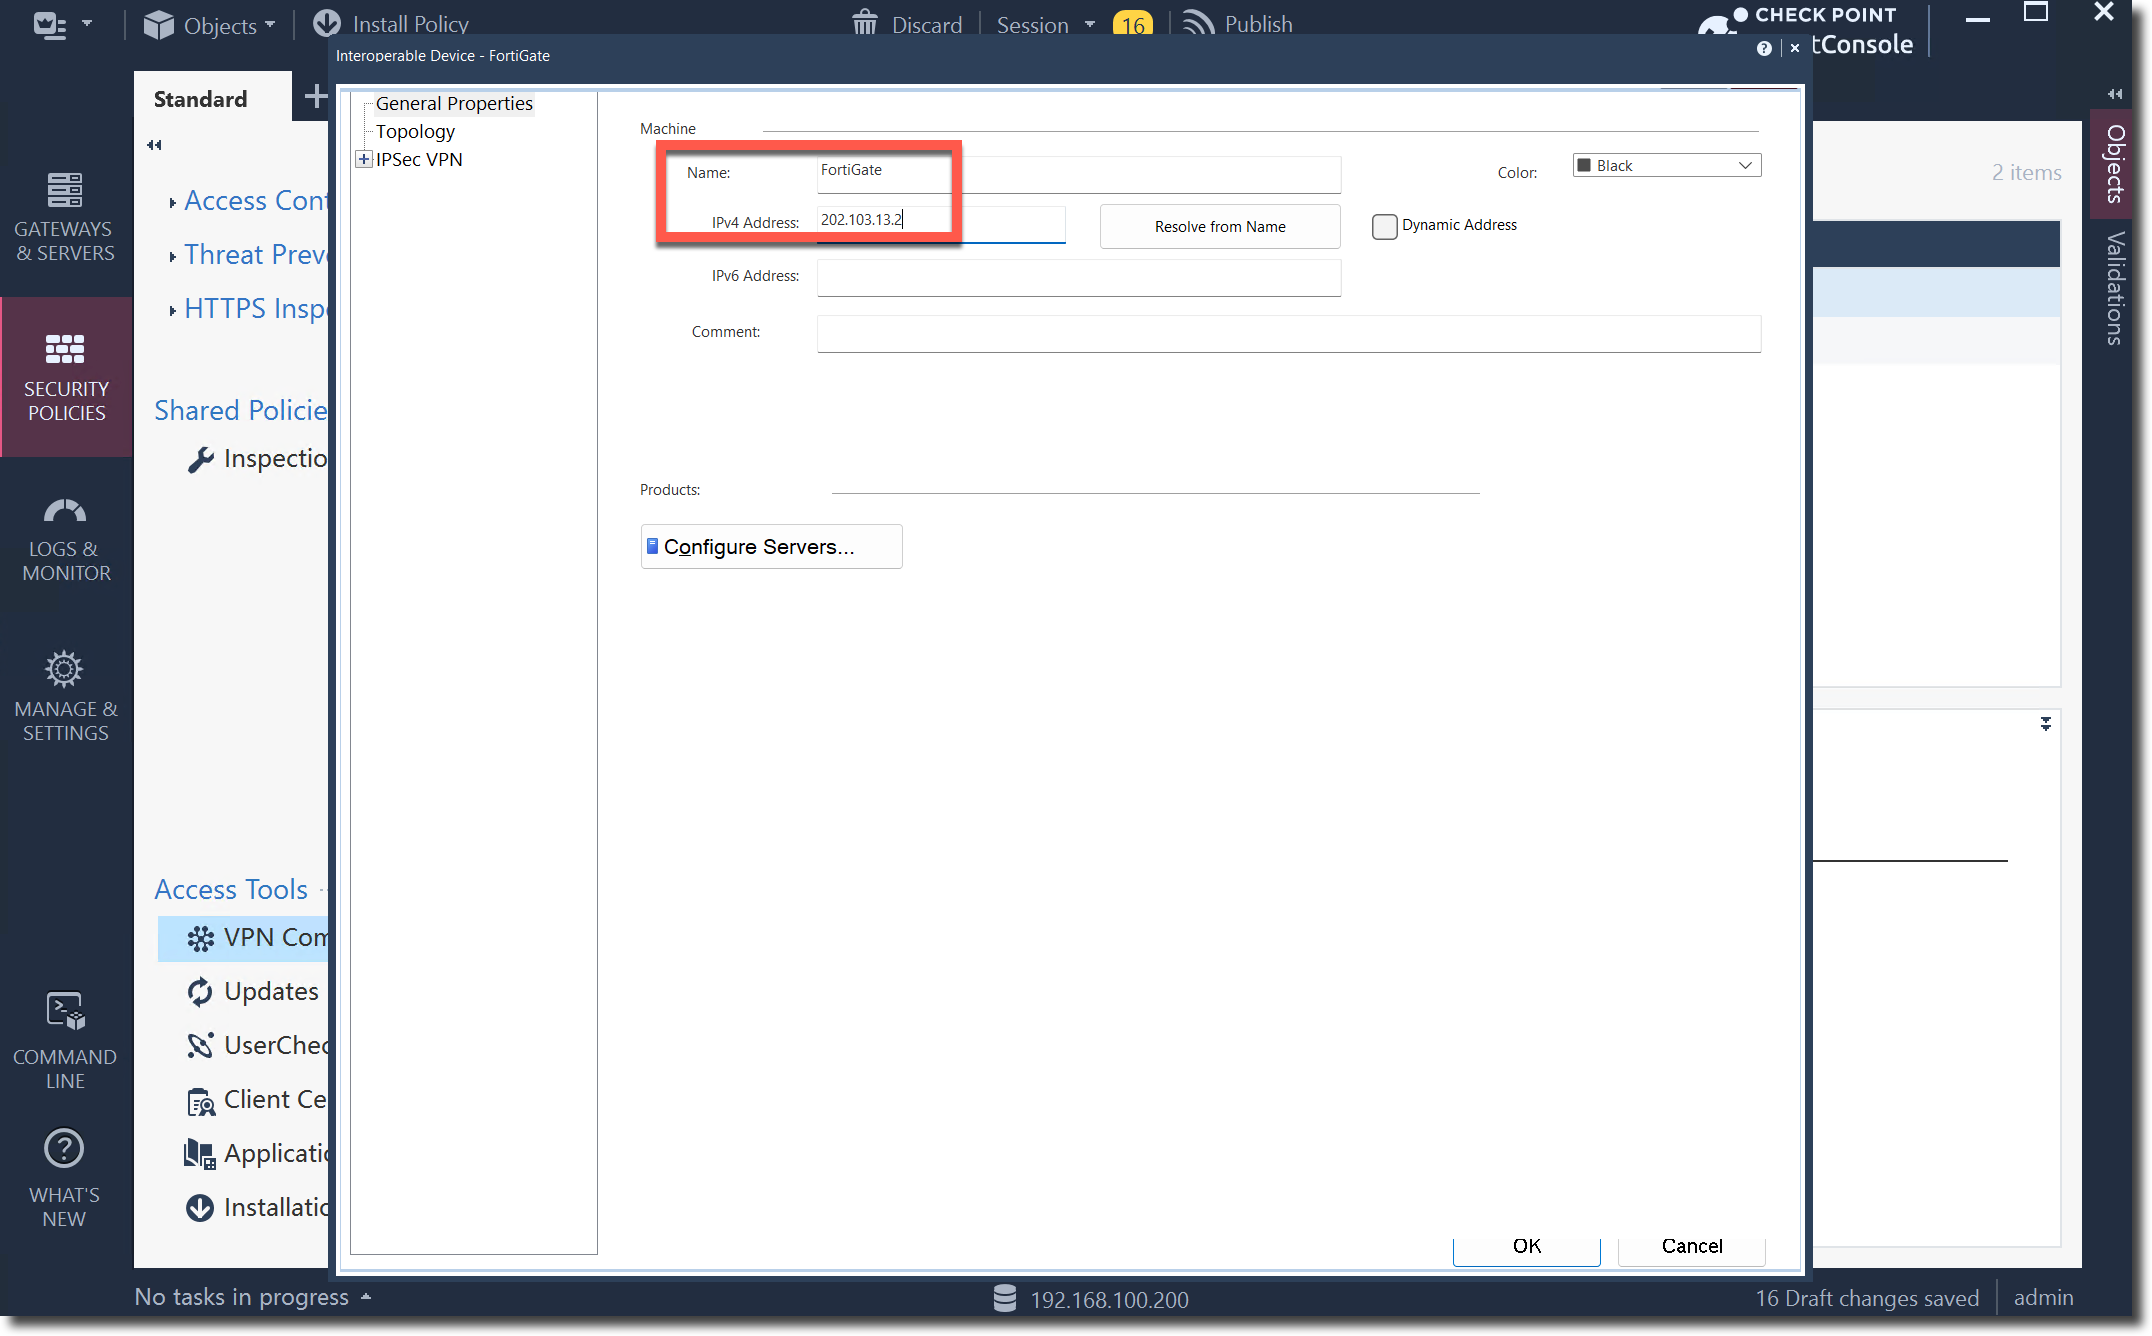
在弹出的“Interoperable Device”的“General Properties”中的“Machine”处,填入 FortiGate 的 VPN 网关地址。
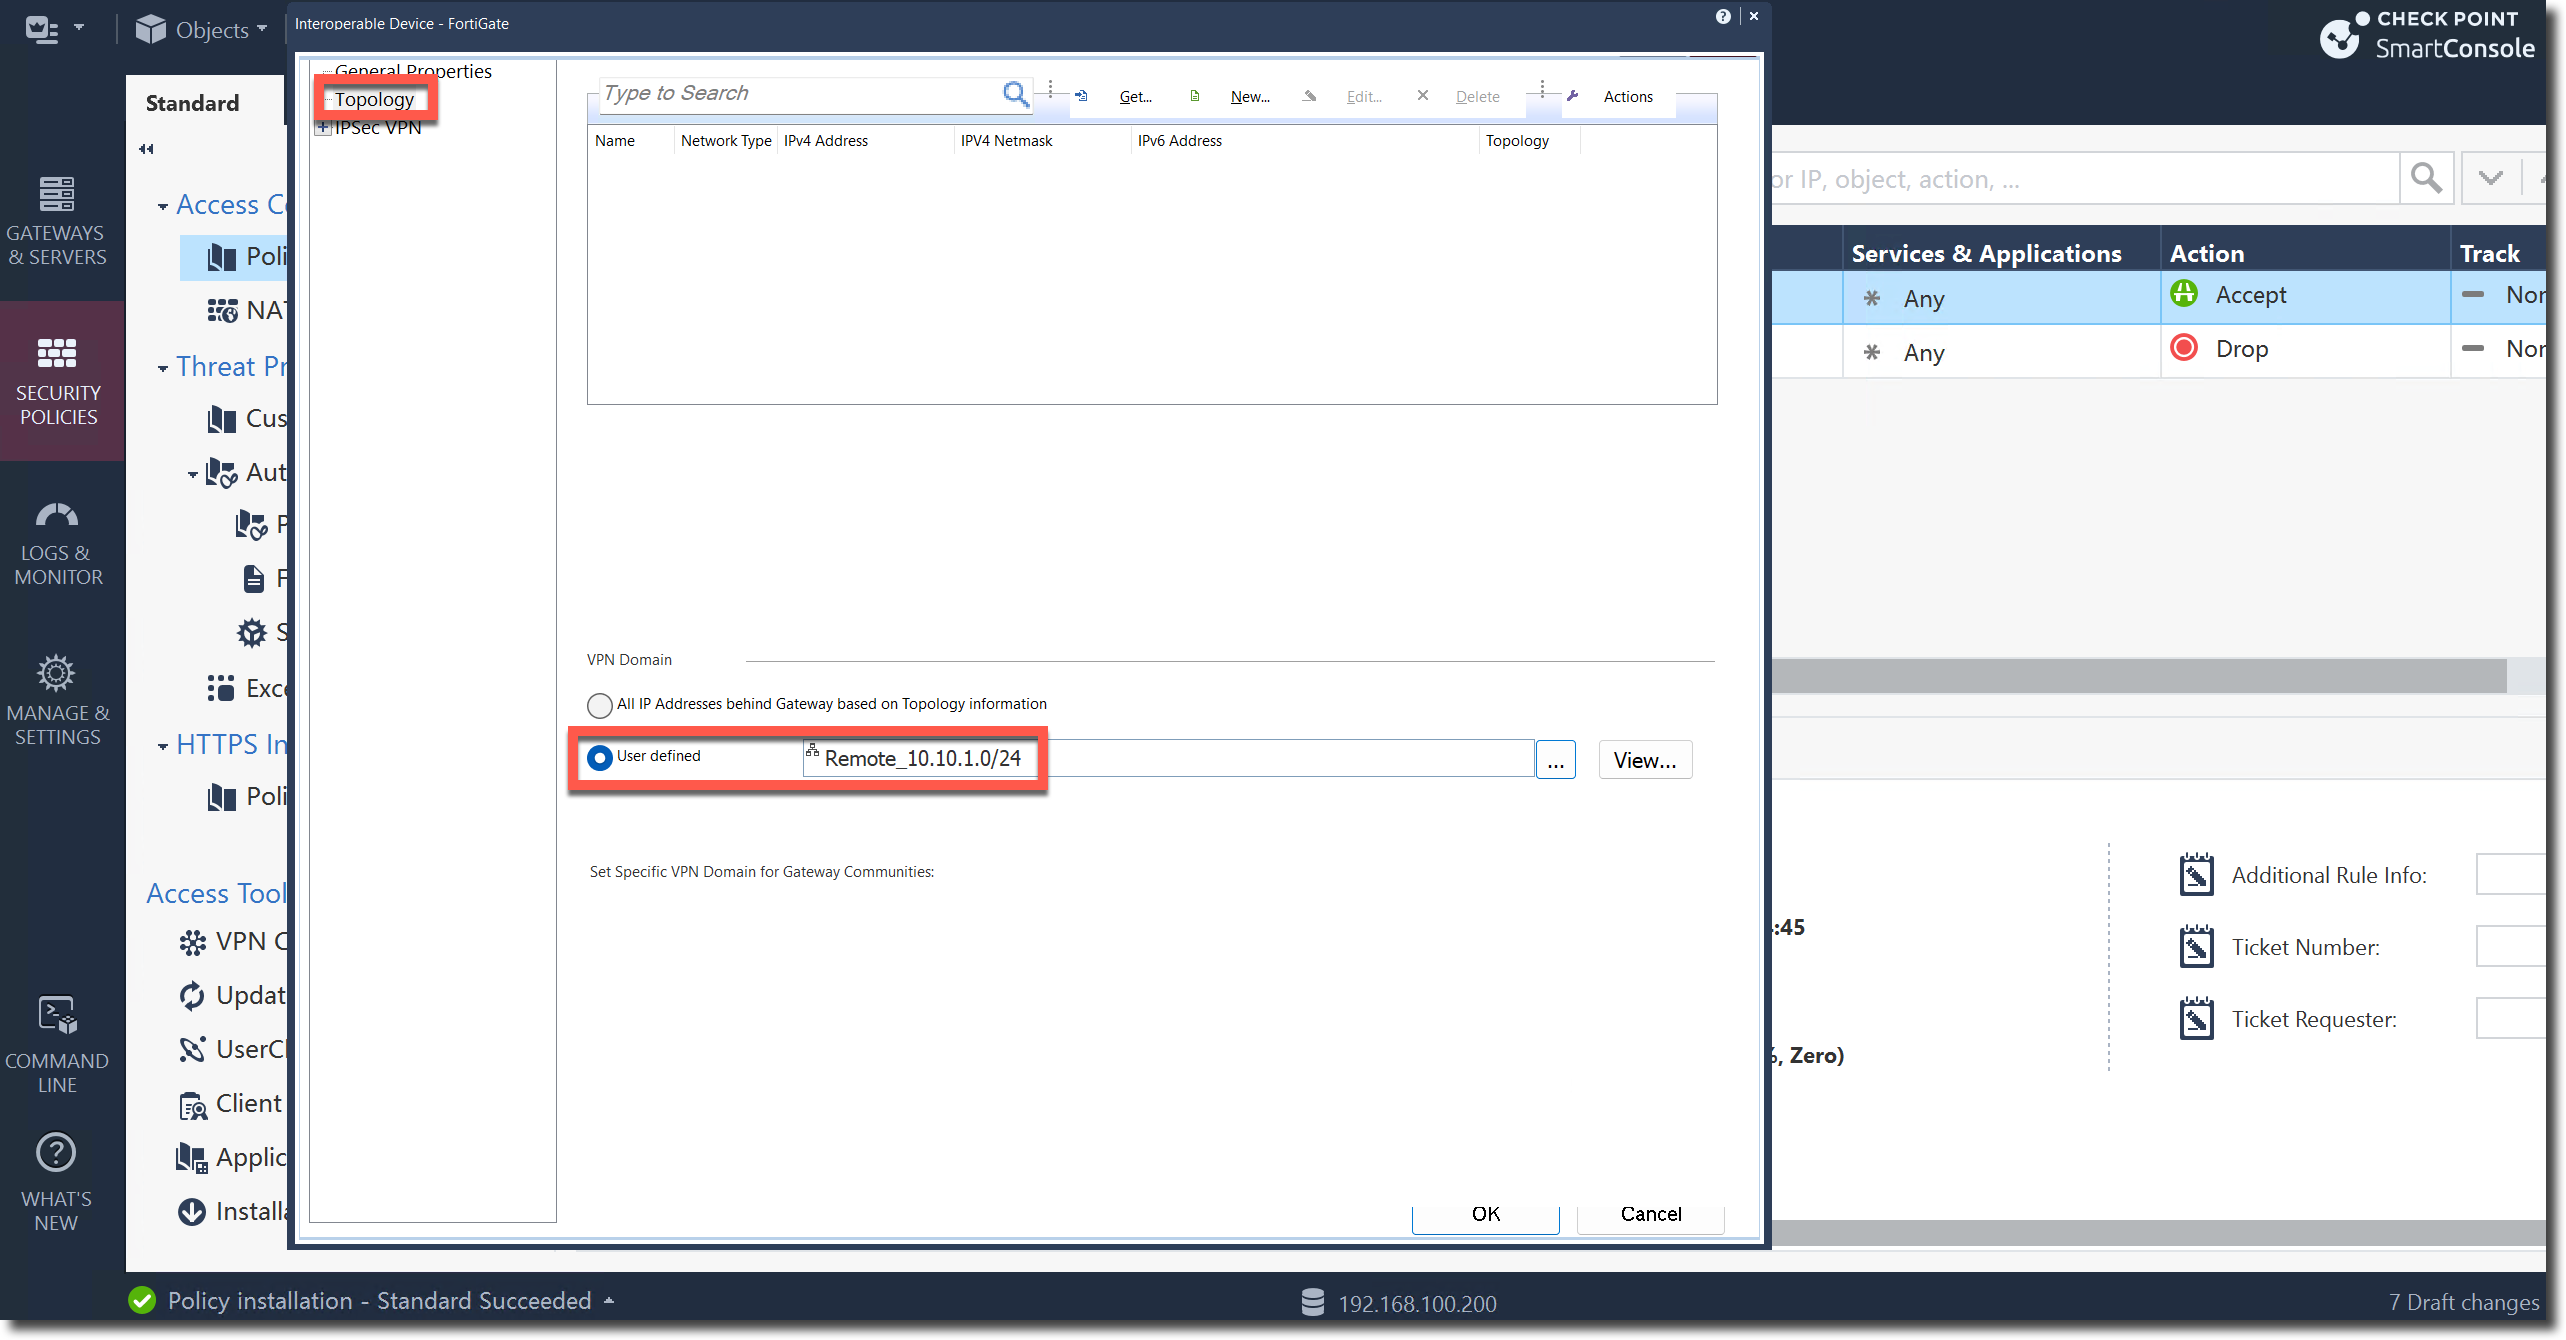
在“Topology”中配置“VPN Domain”为“User defined”,并选择对端(FortiGate 侧)VPN 感兴趣流的地址对象,点击 OK 完成创建。
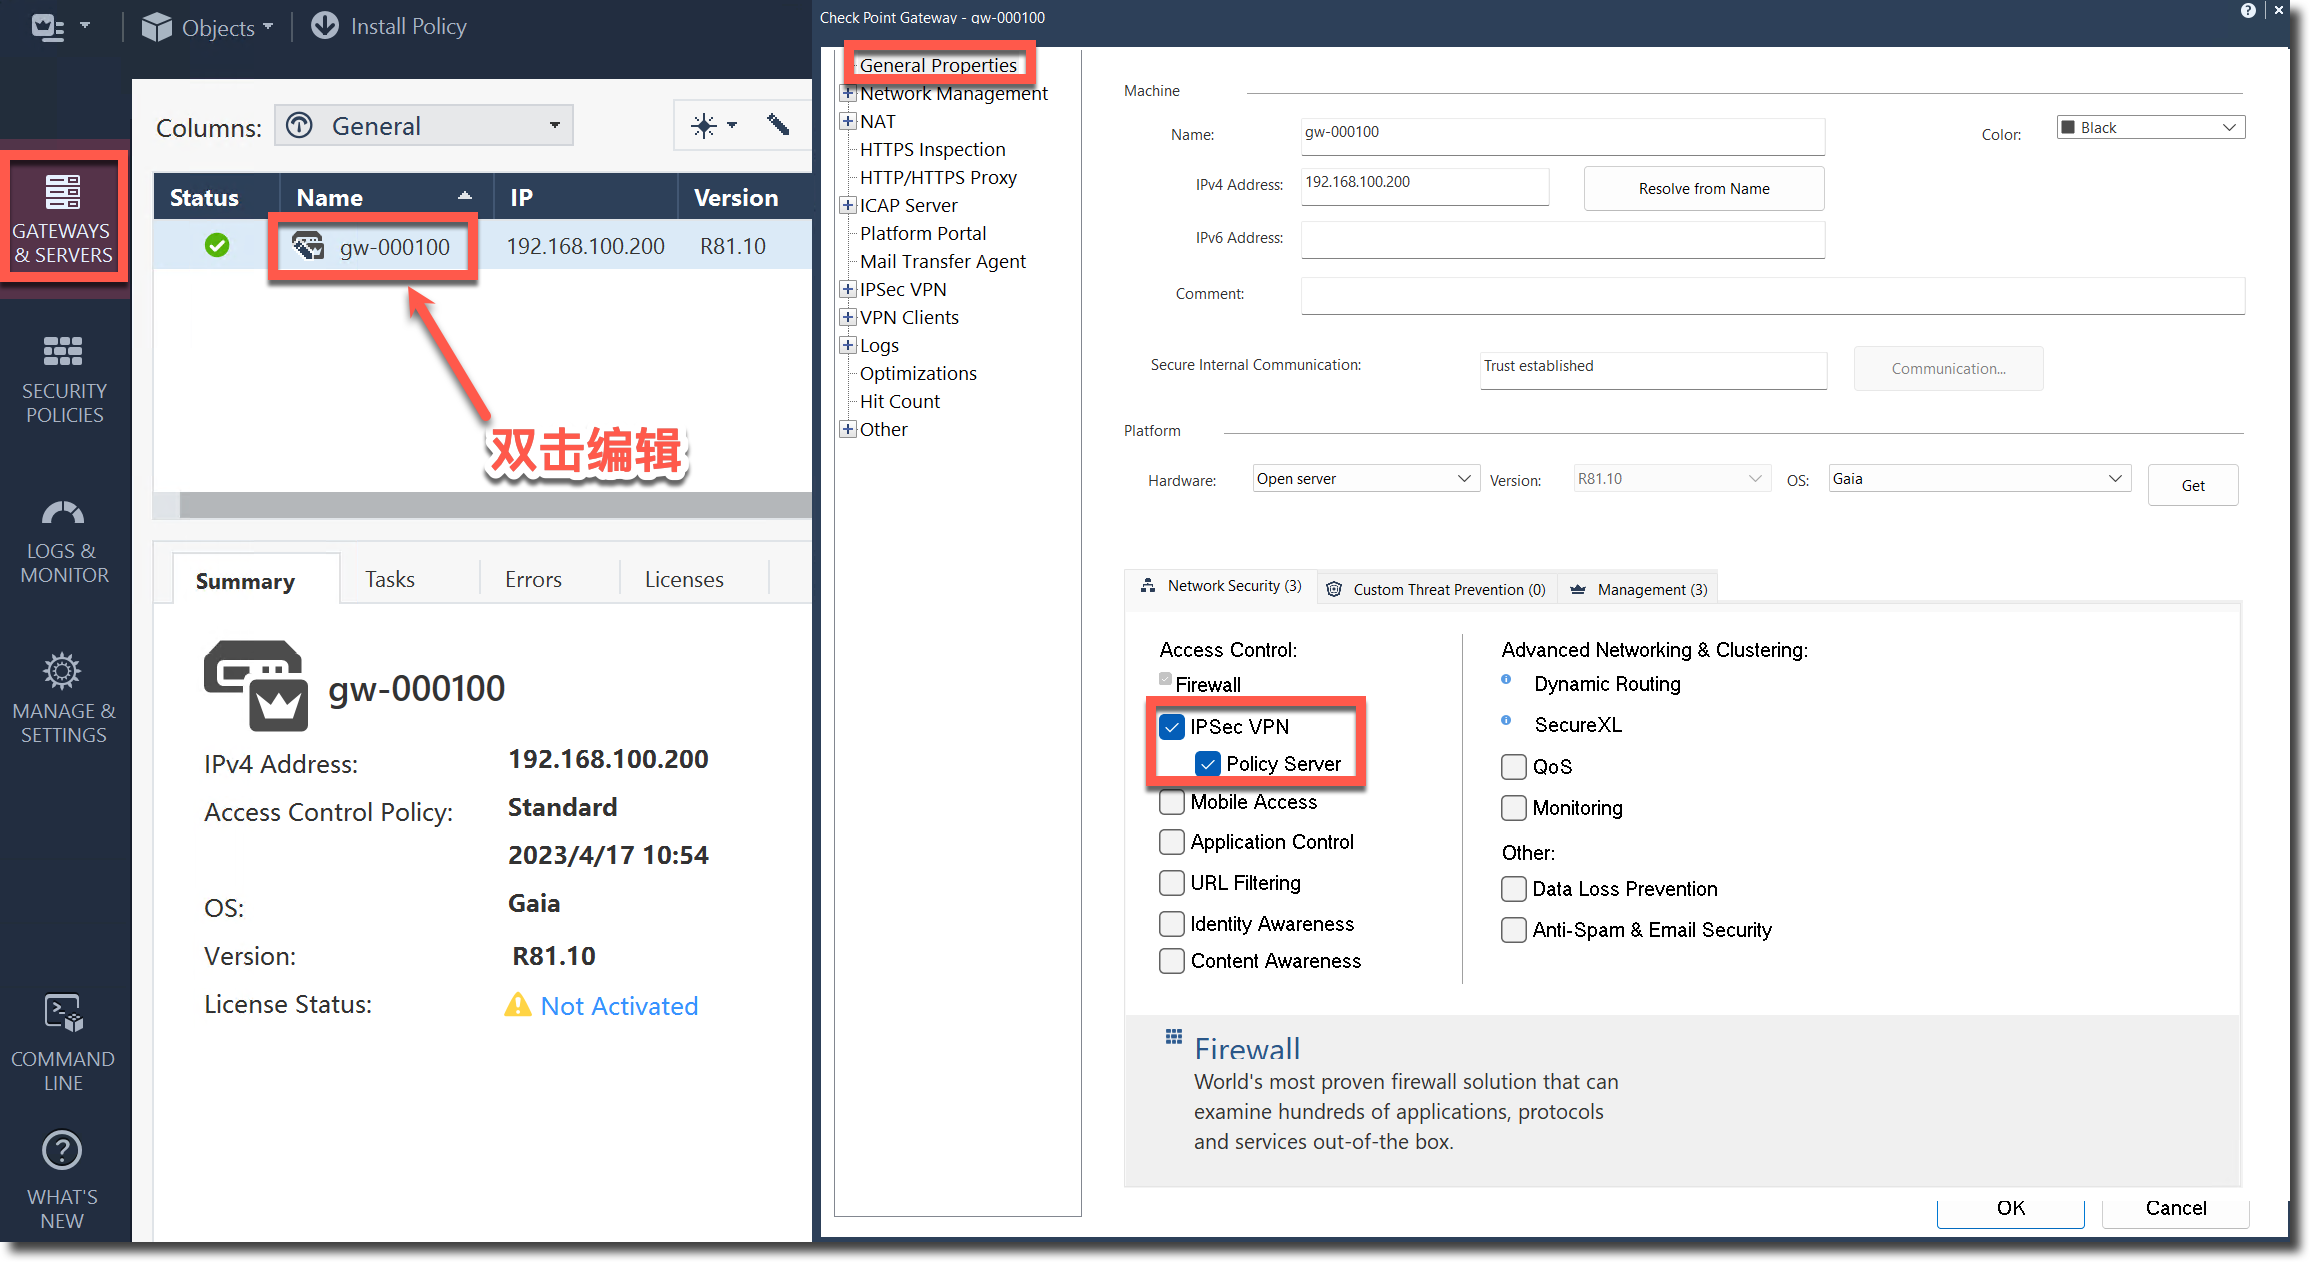
进入“GATEWAYS & SERVERS”选项卡,双击管理的防火墙设备,在弹出的页面中的“General Properties”中开启 IPSec VPN 服务。
在“Network Domain → VPN Domain”中,配置“User defined”为本地 VPN 保护网段的地址对象。

在“IPSec VPN → Link Selection”中,配置“Always use this IP address”为“Selected address from topology table”,并选择 eth1(本地 VPN 网关)的接口 IP,点击 OK 下发配置。

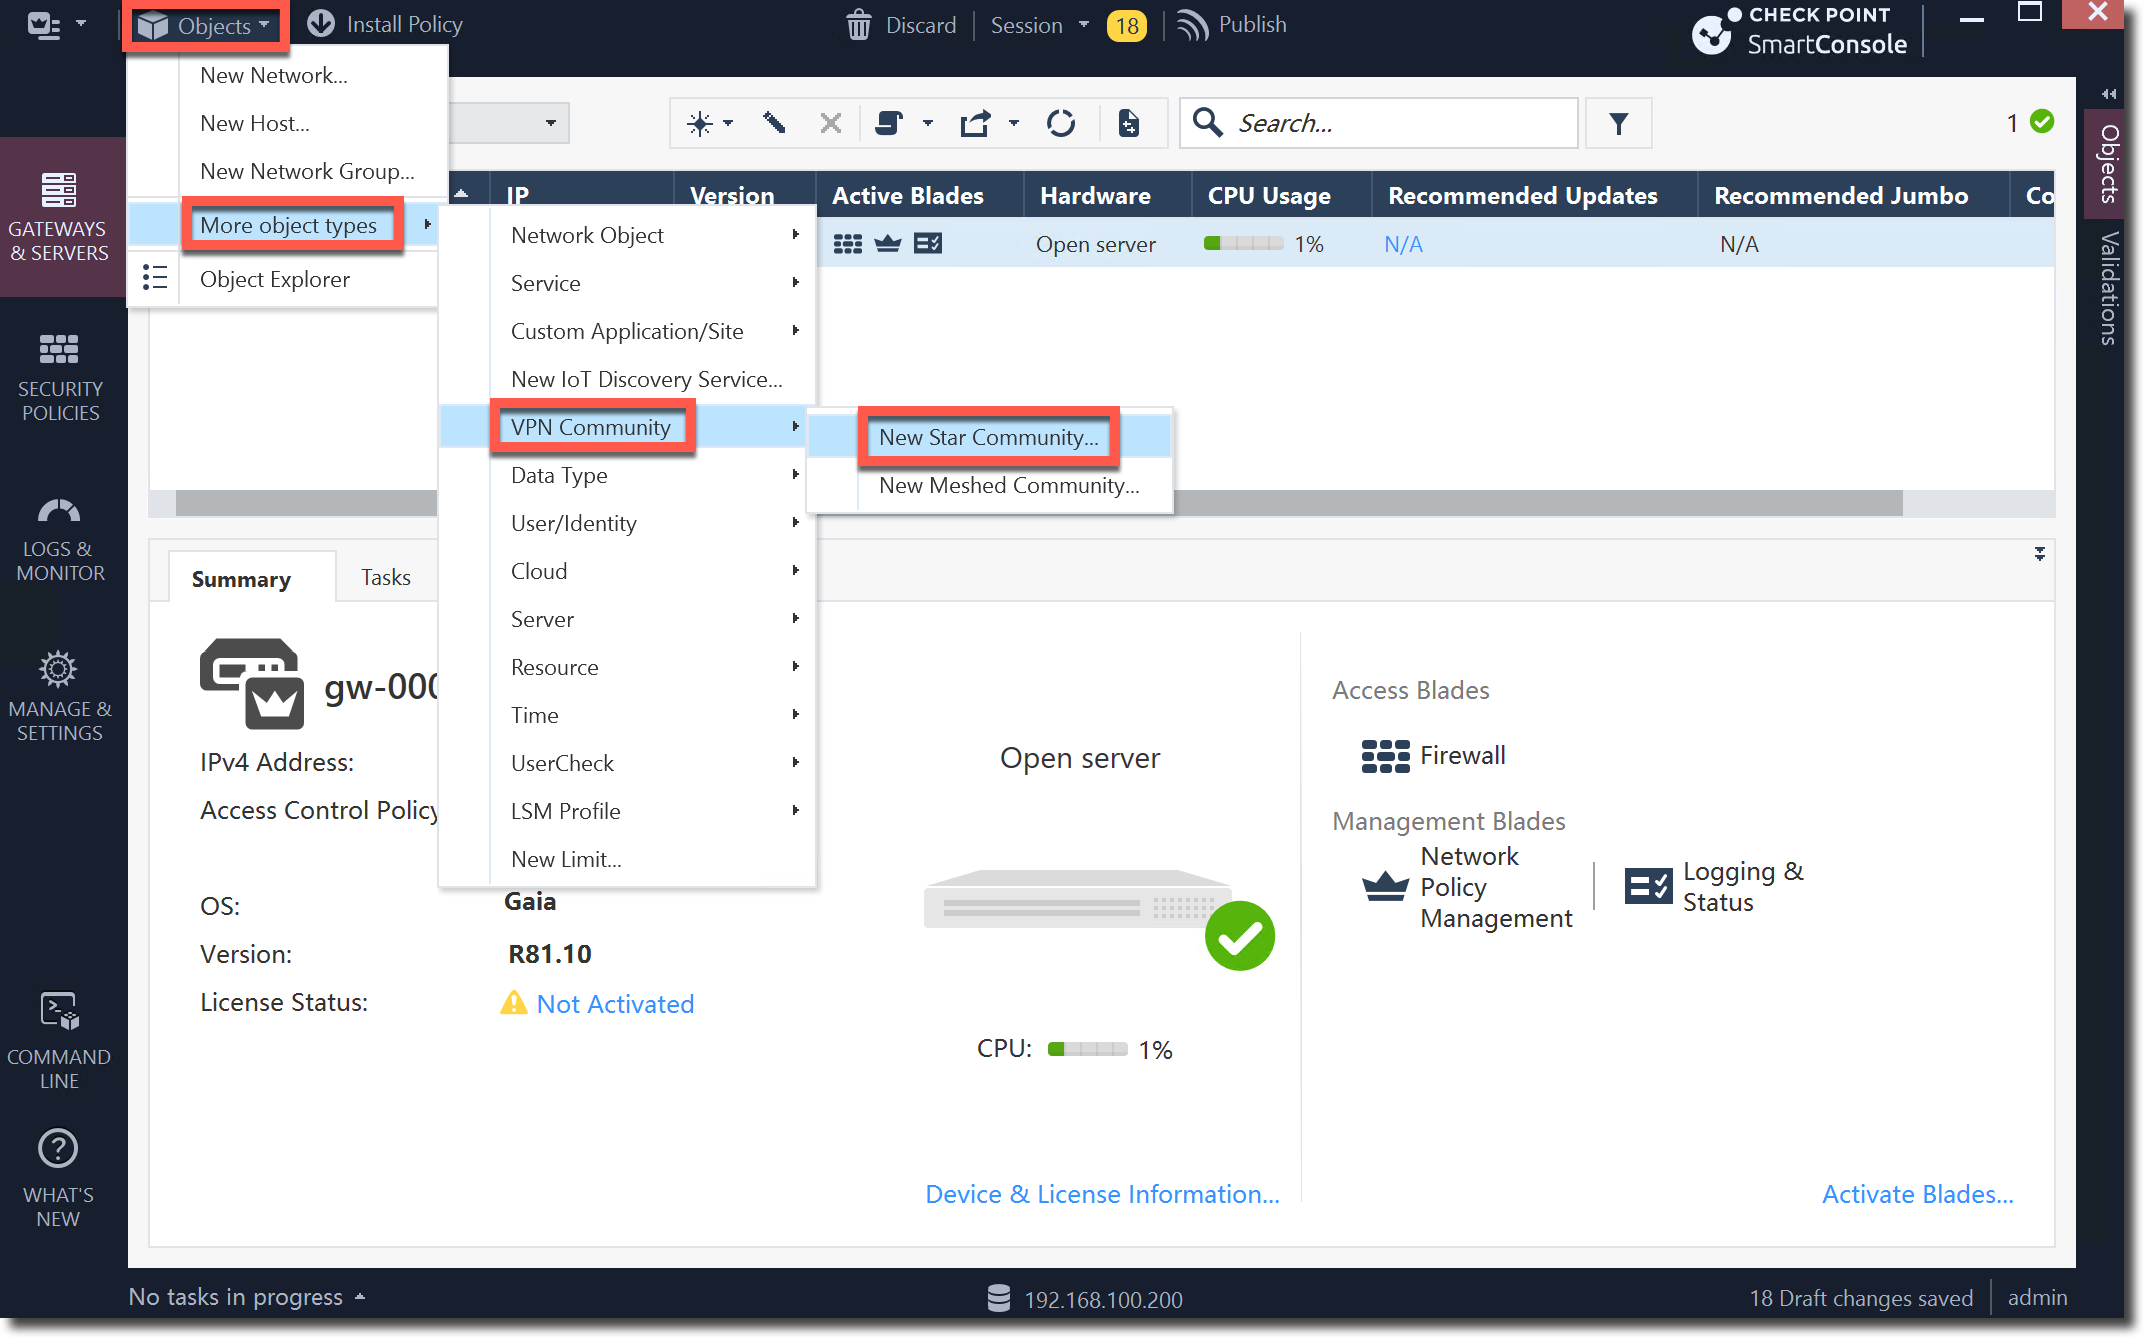
创建“VPNCommunity”对象。
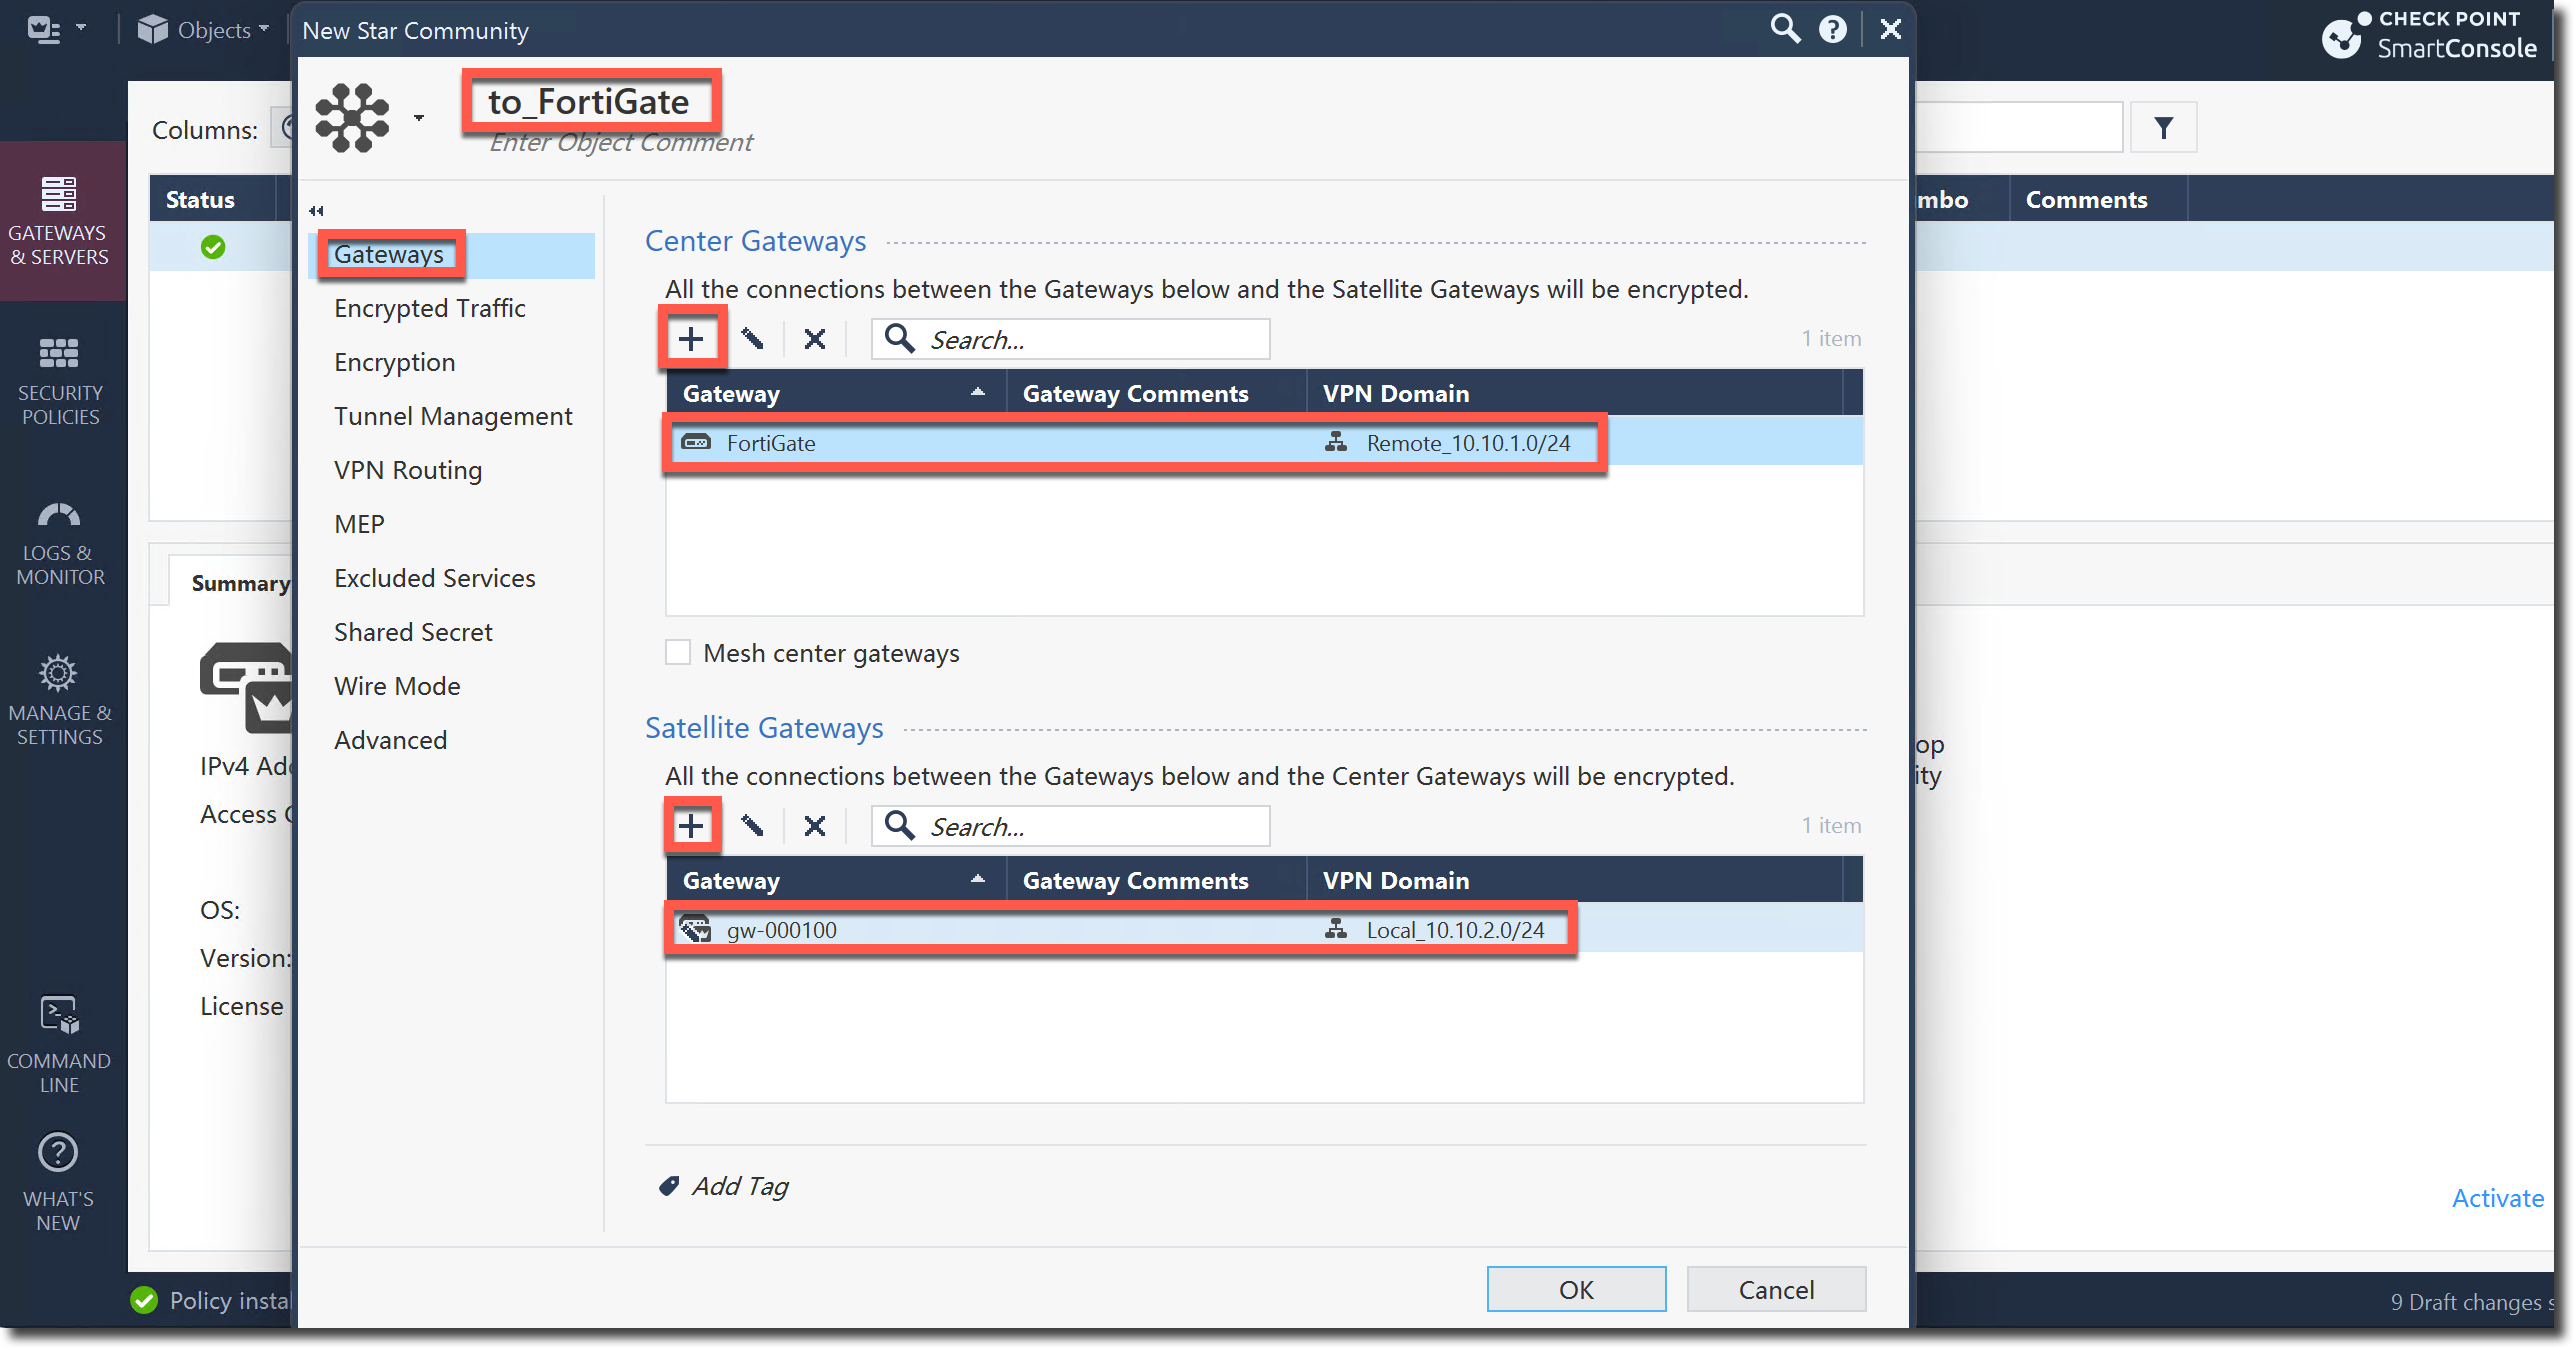
- 在弹出的页面中,配置 Gateway,“Center Gateways”添加上步创建的“Interoperable Device”,“Satellite Gateways”添加本地 Gateway。
在“Encrypted Traffic”中,不勾选“Accept all encrypted Traffic on”。
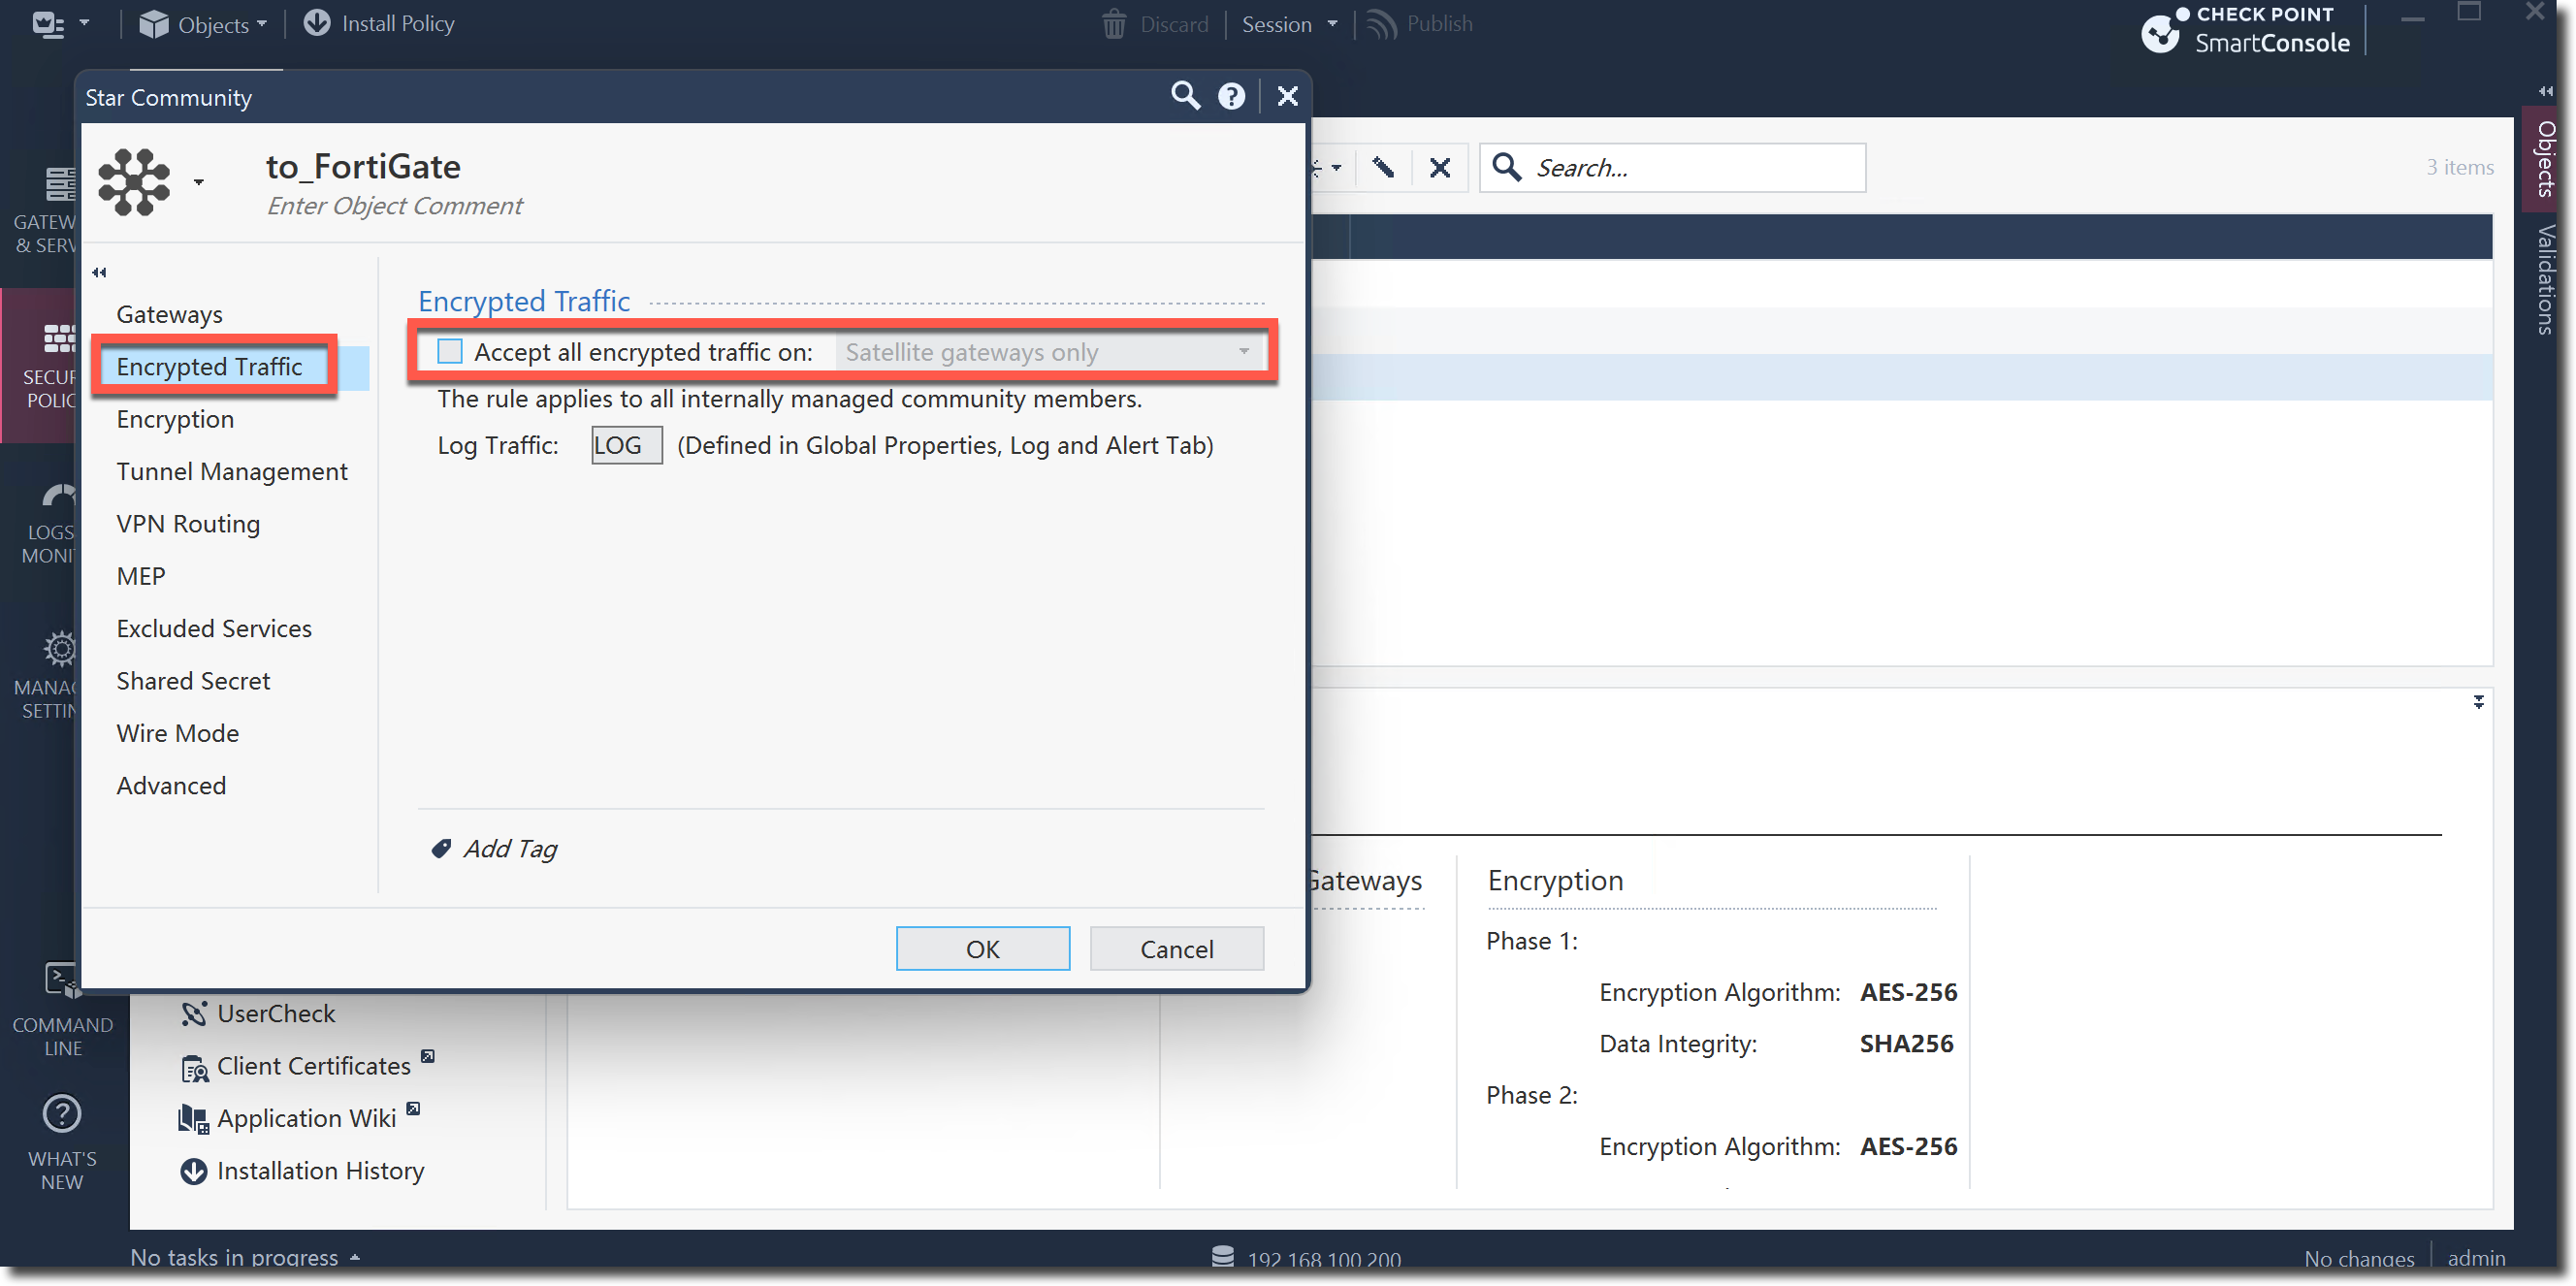
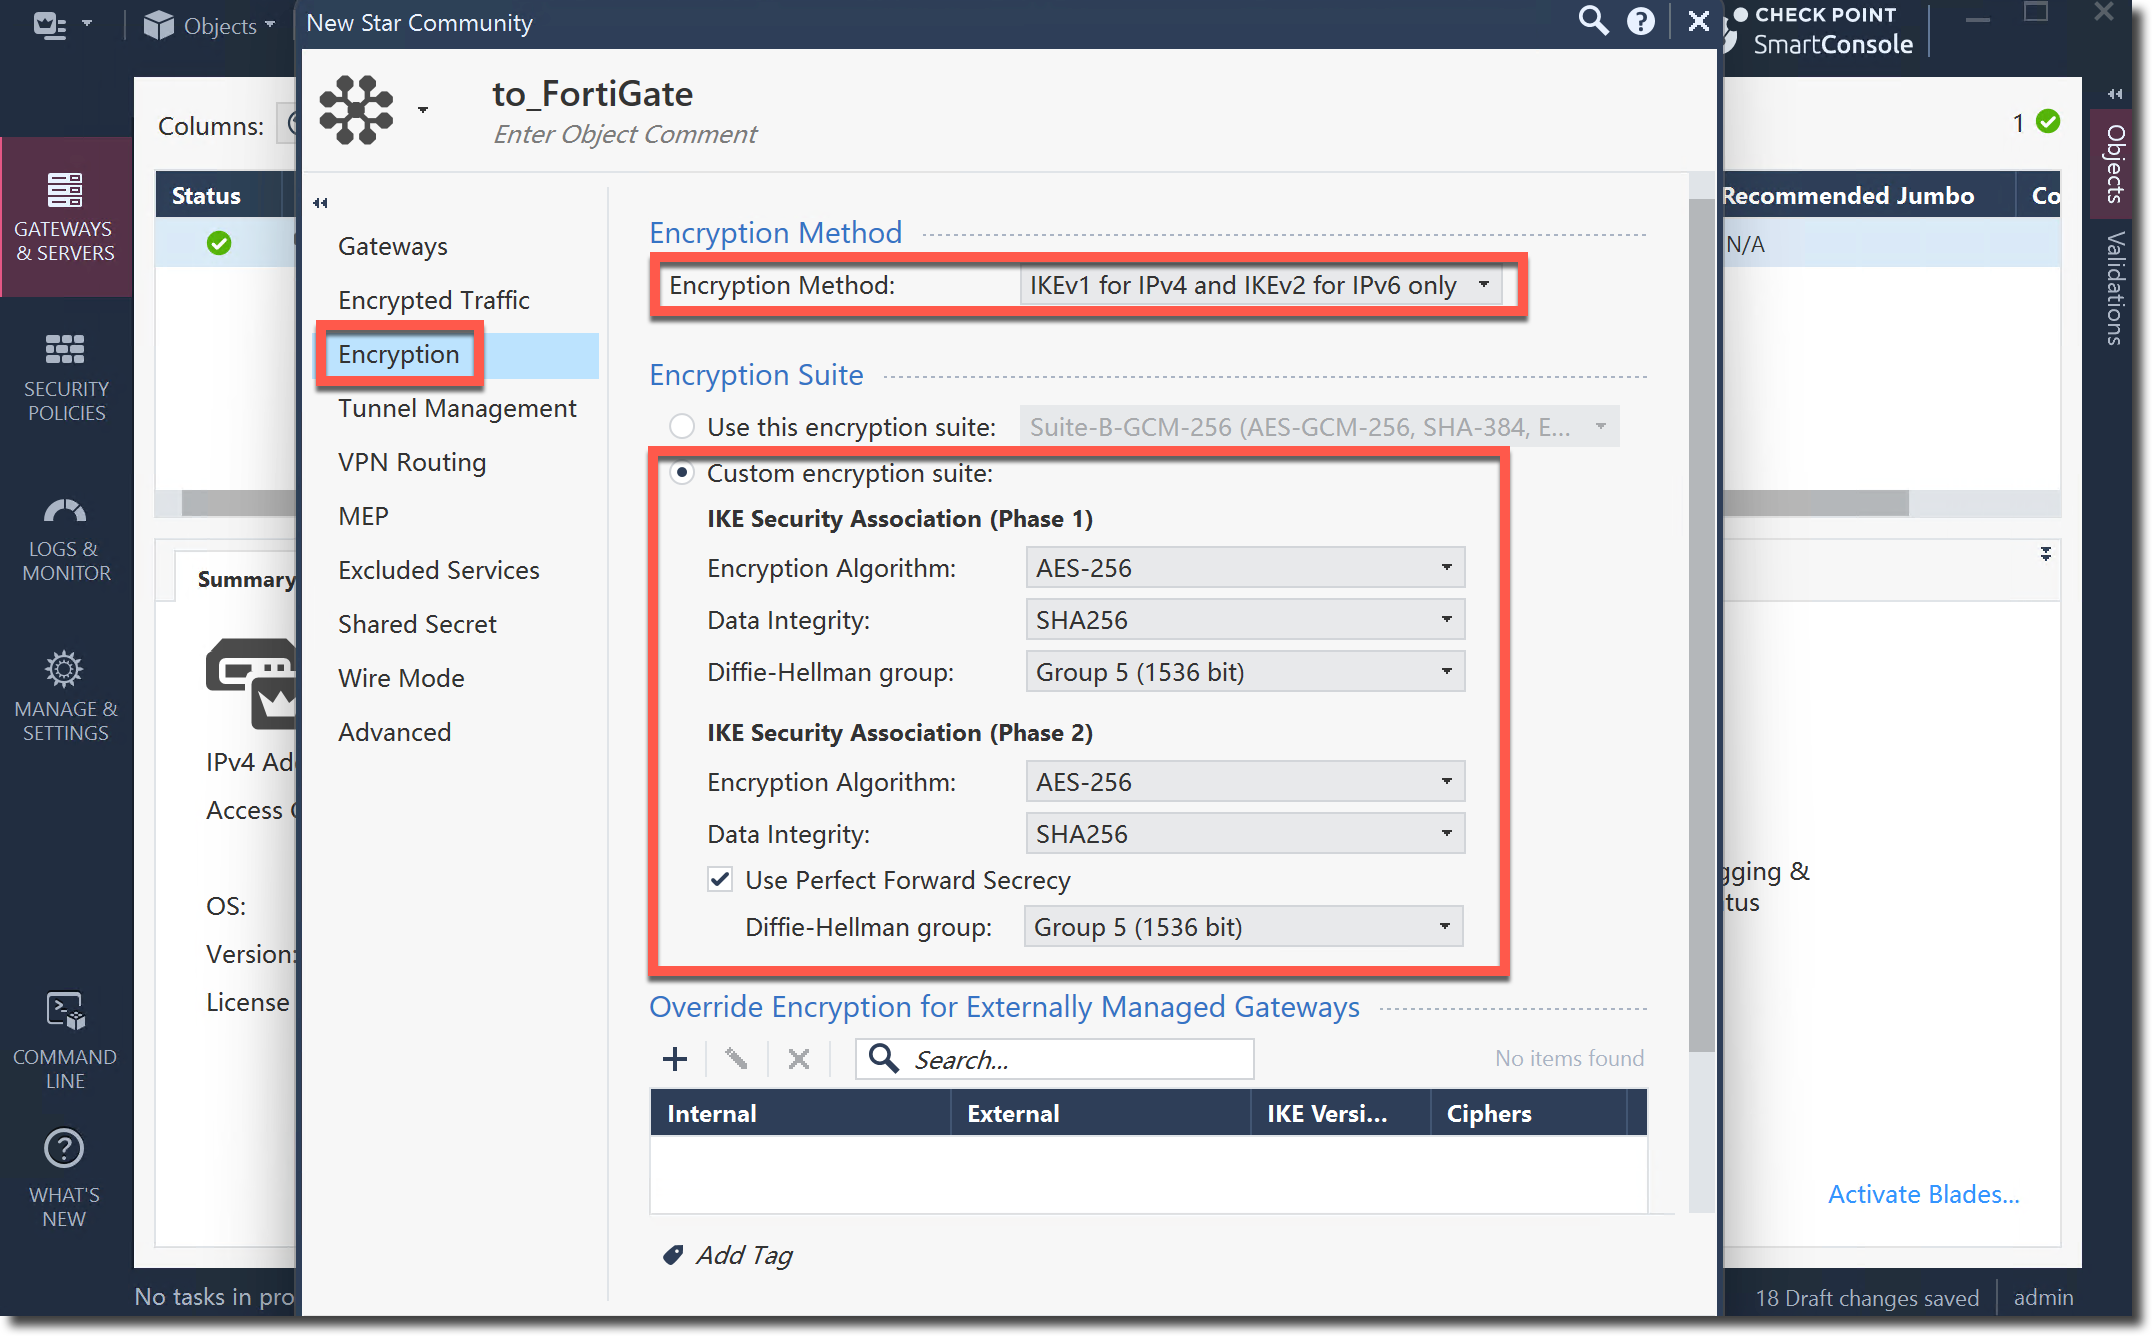
在“Encryption”中配置一阶段和二阶段的安全提议,注意与 FortiGate 端保持一致。
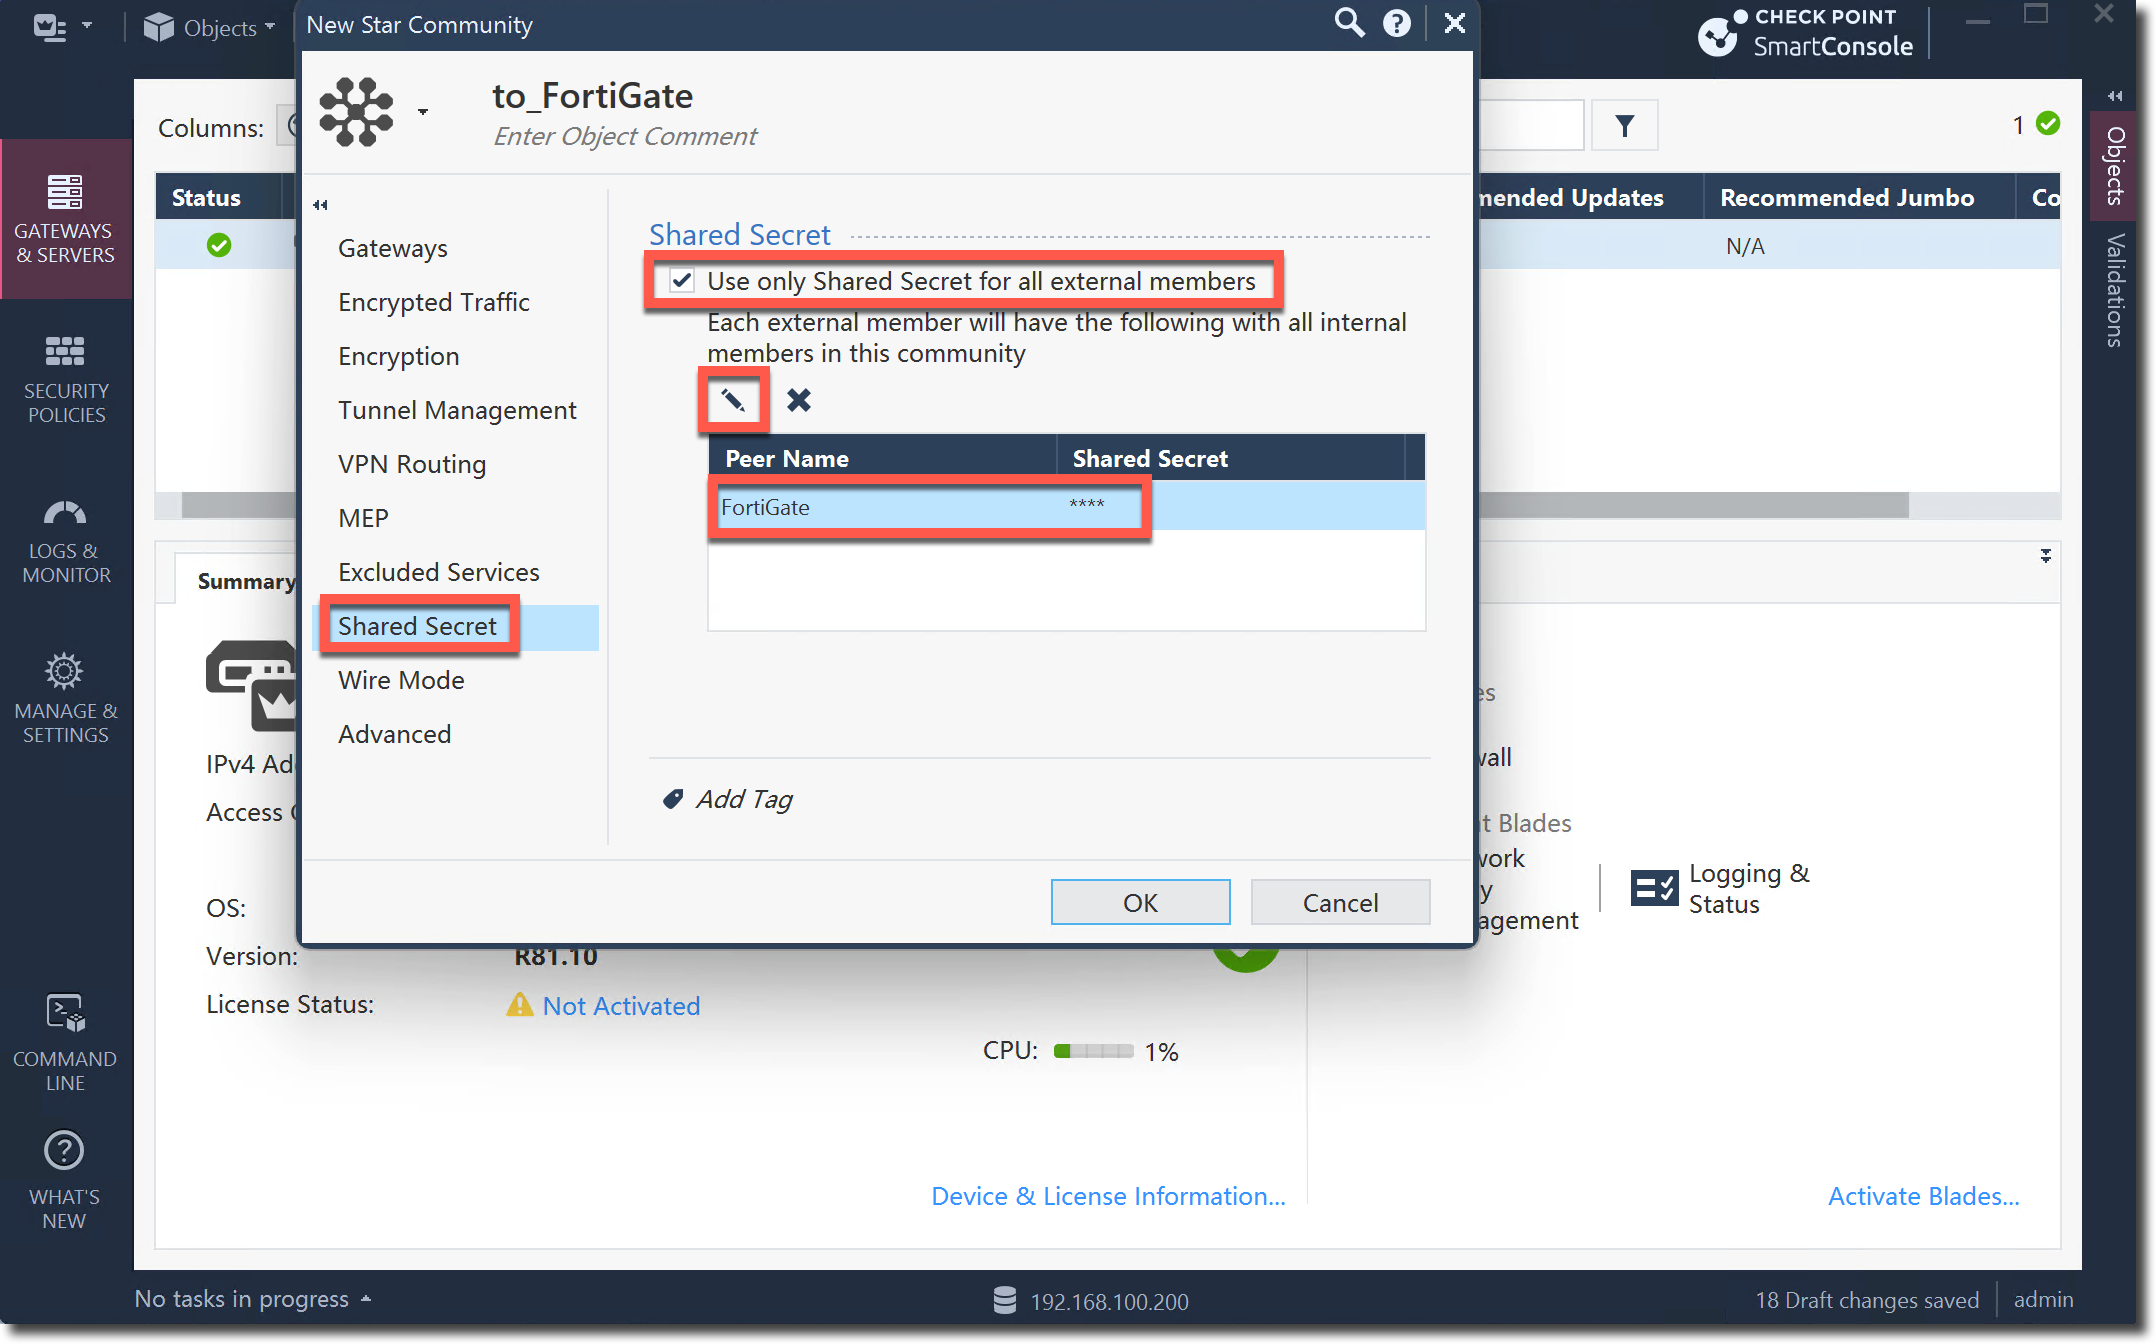
在“Shared Secret”中开启“Use only Shared Secret for all external members”,编辑预共享密钥与 FortiGate 端一致。
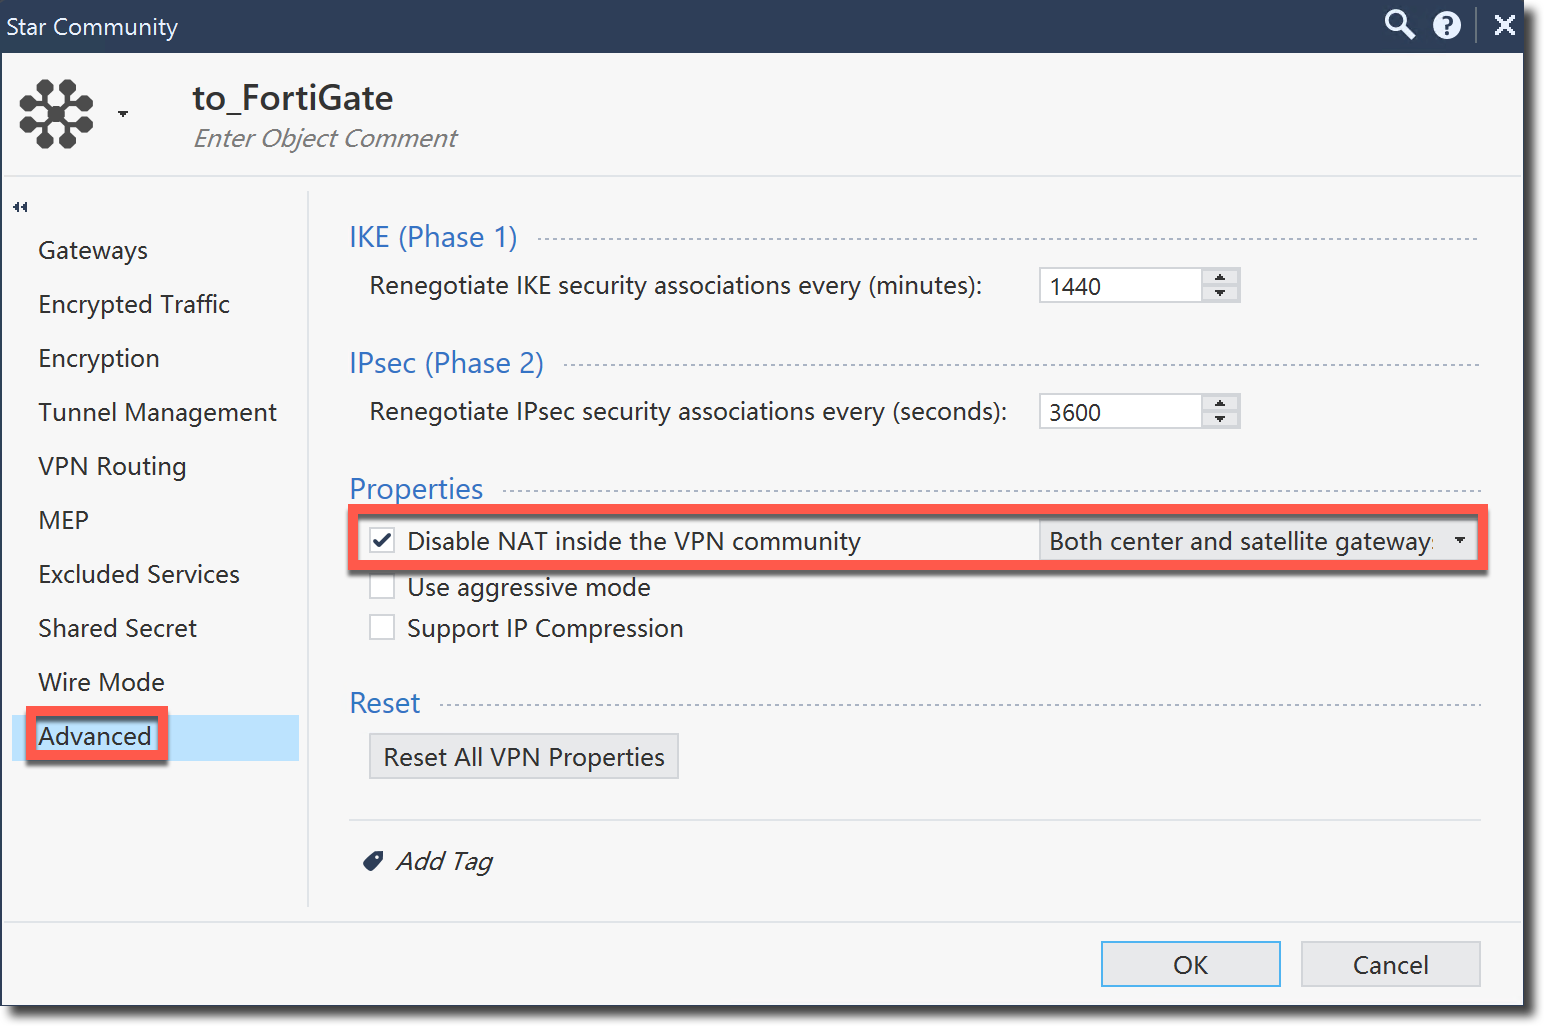
由于 Check Point 的 IPSec 绑定在实际链路口,而不是虚拟 tunnel 接口,在出方向上,SNAT 动作优先于 IPSec 封装,VPN 流量经过 SNAT 后会匹配不上感兴趣流,所以需要配置 IPSec 流量不被 SNAT 处理。在“Advanced”选项卡中,勾选“Disable NAT inside the VPN Community”,开启后,进入 VPN 隧道的流量不会匹配 NAT 策略。点击 OK 下发配置。
在上网策略之前配置 IPSec VPN 相关网段放通的安全策略。
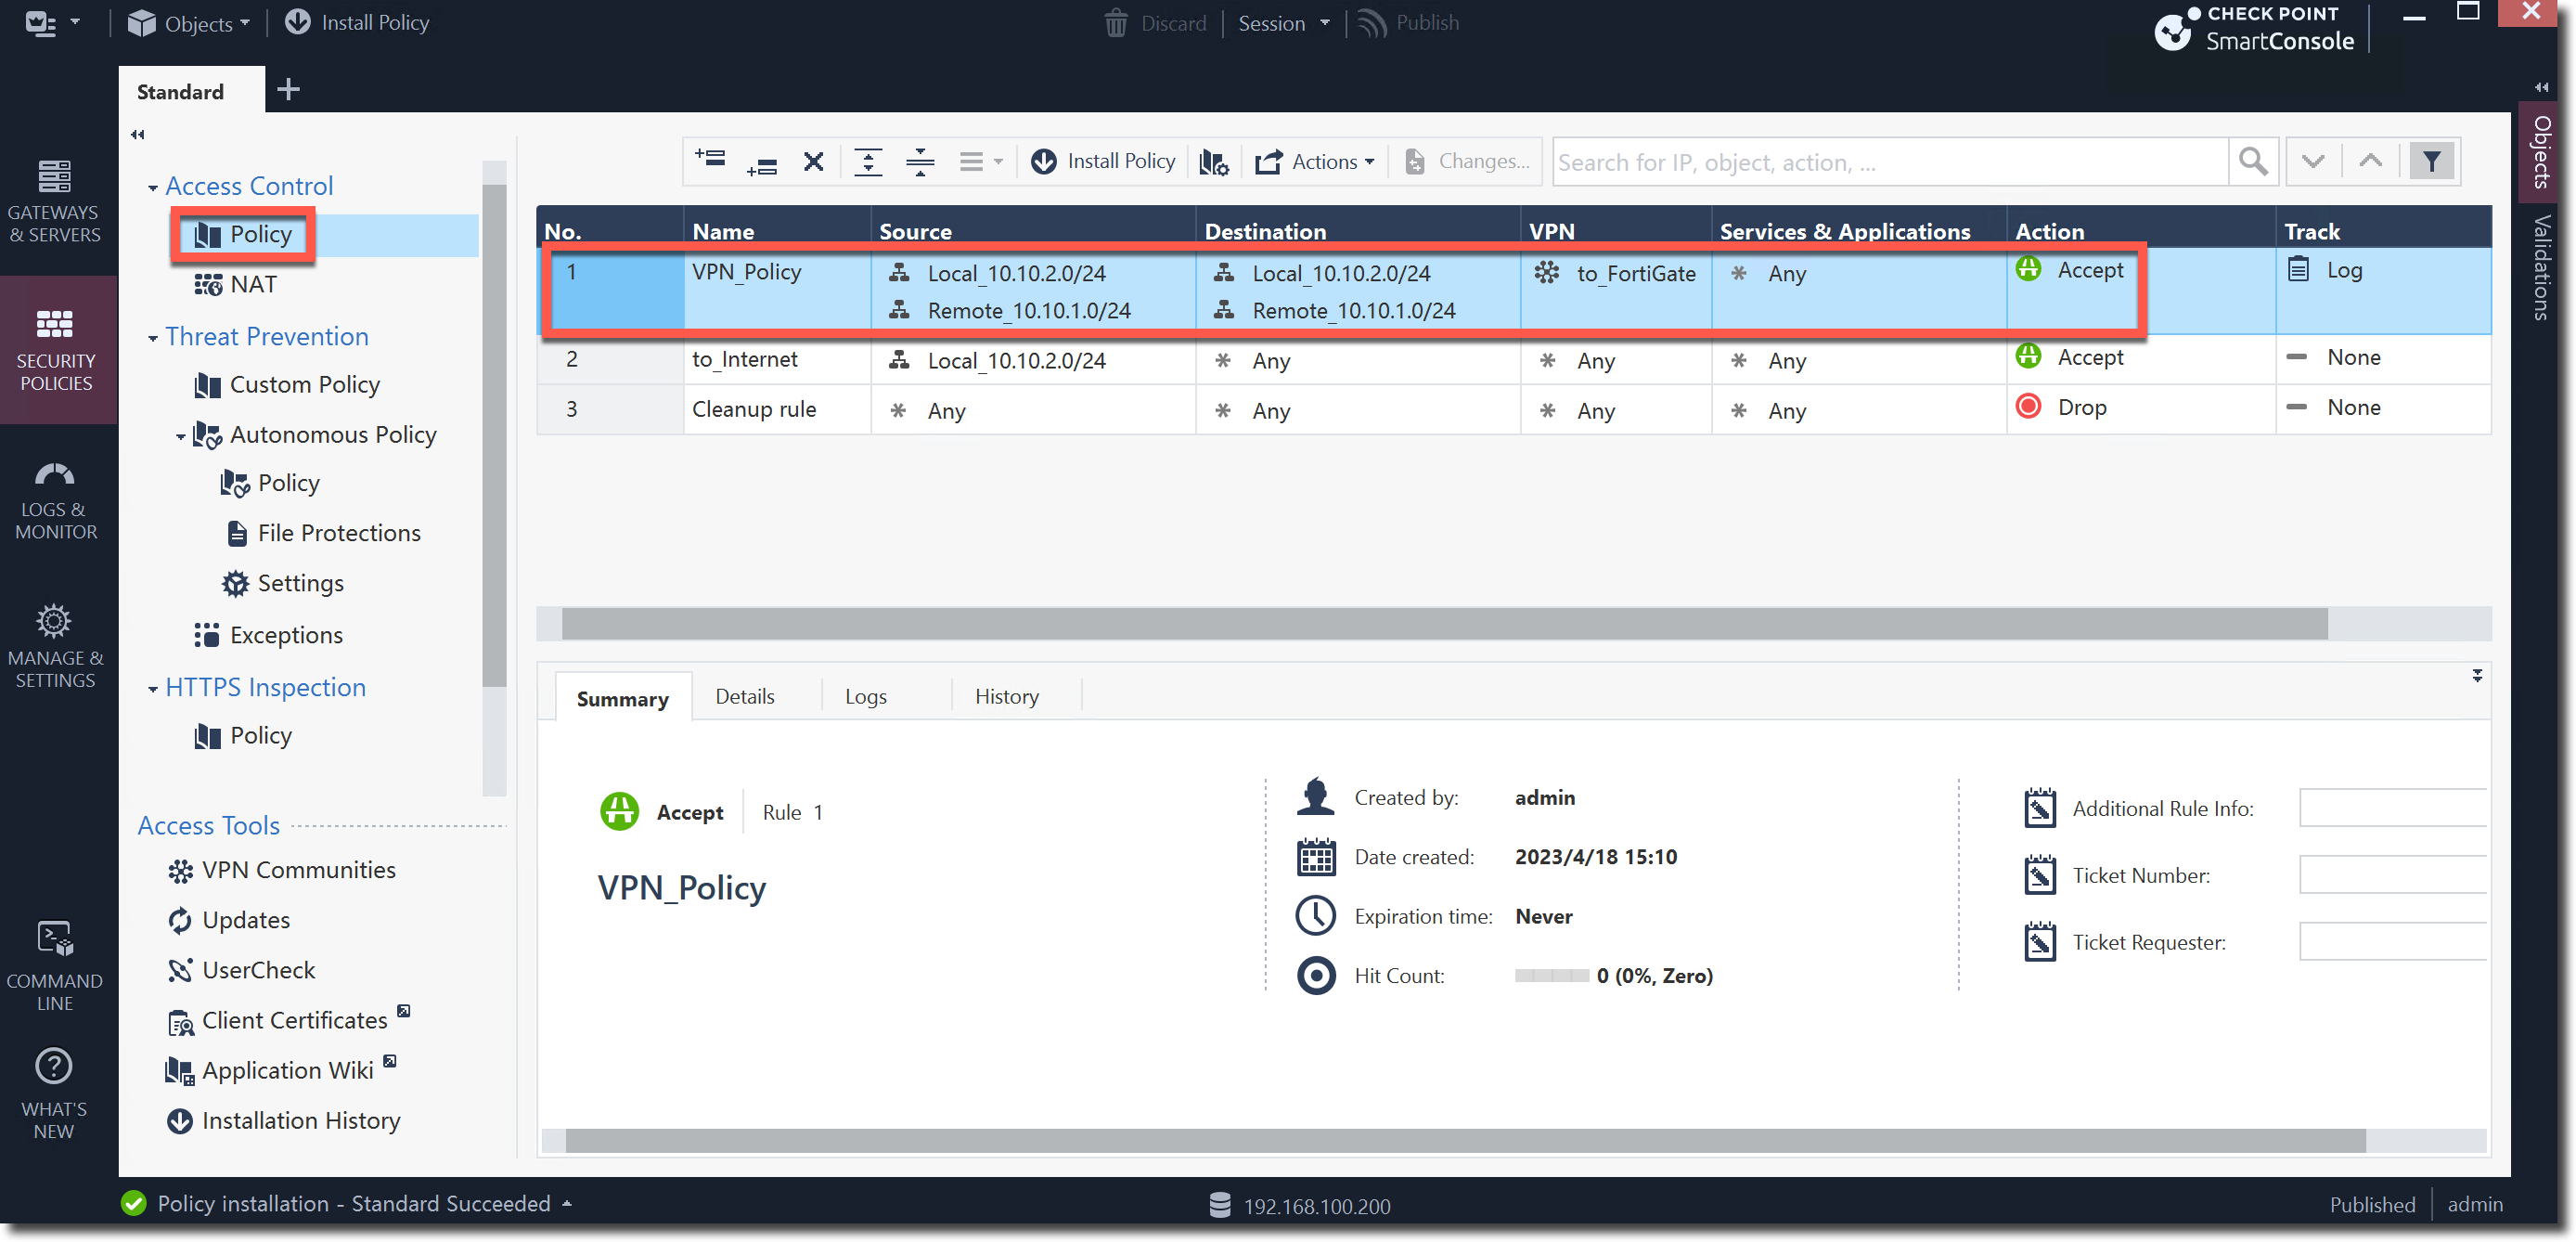
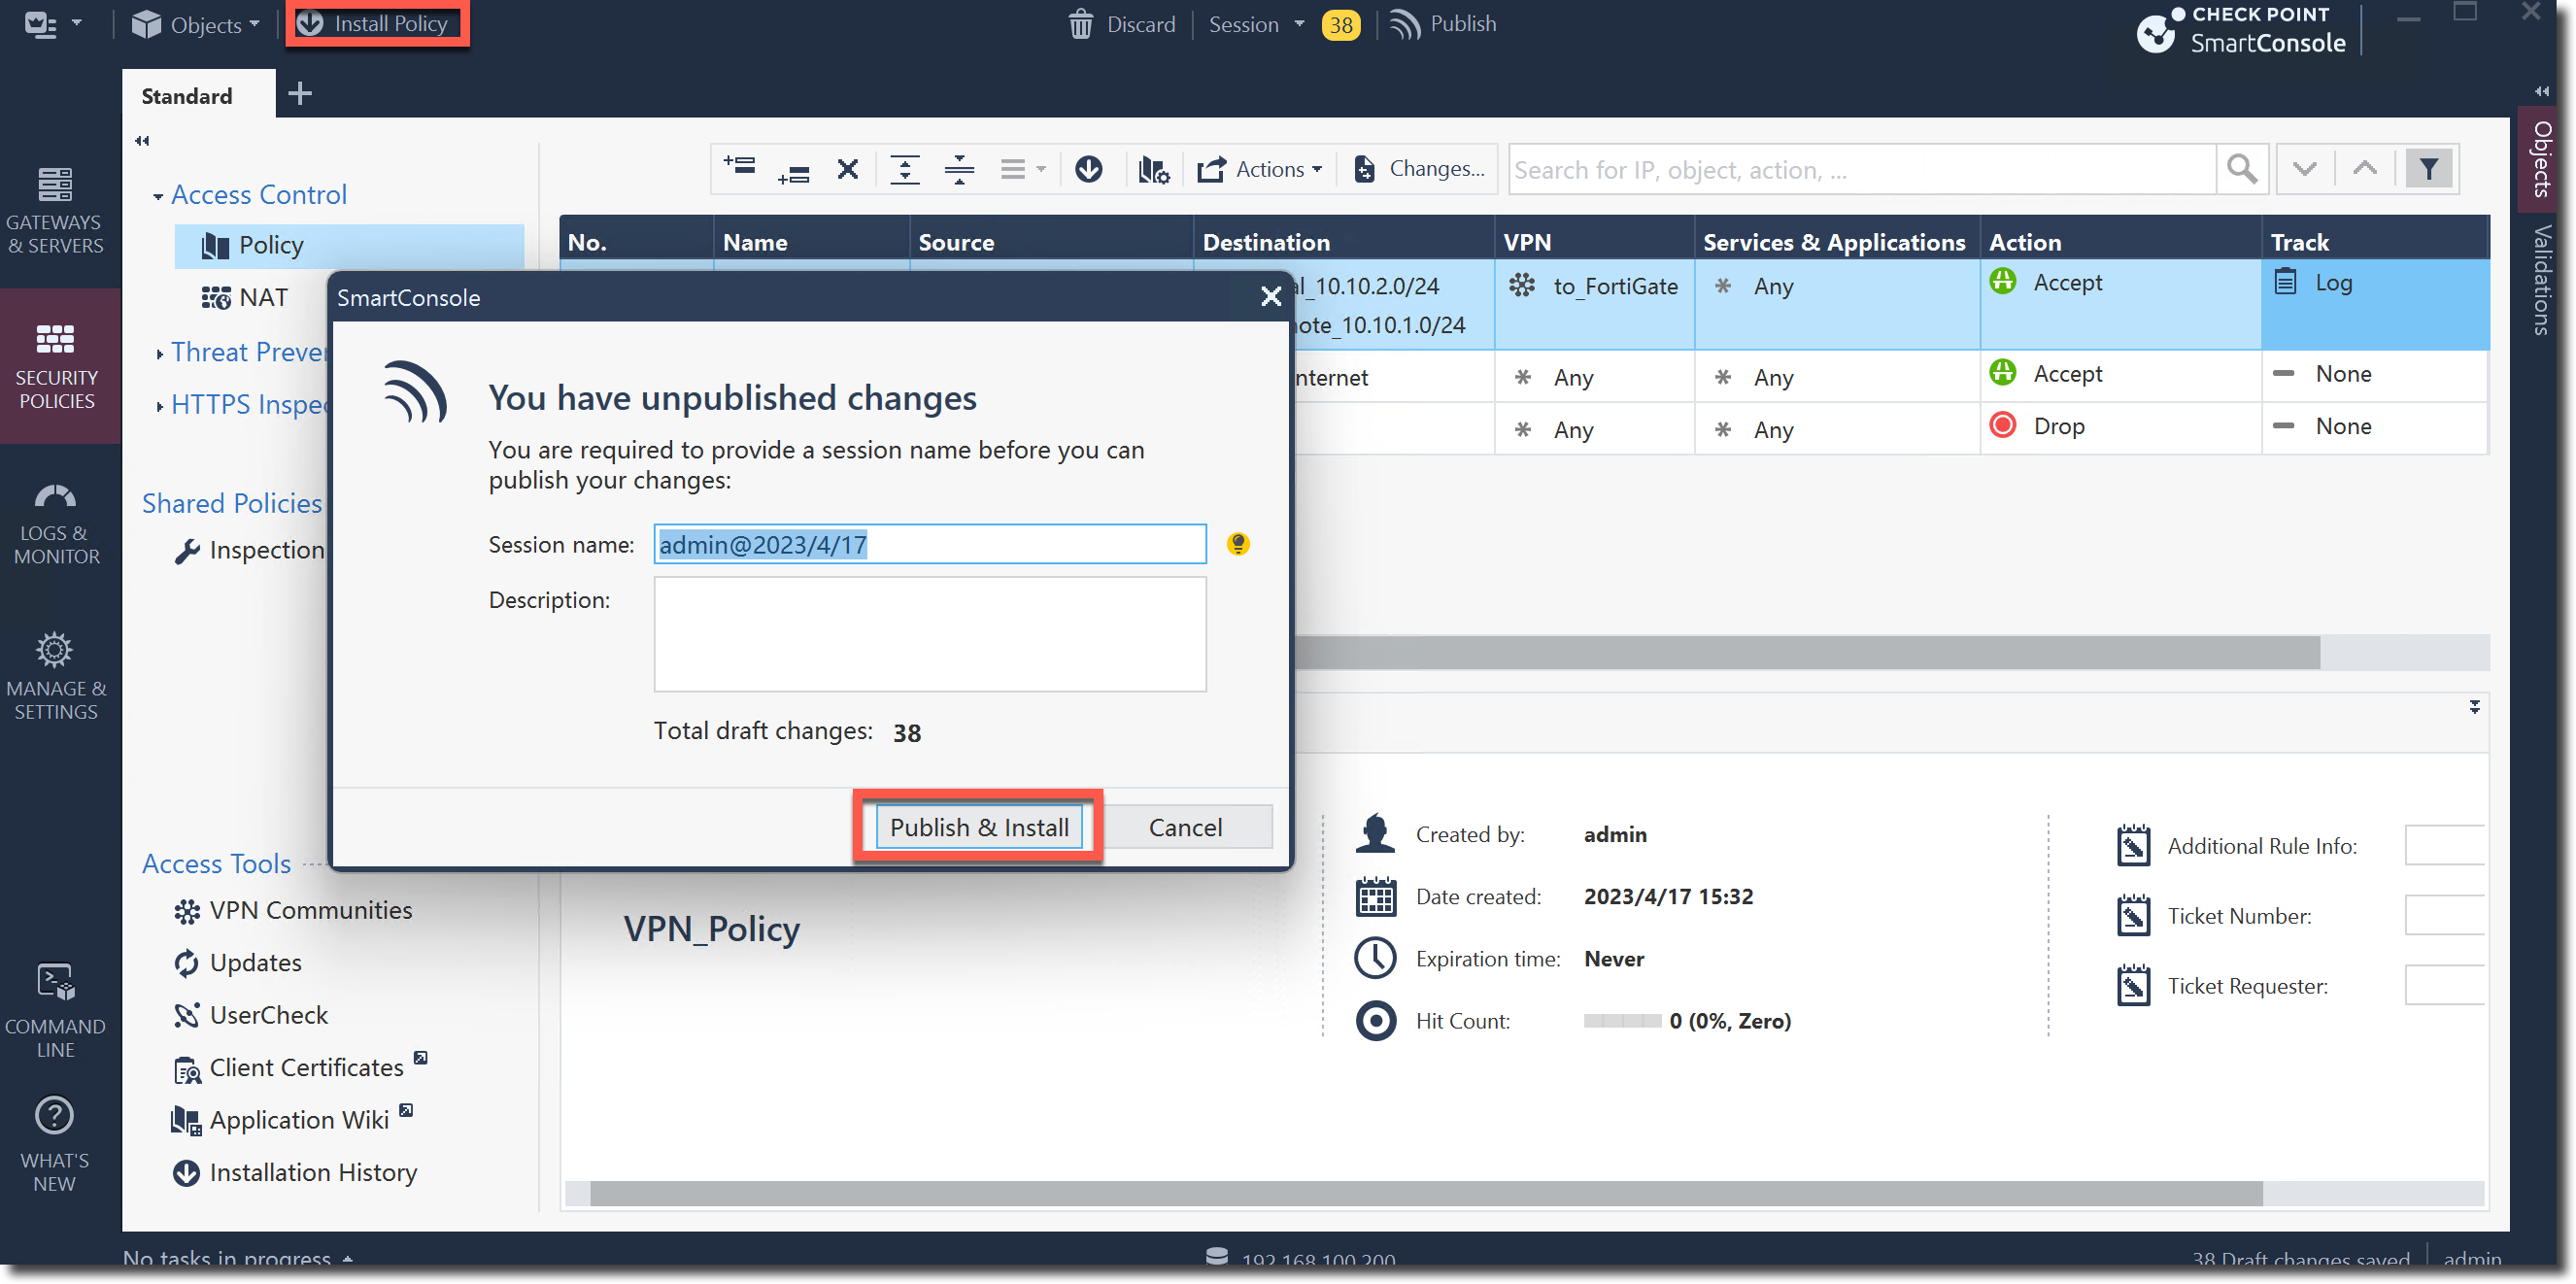
最后,点击“Install Policy”安装所有策略。
结果验证
FortiGate 上查看 IPSec 隧道建立,在仪表盘新建 IPSec 监控,可以看到 IPSec 建立成功。
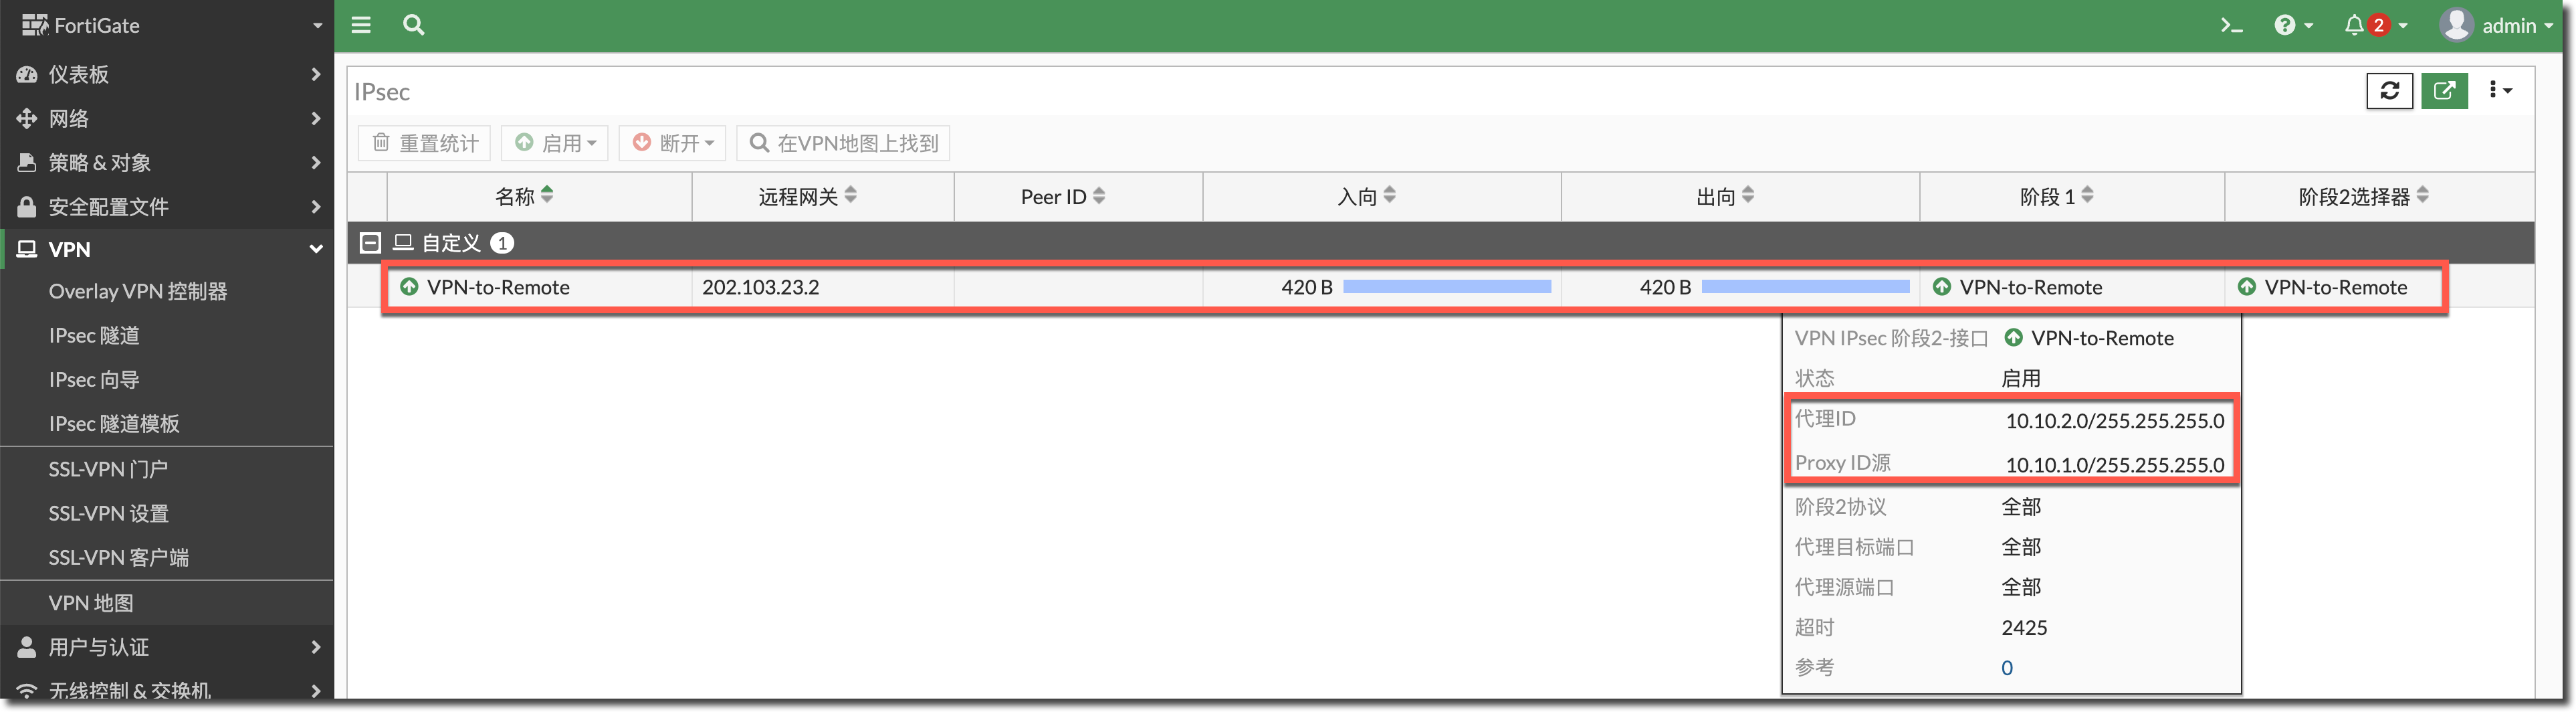
FortiGate # diagnose vpn ike gateway list
vd: root/0
name: VPN-to-Remote
version: 1
interface: port2 4
addr: 202.103.13.2:500 -> 202.103.23.2:500
tun_id: 202.103.23.2/::202.103.23.2
remote_location: 0.0.0.0
network-id: 0
created: 127s ago
IKE SA: created 1/1  established 1/1  time 0/0/0 ms
IPsec SA: created 1/1  established 1/1  time 0/0/0 ms
  id/spi: 508 d0481e88ec264101/908a37e3aa3e43be
  direction: initiator
  status: established 127-127s ago = 0ms
  proposal: aes256-sha256
  key: 39c34495a79b54ca-cdd33b755c2150e9-2b31e3f2ace9c0a2-5b9307e2ee57ee63
  lifetime/rekey: 1400/1242
  DPD sent/recv: 0000006e/00000000

FortiGate # diagnose vpn tunnel list
list all ipsec tunnel in vd 0
------------------------------------------------------
name=VPN-to-Remote ver=1 serial=1 202.103.13.2:0->202.103.23.2:0 tun_id=202.103.23.2 tun_id6=::202.103.23.2 dst_mtu=1500 dpd-link=on1
bound_if=4 lgwy=static/1 tun=intf mode=auto/1 encap=none/552 options[0228]=npu frag-rfc  run_state=0 role=primary accept_traffic=1 o0
proxyid_num=1 child_num=0 refcnt=4 ilast=31 olast=31 ad=/0
stat: rxp=10 txp=10 rxb=840 txb=840
dpd: mode=on-idle on=1 idle=20000ms retry=3 count=0 seqno=110
natt: mode=none draft=0 interval=0 remote_port=0
proxyid=VPN-to-Remote proto=0 sa=1 ref=10 serial=2 auto-negotiate
  src: 0:10.10.1.0-10.10.1.255:0
  dst: 0:10.10.2.0-10.10.2.255:0
  SA:  ref=3 options=38203 type=00 soft=0 mtu=1438 expire=3166/0B replaywin=2048
       seqno=b esn=0 replaywin_lastseq=0000000a qat=0 rekey=0 hash_search_len=1
  life: type=01 bytes=0/0 timeout=3297/3600
  dec: spi=daad030c esp=aes key=32 71ddf0ef357e7828acaffcbb4678daa04020591c56c2e6b3371643d4d5c0d1f5
       ah=sha256 key=32 cc7d15cad39ce576d9a1656e51c1b0e870aec41cf5d5e39c7ffcead1750363bd
  enc: spi=ccc51a59 esp=aes key=32 43d629dbc1e0bdb045772b7d5f42f6400a9ae5544be14b52312d7d7543bfb96b
       ah=sha256 key=32 5fdff7bce9562ae578488bbb78e9f050f91cfc137871c947056232114e017b93
  dec:pkts/bytes=20/1680, enc:pkts/bytes=20/2400
  npu_flag=00 npu_rgwy=202.103.23.2 npu_lgwy=202.103.13.2 npu_selid=1 dec_npuid=0 enc_npuid=0
run_tally=0
查看 FortiGate 的路由表。
FortiGate # get router info routing-table all
Codes: K - kernel, C - connected, S - static, R - RIP, B - BGP
       O - OSPF, IA - OSPF inter area
       N1 - OSPF NSSA external type 1, N2 - OSPF NSSA external type 2
       E1 - OSPF external type 1, E2 - OSPF external type 2
       i - IS-IS, L1 - IS-IS level-1, L2 - IS-IS level-2, ia - IS-IS inter area
       * - candidate default

Routing table for VRF=0
S*      0.0.0.0/0 [10/0] via 202.103.13.1, port2, [1/0]
C       10.10.1.0/24 is directly connected, port3
S       10.10.2.0/24 [10/0] via VPN-to-Remote tunnel 202.103.23.2, [1/0]
C       192.168.100.0/24 is directly connected, port1
C       202.103.13.0/24 is directly connected, port2
FortiGate 侧 PC1 业务测试。
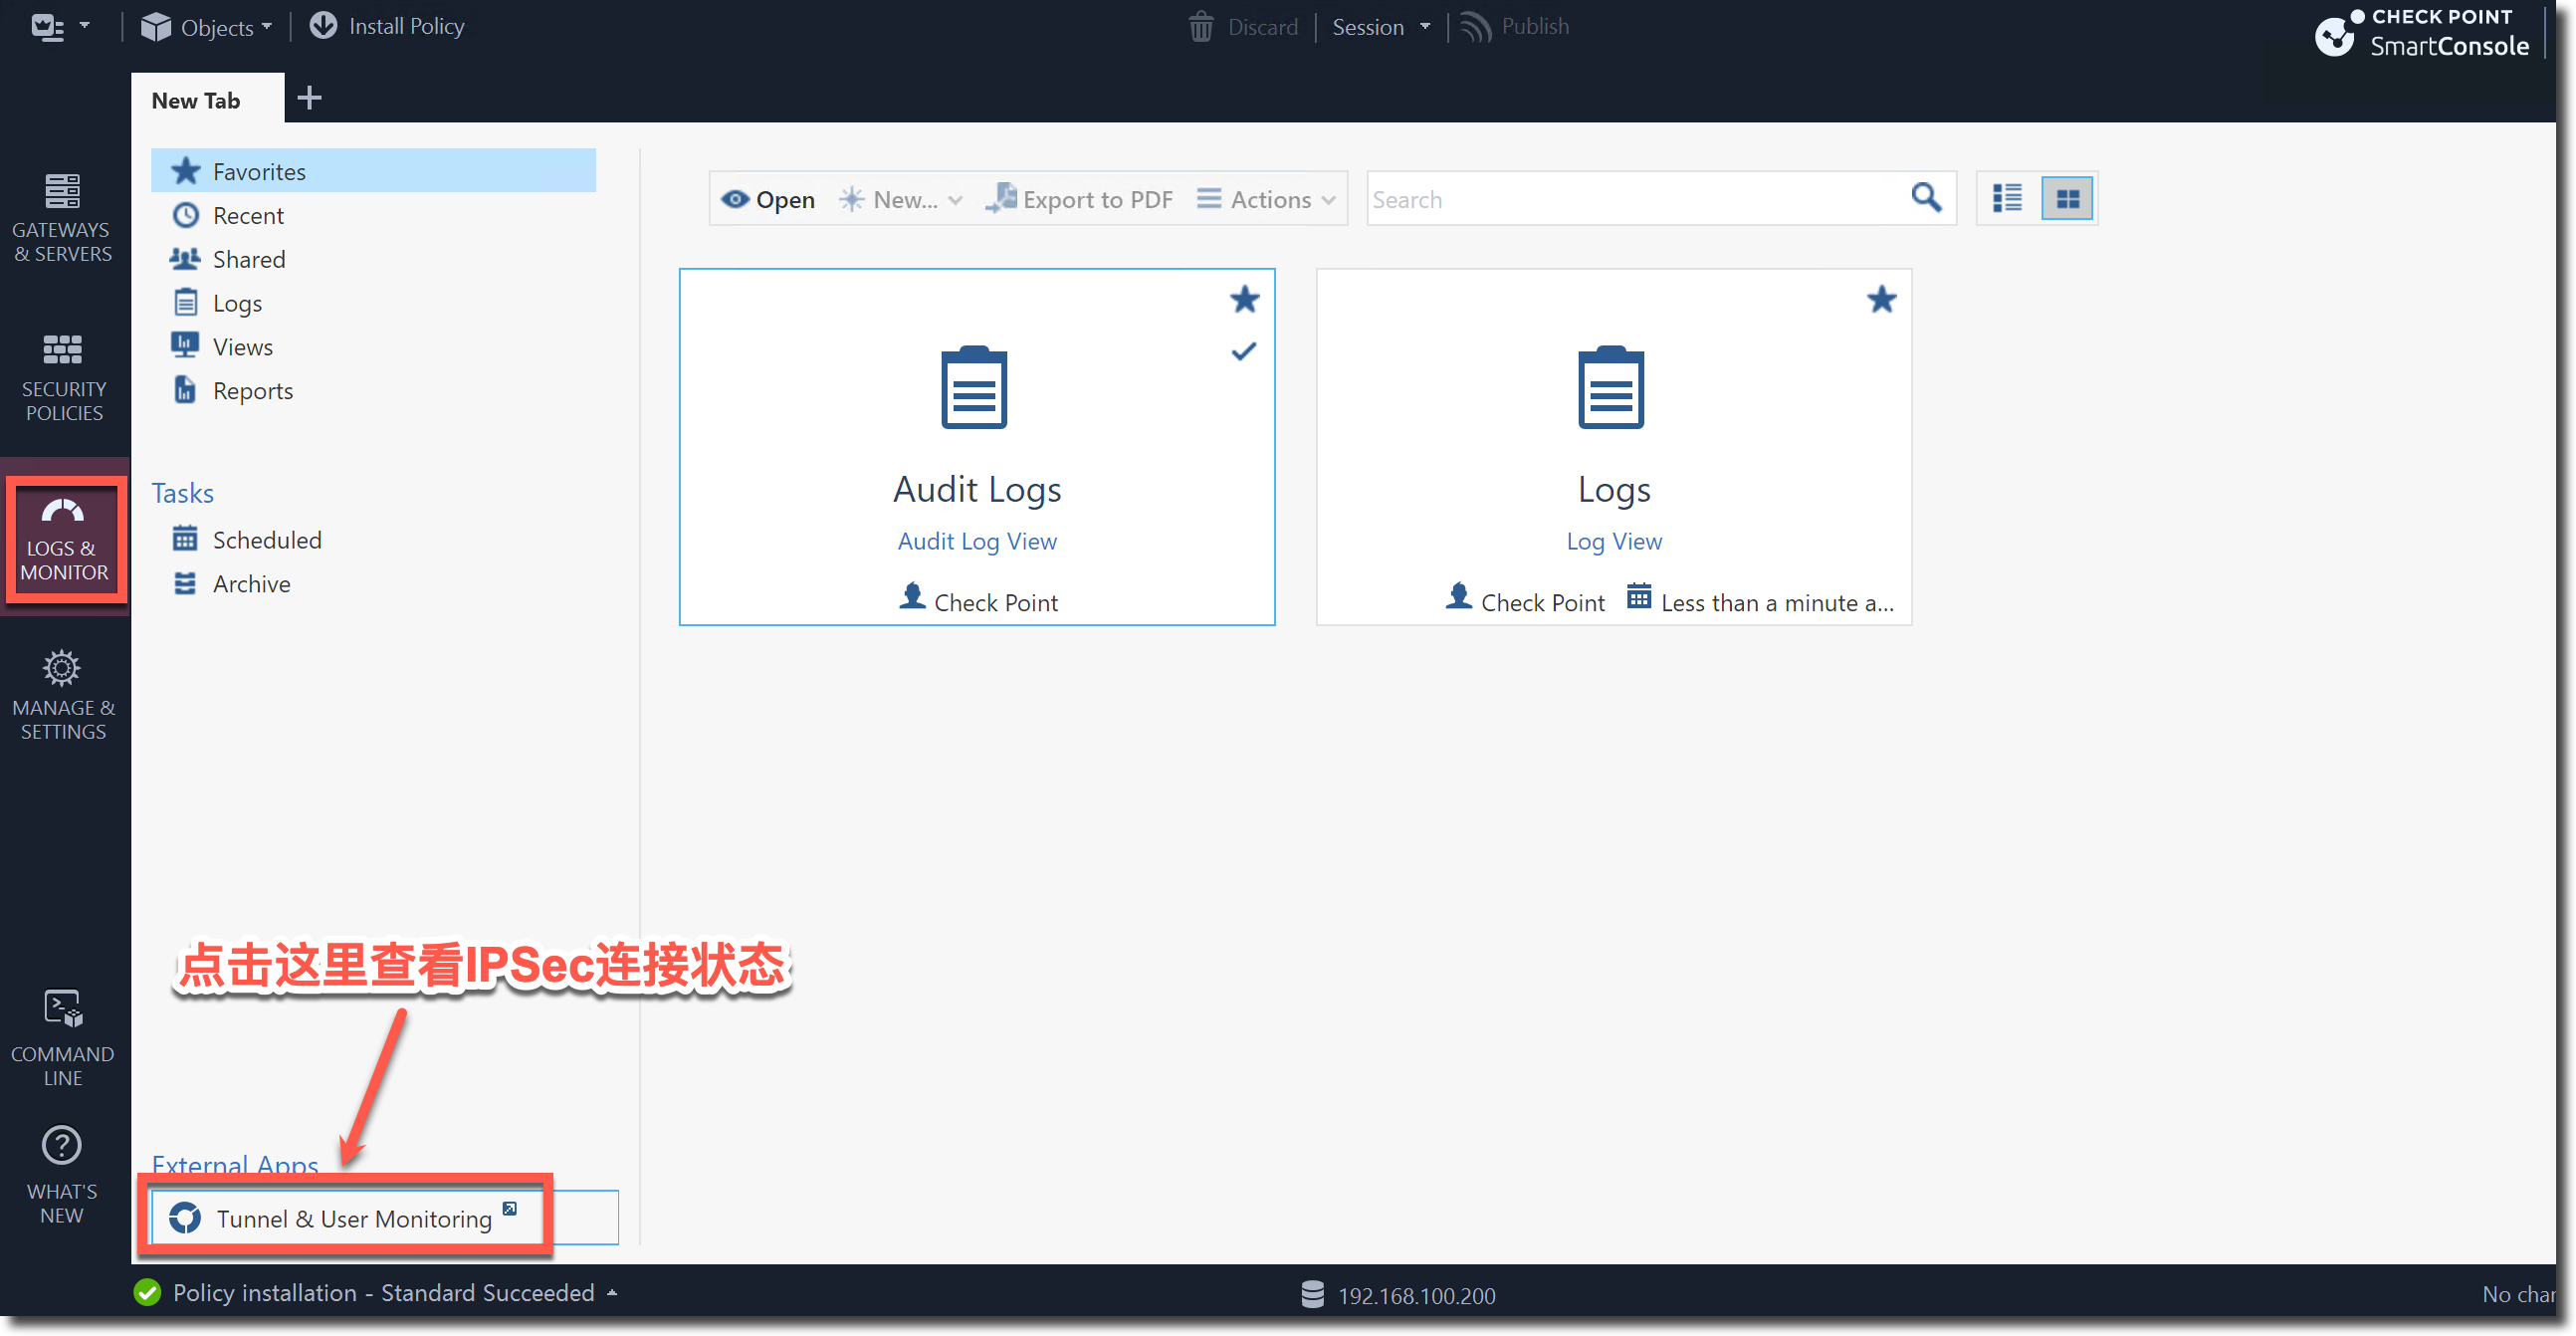
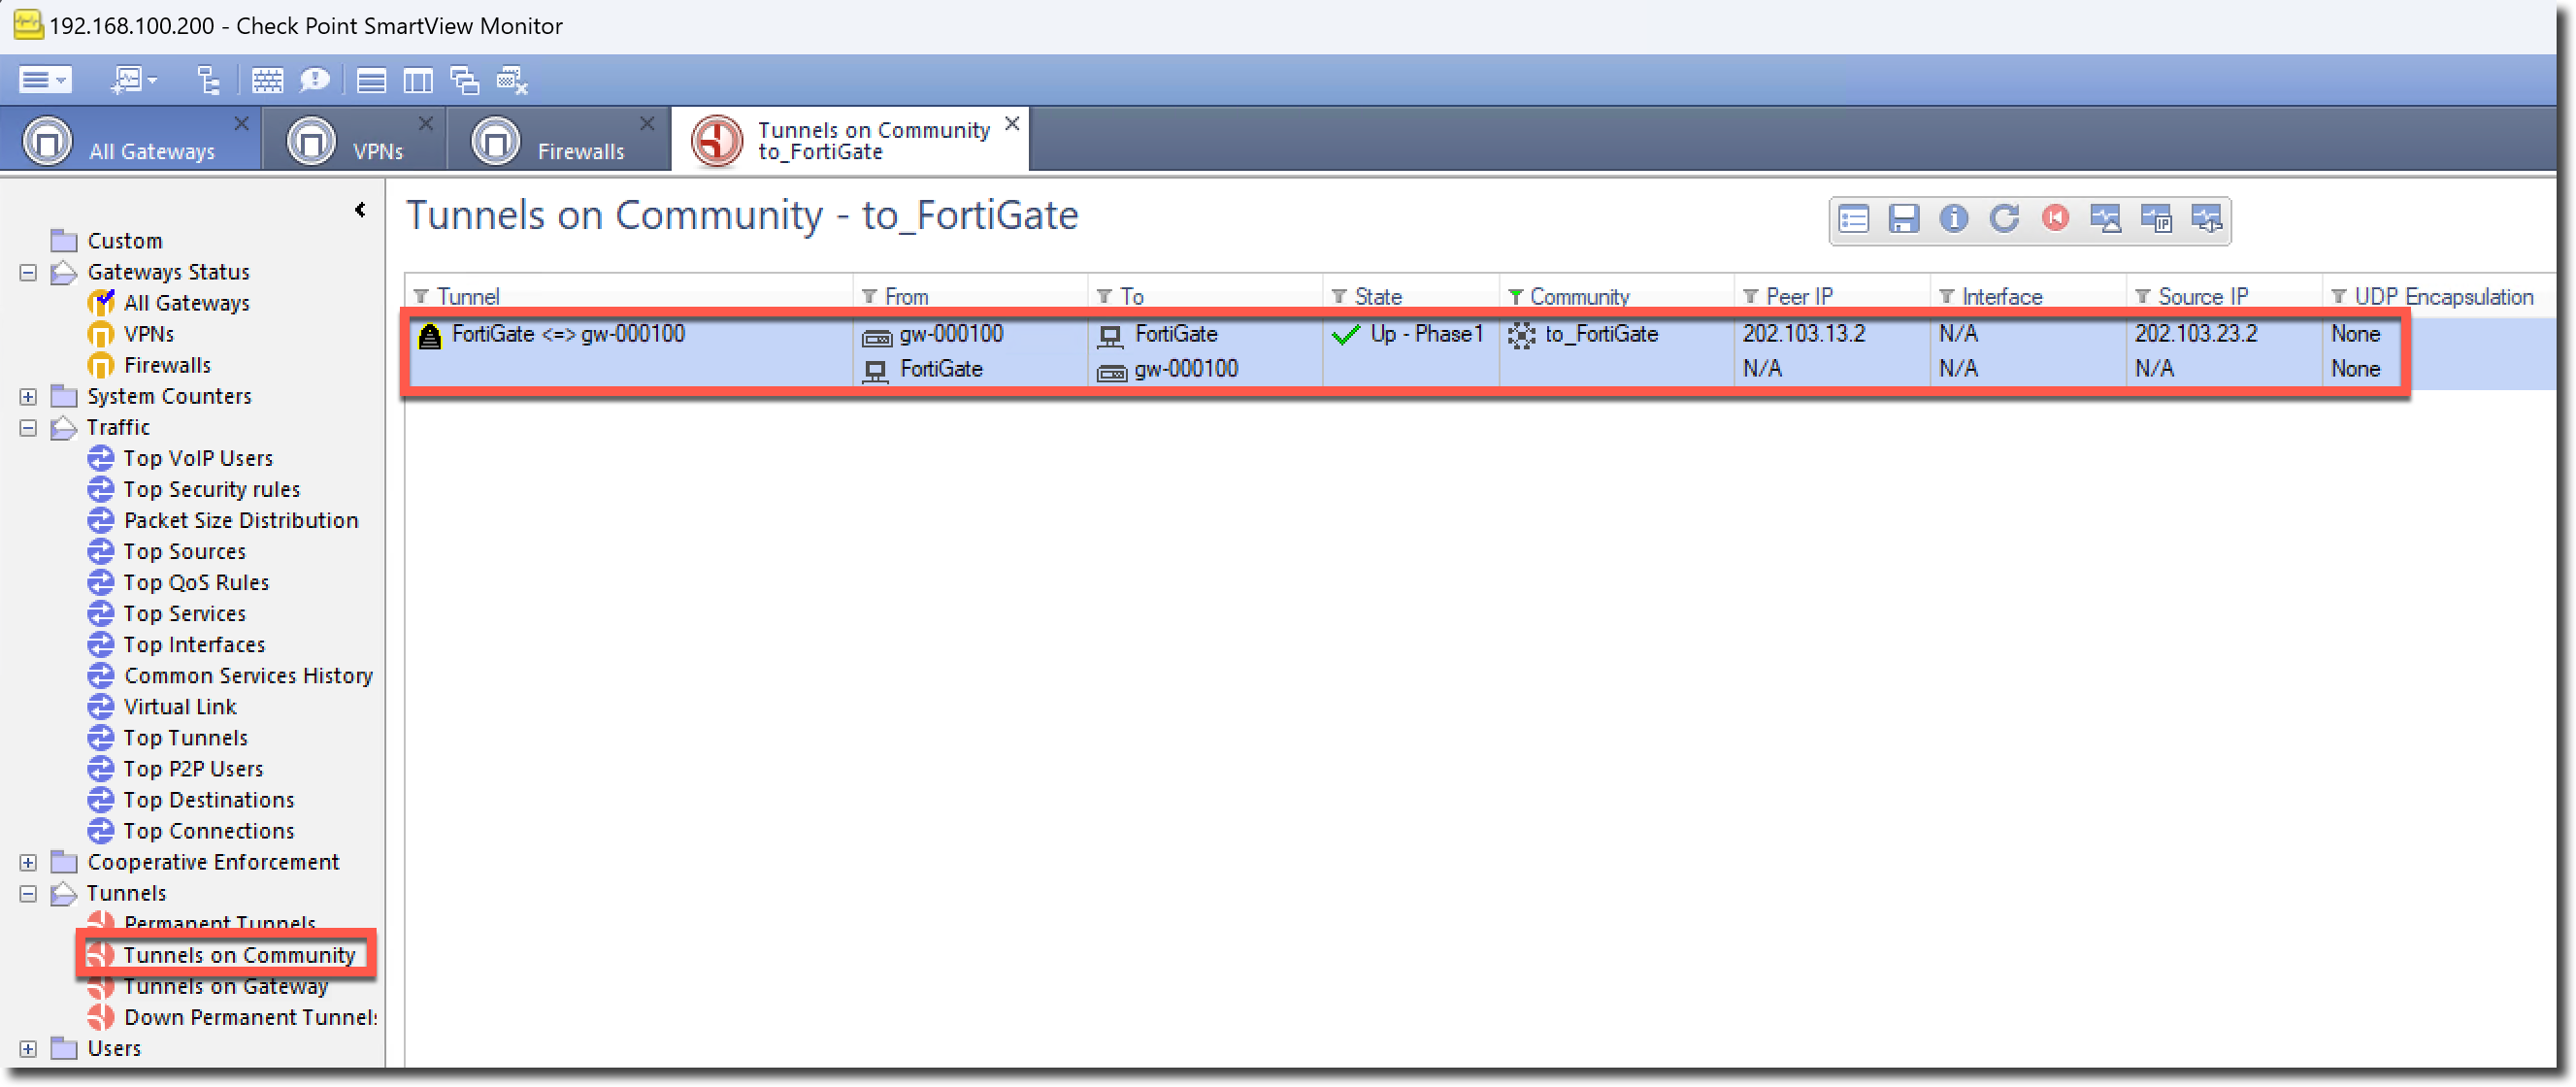
VPCS> show

NAME   IP/MASK              GATEWAY                             GATEWAY
VPCS1  10.10.1.2/24         10.10.1.1
       fe80::250:79ff:fe66:6805/64

VPCS> ping 10.10.2.2

84 bytes from 10.10.2.2 icmp_seq=1 ttl=62 time=5.727 ms
84 bytes from 10.10.2.2 icmp_seq=2 ttl=62 time=2.354 ms
84 bytes from 10.10.2.2 icmp_seq=3 ttl=62 time=4.145 ms
84 bytes from 10.10.2.2 icmp_seq=4 ttl=62 time=2.402 ms
84 bytes from 10.10.2.2 icmp_seq=5 ttl=62 time=3.445 ms
Check Point 防火墙查看 IPSec 连接状态。
查看 Check Point 防火墙的路由表,可以看到 VPN 流量匹配了默认路由,送往本地 VPN 网关接口 eth1(如果默认路由指向的不是本地 VPN 网关接口,请自行配置细化的 VPN 路由指向 VPN 网关接口)。
gw-000100> show route
Codes: C - Connected, S - Static, R - RIP, B - BGP (D - Default),
       O - OSPF IntraArea (IA - InterArea, E - External, N - NSSA),
       A - Aggregate, K - Kernel Remnant, H - Hidden, P - Suppressed,
       NP - NAT Pool, U - Unreachable, i - Inactive

S               0.0.0.0/0           via 202.103.23.1, eth1, cost 0, age 12890
C               10.10.2.0/24        is directly connected, eth2
C               127.0.0.0/8         is directly connected, lo
C               192.168.100.0/24    is directly connected, eth0
C               202.103.23.0/24     is directly connected, eth1
Check Point 防火墙侧 PC2 业务测试。
VPCS> show

NAME   IP/MASK              GATEWAY                             GATEWAY
VPCS1  10.10.2.2/24         10.10.2.1
       fe80::250:79ff:fe66:6806/64

VPCS> ping 10.10.1.2

84 bytes from 10.10.1.2 icmp_seq=1 ttl=62 time=2.687 ms
84 bytes from 10.10.1.2 icmp_seq=2 ttl=62 time=2.235 ms
84 bytes from 10.10.1.2 icmp_seq=3 ttl=62 time=2.130 ms
84 bytes from 10.10.1.2 icmp_seq=4 ttl=62 time=2.225 ms
84 bytes from 10.10.1.2 icmp_seq=5 ttl=62 time=2.170 ms
FortiGate 侧抓包查看。
FortiGate # diagnose sniffer packet any 'host 10.10.2.2 and host 10.10.1.2 and icmp' 4 0 l
Using Original Sniffing Mode
interfaces=[any]
filters=[host 10.10.2.2 and host 10.10.1.2 and icmp]
2023-04-18 15:18:07.196766 VPN-to-Remote in 10.10.2.2 -> 10.10.1.2: icmp: echo request
2023-04-18 15:18:07.196805 port3 out 10.10.2.2 -> 10.10.1.2: icmp: echo request
2023-04-18 15:18:07.197221 port3 in 10.10.1.2 -> 10.10.2.2: icmp: echo reply
2023-04-18 15:18:07.197240 VPN-to-Remote out 10.10.1.2 -> 10.10.2.2: icmp: echo reply
2023-04-18 15:18:08.200924 VPN-to-Remote in 10.10.2.2 -> 10.10.1.2: icmp: echo request
2023-04-18 15:18:08.200964 port3 out 10.10.2.2 -> 10.10.1.2: icmp: echo request
2023-04-18 15:18:08.201134 port3 in 10.10.1.2 -> 10.10.2.2: icmp: echo reply
2023-04-18 15:18:08.201143 VPN-to-Remote out 10.10.1.2 -> 10.10.2.2: icmp: echo reply
2023-04-18 15:18:09.204488 VPN-to-Remote in 10.10.2.2 -> 10.10.1.2: icmp: echo request
2023-04-18 15:18:09.204523 port3 out 10.10.2.2 -> 10.10.1.2: icmp: echo request
2023-04-18 15:18:09.204736 port3 in 10.10.1.2 -> 10.10.2.2: icmp: echo reply
2023-04-18 15:18:09.204749 VPN-to-Remote out 10.10.1.2 -> 10.10.2.2: icmp: echo reply
2023-04-18 15:18:10.208678 VPN-to-Remote in 10.10.2.2 -> 10.10.1.2: icmp: echo request
2023-04-18 15:18:10.208715 port3 out 10.10.2.2 -> 10.10.1.2: icmp: echo request
2023-04-18 15:18:10.209058 port3 in 10.10.1.2 -> 10.10.2.2: icmp: echo reply
2023-04-18 15:18:10.209069 VPN-to-Remote out 10.10.1.2 -> 10.10.2.2: icmp: echo reply
2023-04-18 15:18:11.212295 VPN-to-Remote in 10.10.2.2 -> 10.10.1.2: icmp: echo request
2023-04-18 15:18:11.212330 port3 out 10.10.2.2 -> 10.10.1.2: icmp: echo request
2023-04-18 15:18:11.212521 port3 in 10.10.1.2 -> 10.10.2.2: icmp: echo reply
2023-04-18 15:18:11.212534 VPN-to-Remote out 10.10.1.2 -> 10.10.2.2: icmp: echo reply
说明
关于 sniffer 抓 VPN 业务和 ESP 的包:
抓取 IPsec VPN 的 IKE 协商包:
diagnose sniffer packet any "host 101.1.1.1 and (port 500 or port 4500)" 4抓取 IPsec VPN 的 ESP 加密数据包:
diagnose sniffer packet any "host 101.1.1.1 and esp" 4抓取 IPsec VPN 的明文业务数据包:
diagnose sniffer packet any "host 192.168.112.100 and icmp" 4注意:由于硬件设备存在 IPsec VPN 芯片加速,因此可能数据包会抓不完全,主要指“ESP 数据和明文业务数据”抓不全,因此有时候需要将 VPN 隧道的 NP 加速关闭:
FortiGate # config vpn ipsec phase1-interface
FortiGate (phase1-interface) # edit BJ-OSPF-TO-SH
FortiGate (BJ-OSPF-TO-SH) # set npu-offload disable
FortiGate (BJ-OSPF-TO-SH) # end
Check Point 防火墙 IPsec VPN Debug 请参考:https://sc1.checkpoint.com/documents/R81/WebAdminGuides/EN/CP_R81_SitetoSiteVPN_AdminGuide/Topics-VPNSG/CLI/vpn-debug.htm 。
vpn debug
      on [<Debug_Topic>=<Debug_Level>]
      off
      ikeon [-s <Size_in_MB>]
      ikeoff
      trunc [<Debug_Topic>=<Debug_Level>]
      truncon [<Debug_Topic>=<Debug_Level>]
      truncoff
      timeon [<Seconds>]
      timeoff
      ikefail [-s <Size_in_MB>]
      mon
      moff
      say ["String"]
      tunnel [<Level>]