SNMP 的 HA 独立管理
SNMP 的 HA 独立管理
需求
在 HA 环境下配置 FortiGate 的 SNMP,并且通过 HA 成员的独立管理接口进行 SNMP 操作。
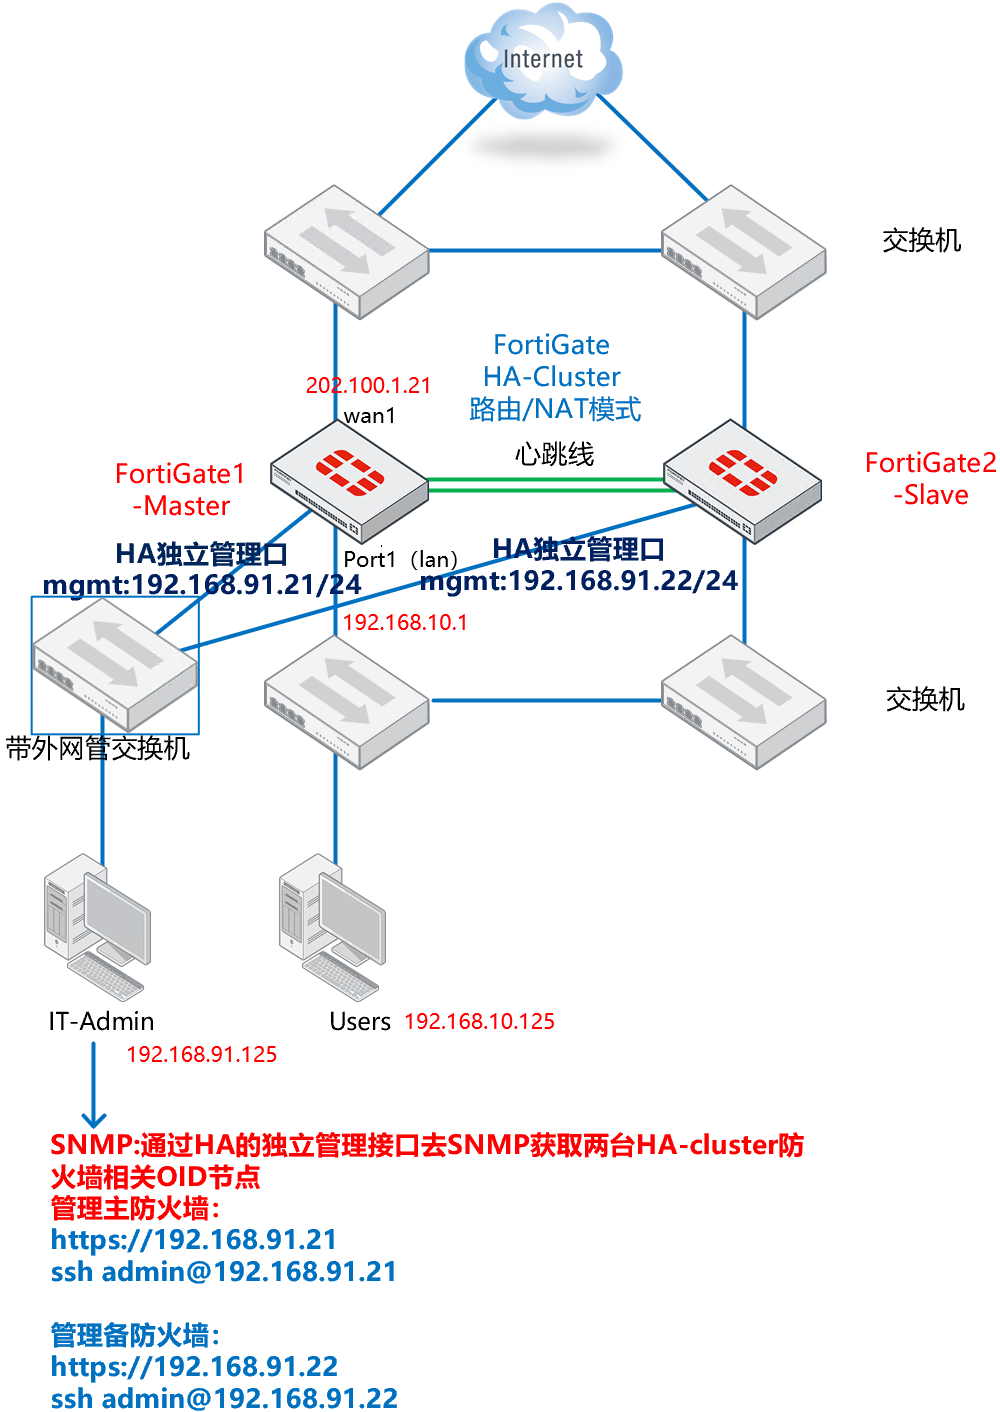
组网拓扑
操作步骤
重要
HA 独立管理口的配置,请参考:HA 双机热备 → HA-Cluster 的网管 → HA 集群带外独立管理 - 独立管理接口章节,使用的同样的一个拓扑图。本章节将关注点放置于如何配置和使用 SNMP 上。
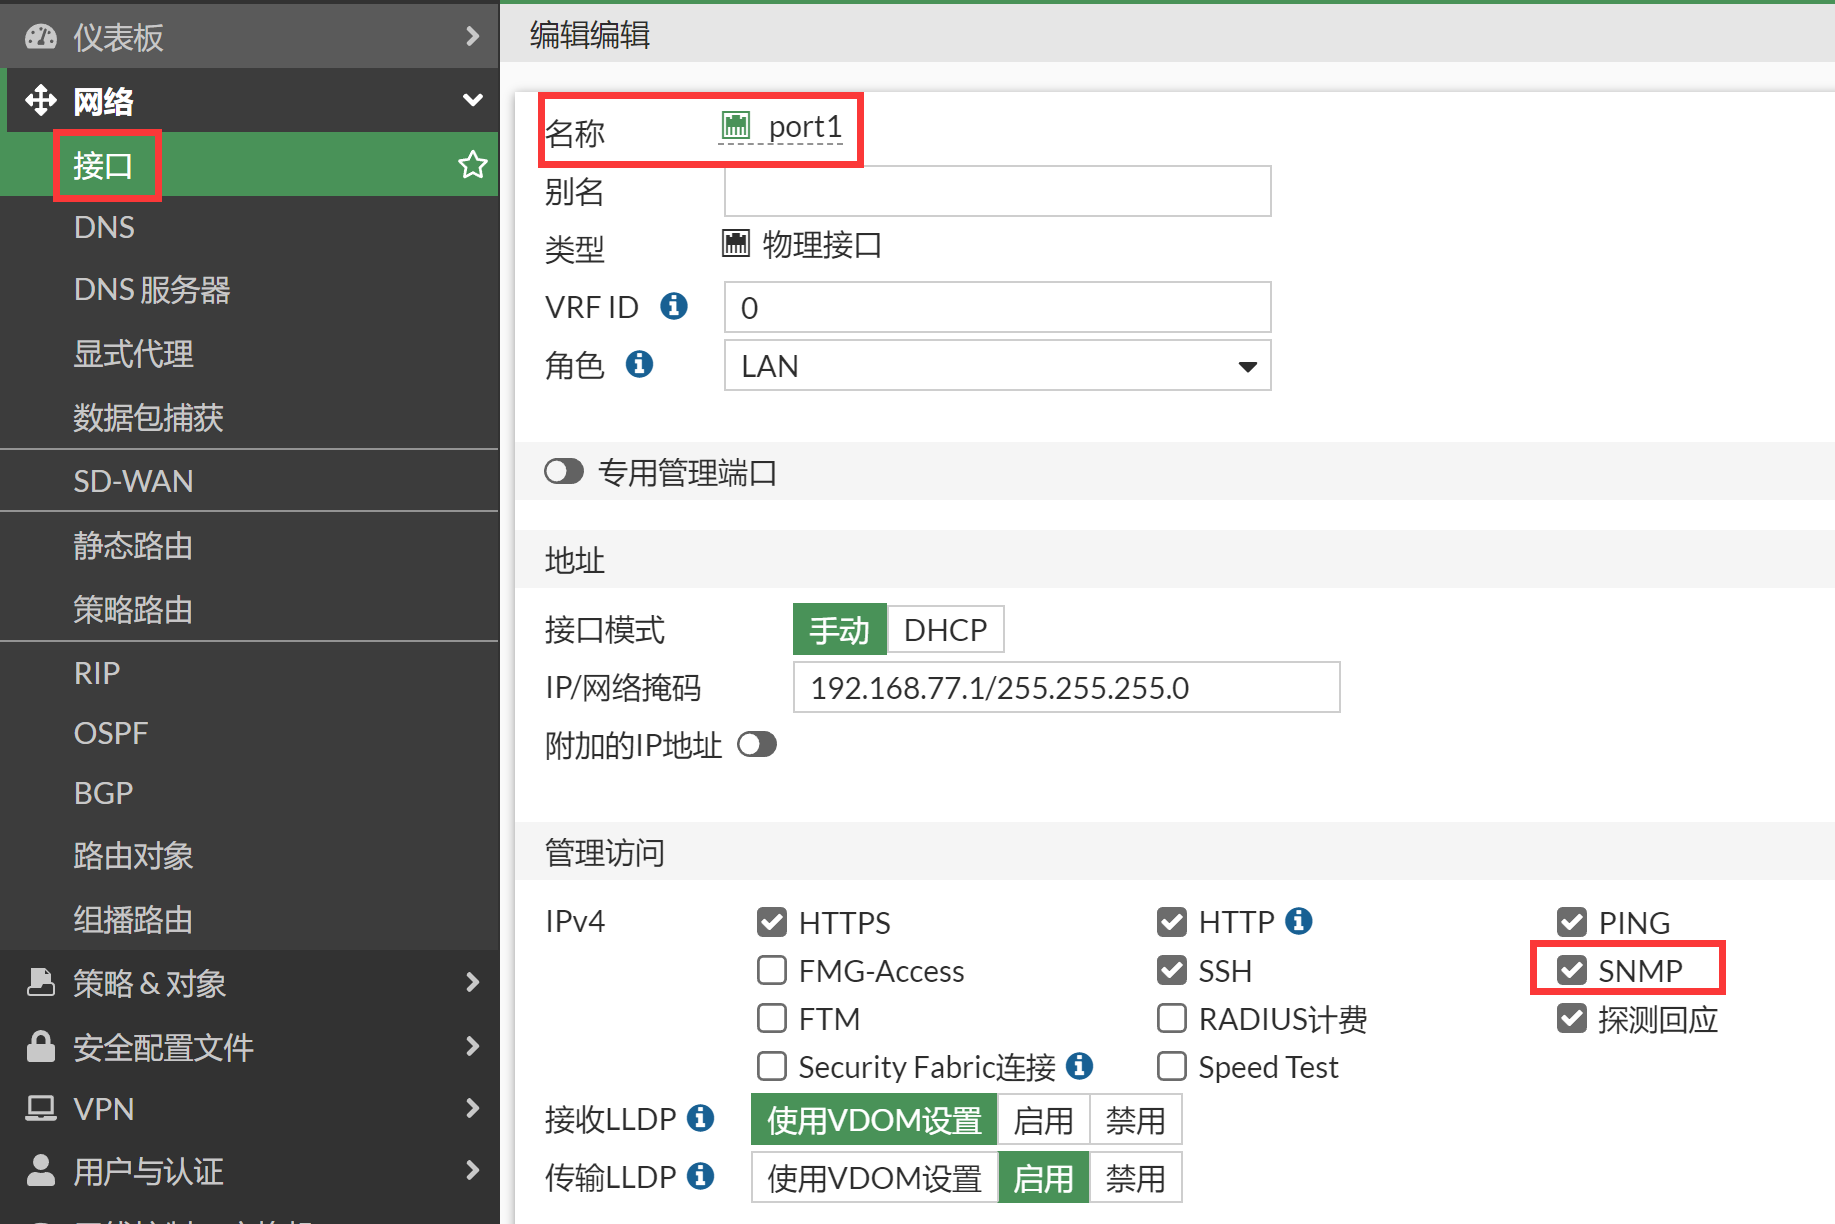
在 HA 独立管理接口上开启 SNMP 的允许访问(包括主防火墙的 HA 独立管理口 port1 和备防火墙的 HA 独立管理口 port1)。
开启 SNMP 的总开关。
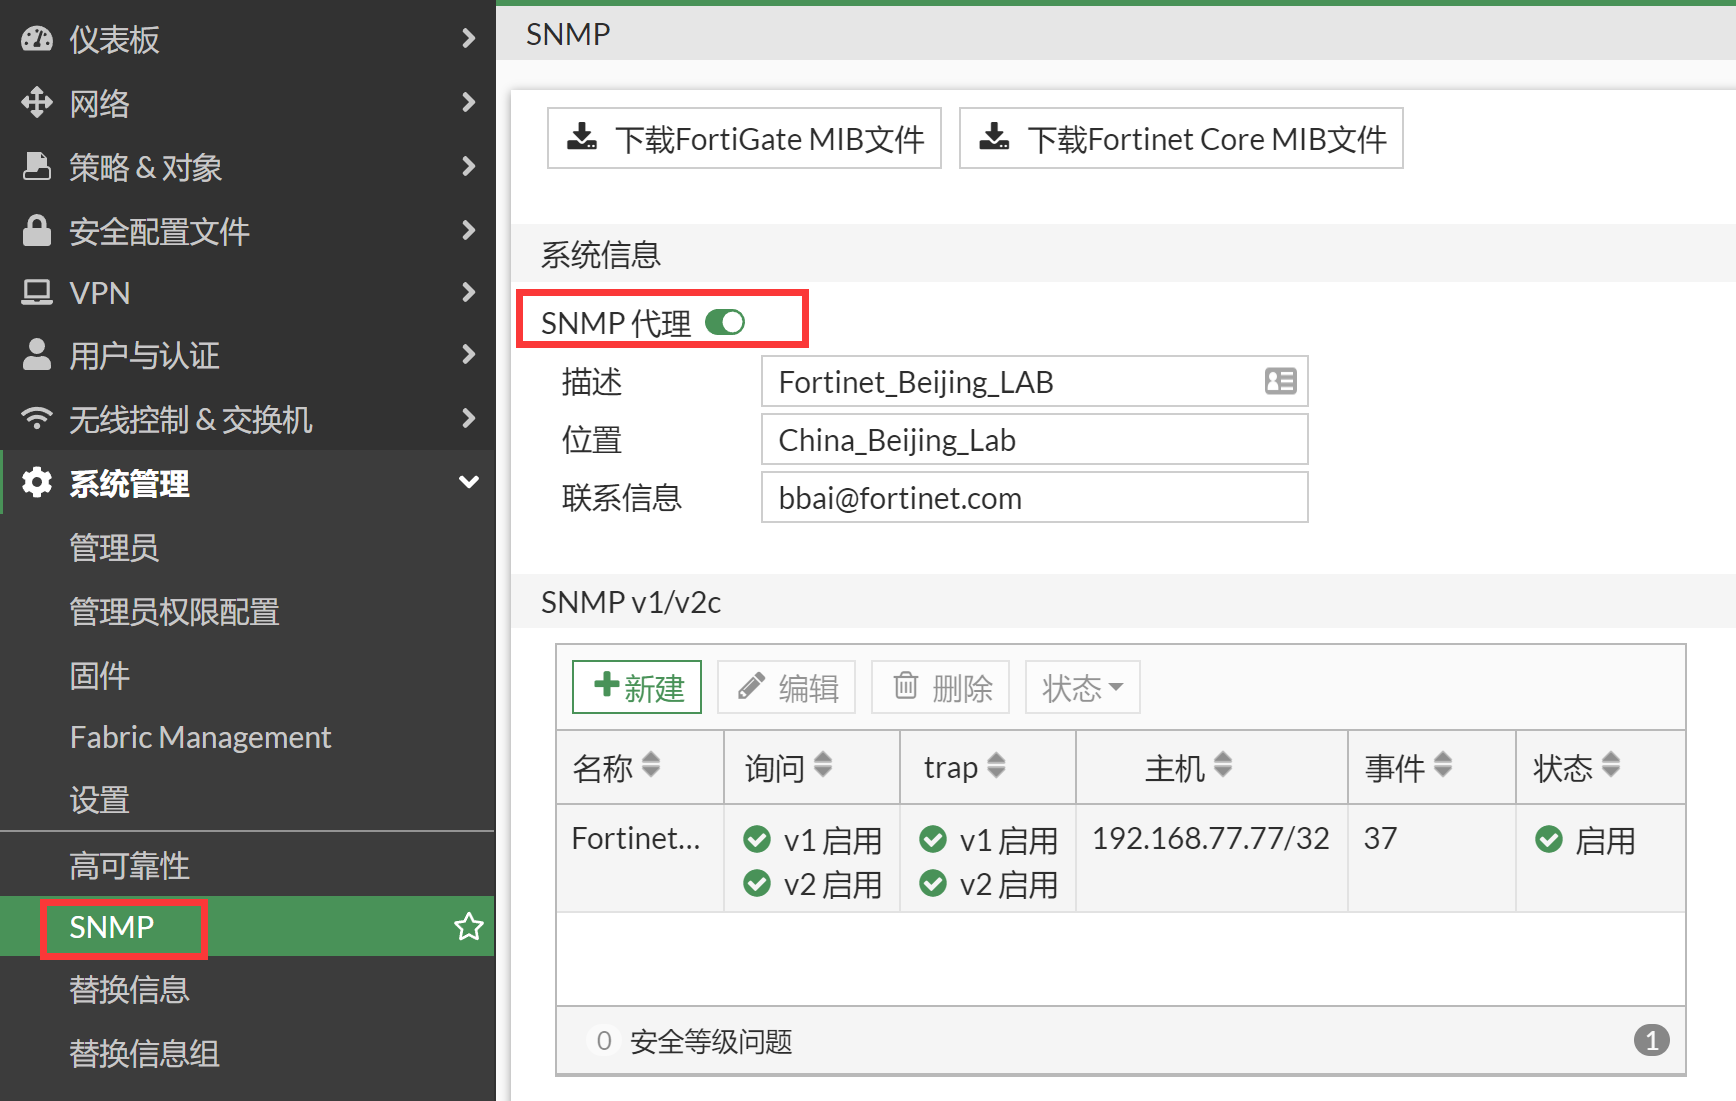
配置 SNMP v2 的属性,比如配置 SNMPv2 的 SNMP 属性为 Fortinet123#,建议不要使用通用的 public,容易被探测和攻击。需要添加 SNMP 客户端的主机 IP(192.168.77.77)的 SNMP 权限,把主机的 IP 地址(192.168.77.77)添加到 SNMPv2 的配置里面。

配置 SNMPv3,配置 SNMPv3 的用户名为 fortinet,认证算法选择 SHA1,密码为 forti3389,加密算法选择为 AES,密码为 forti5566。需要添加 SNMP 客户端的主机 IP(192.168.77.77)的 SNMP 权限,把主机的 IP 地址(192.168.77.77)添加到 SNMPv2 的配置里面。

这个时候去测试 SNMP 会发现 SNMP 是无法成功获取到的。
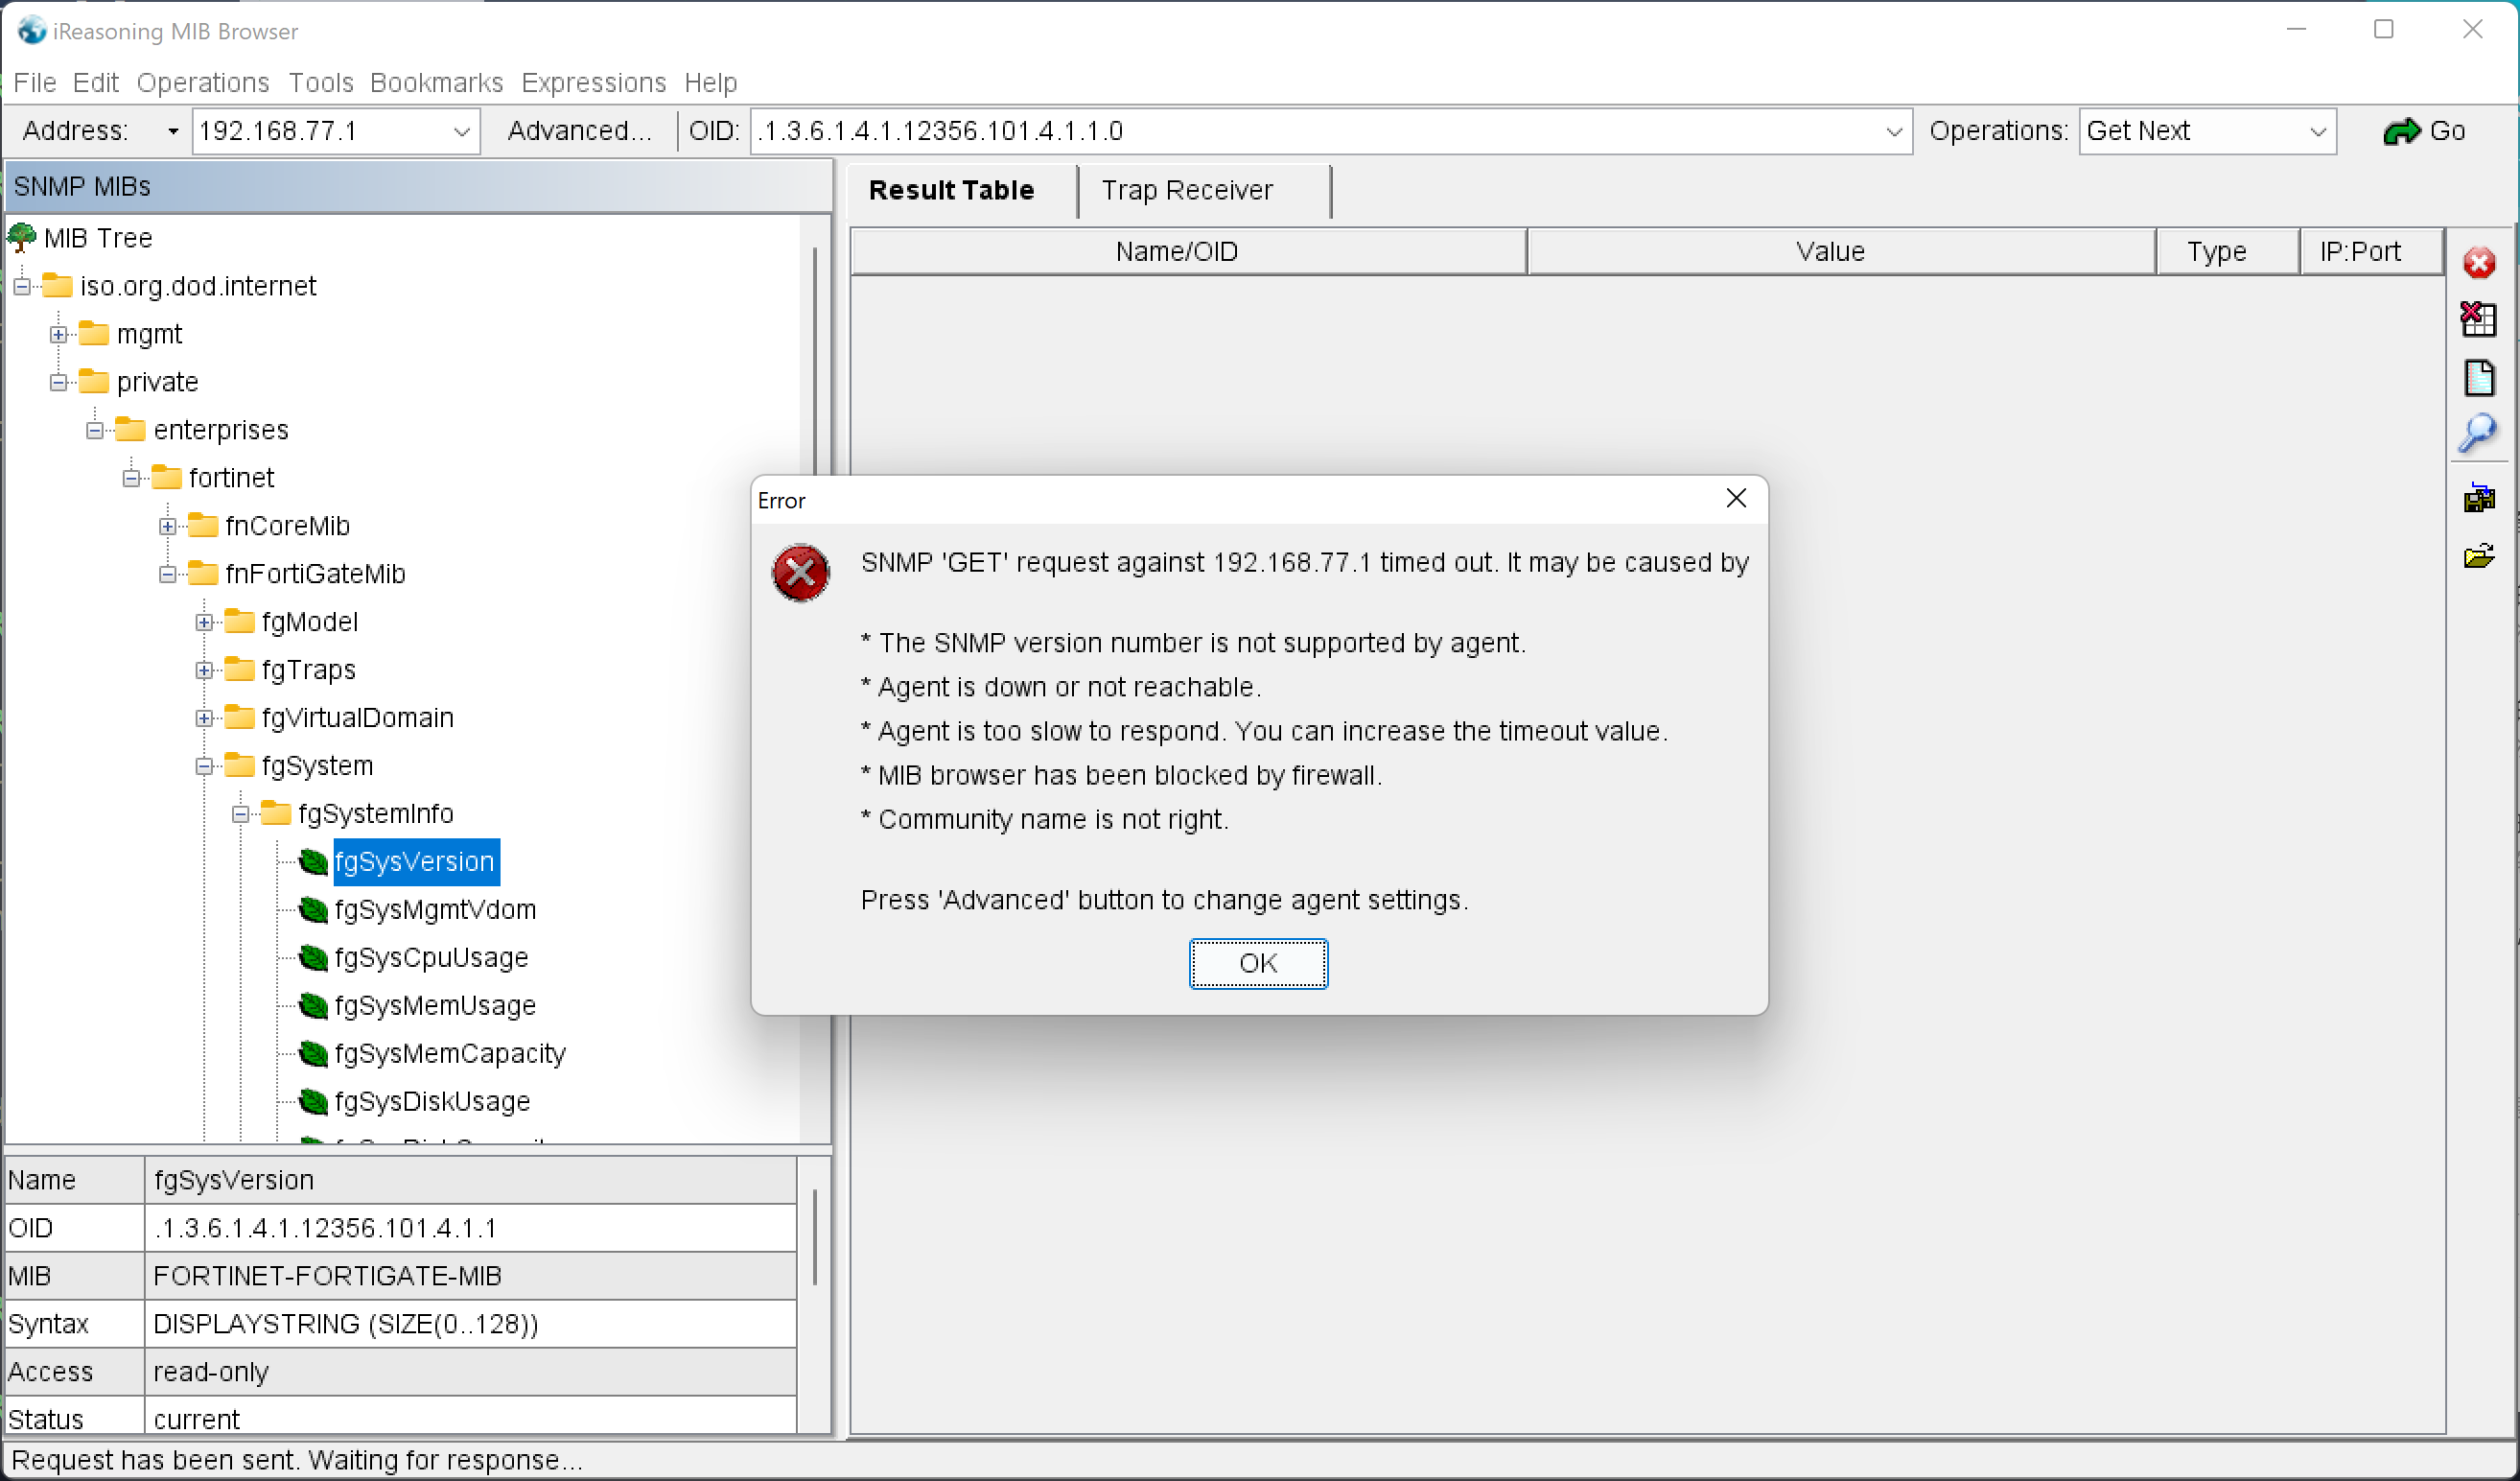
在 FortiGate 上进行抓包,可以看到 SNMP 查询没有任何回应,debug flow 显示 SNMP 请求在 vd-vsys_hamgmt 里面被丢弃的。
FGT1-MASTER # diagnose sniffer packet any "host 192.168.77.77 and port 161" 4
Using Original Sniffing Mode
interfaces=[any]
filters=[host 192.168.77.77 and port 161]
7.576093 port1 in 192.168.77.77.53750 -> 192.168.77.1.161: udp 53
7.576474 port1 in 192.168.77.77.53750 -> 192.168.77.1.161: udp 53
15.795977 port1 in 192.168.77.77.53751 -> 192.168.77.1.161: udp 53
15.796132 port1 in 192.168.77.77.53751 -> 192.168.77.1.161: udp 53

FGT1-MASTER # diagnose debug flow filter port 161
FGT1-MASTER # diagnose debug flow filter addr 192.168.77.77
FGT1-MASTER # diagnose debug flow show function-name enable
show function name
FGT1-MASTER # diagnose debug flow trace start 10
FGT1-MASTER # diagnose debug enable
FGT1-MASTER # id=20085 trace_id=1 func=print_pkt_detail line=5863 msg="vd-vsys_hamgmt:0 received a packet(proto=17, 192.168.77.77:53831->192.168.77.1:161) tun_id=0.0.0.0 from port1. "
id=20085 trace_id=1 func=init_ip_session_common line=6042 msg="allocate a new session-00014576, tun_id=0.0.0.0"
id=20085 trace_id=1 func=vf_ip_route_input_common line=2605 msg="find a route: flag=84000000 gw-192.168.77.1 via vsys_hamgmt"
id=20085 trace_id=2 func=print_pkt_detail line=5863 msg="vd-vsys_hamgmt:0 received a packet(proto=17, 192.168.77.77:53831->192.168.77.1:161) tun_id=0.0.0.0 from port1. "
id=20085 trace_id=2 func=resolve_ip_tuple_fast line=5949 msg="Find an existing session, id-00014576, original direction"
查看 SNMP 的 debug 信息,显示无法在 vsys_hamgmt VDOM 下查找到对应的 community。
FGT1-MASTER # diagnose debug application snmpd -1
Debug messages will be on for 28 minutes.
FGT1-MASTER # diagnose debug enable
FGT1-MASTER # snmpd: <msg> 53 bytes 192.168.77.77:34002 -> 192.168.77.1/192.168.77.1:161 (itf 3.3)
snmpd: checking if community "Fortinet123#" is valid
snmpd: updating cache: vdom_idx_map_cache
snmpd: updating vdom idx mapping
snmpd: Creating vdom_idx_cache for root
snmpd: Vdom created kernel-index=0, snmp-index=1, name=root
snmpd: cannot locate vdom with name vsys_hamgmt
snmpd: checking against community "Fortinet123#"
snmpd: request 2(vsys_hamgmt)/3/192.168.77.77 != comm 1/0/192.168.77.77/255.255.255.255
snmpd: host or intf mismatch
snmpd: checking against community "FortiManager"
snmpd: full name mismatch
snmpd: failed to match community "Fortinet123#"
snmpd: </msg> 0
重要
SNMP 获取失败的原因是什么呢?
原因就是因为存在 HA 独立管理口,HA 独立管理口其实认为是一个独立的 VDOM,vsys_hamgmt,默认的 SNMP 处理是 root 这个 VDOM 进行处理的,而不是 vsys_hamgmt,因此 SNMP 请求 HA 的独立管理口是不行的。
这个时候如果是请求的是 root vdom 里面的业务接口,非 HA 独立管理口的话,就没啥问题的,此问题仅仅出现在请求 HA 独立管理口的 SNMP 的情况下。
因此为了满足这种场景下的 SNMP 使用需求,在 SNMP 的配置下有一个命令来适配 HA 独立管理口的使用,具体可以参考 Fortinet Community 文档的说明:
8.,这样 SNMP 才可以通过 HA 独立管理口获取到数据(只支持命令行配置)。以下分别是 SNMPv2 和 SNMPv3 下的配置方法。(如果只是需要 SNMP 相关流量从每台 HA 成员的独立管理口收发,则不需要在 config system ha 下开启 ha-direct)
config system snmp community
    edit 1
        set name "Fortinet123#"
        config hosts
            edit 1
                set ip 192.168.77.77 255.255.255.255
                set ha-direct enable
            next
    next
end
config system snmp user
edit "fortinet"
set notify-hosts 192.168.77.77
set ha-direct enable
next
end重要
开启 SNMP 配置下的“HA-direct”后,主机和备机的 SNMP Trap 报文也会通过各自的独立管理口分别发出,而不是通过主机的业务口发出。
结果验证
Net-SNMP SNMPv2 结果验证。
[Tue Aug 11 15:28:55 root@centos7~#snmpwalk -v2c -c Fortinet123# 192.168.77.1 .1.3.6.1.4.1.12356.101.4.1.1.0  // 主防火墙结果验证
SNMPv2-SMI::enterprises.12356.101.4.1.1.0 = STRING: "v7.0.6,build0366,220606 (GA.F)"
[Tue Aug 11 15:28:57 root@centos7~#snmpwalk -v2c -c Fortinet123# 192.168.77.1 1.3.6.1.2.1.1.3.0
DISMAN-EVENT-MIB::sysUpTimeInstance = Timeticks: (94369138) 10 days, 22:08:11.38
[Tue Aug 11 15:29:02 root@centos7~#snmpwalk -v2c -c Fortinet123# 192.168.77.1 .1.3.6.1.4.1.12356.100.1.1.1.0
SNMPv2-SMI::enterprises.12356.100.1.1.1.0 = STRING: "FGVM08TM22000173"
[Tue Aug 11 15:29:15 root@centos7~#snmpwalk -v2c -c Fortinet123# 192.168.77.2 .1.3.6.1.4.1.12356.101.4.1.1.0  // 备防火墙结果验证
SNMPv2-SMI::enterprises.12356.101.4.1.1.0 = STRING: "v7.0.6,build0366,220606 (GA.F)"
[Tue Aug 11 15:29:17 root@centos7~#snmpwalk -v2c -c Fortinet123# 192.168.77.2 1.3.6.1.2.1.1.3.0
DISMAN-EVENT-MIB::sysUpTimeInstance = Timeticks: (93667021) 10 days, 20:11:10.21
[Tue Aug 11 15:29:21 root@centos7~#snmpwalk -v2c -c Fortinet123# 192.168.77.2 .1.3.6.1.4.1.12356.100.1.1.1.0
SNMPv2-SMI::enterprises.12356.100.1.1.1.0 = STRING: "FGVM08TM22000174"
Net-SNMP SNMP V3 结果验证。
[Thu Aug 06 12:01:01 root@centos7~# net-snmp-config --create-snmpv3-user -ro -a SHA -A forti3389 -x AES -X forti5566 fortinet
adding the following line to /var/lib/net-snmp/snmpd.conf:
   createUser fortinet SHA "forti3389" AES forti5566
adding the following line to /etc/snmp/snmpd.conf:
   rouser fortinet
[Thu Aug 06 12:01:10 root@centos7~#chkconfig snmpd on
Note: Forwarding request to 'systemctl enable snmpd.service'.
Created symlink from /etc/systemd/system/multi-user.target.wants/snmpd.service to /usr/lib/systemd/system/snmpd.service.
[Thu Aug 06 12:01:30 root@centos7~#service snmpd start
Starting snmpd (via systemctl):                            [  OK  ]
[Tue Aug 11 15:37:22 root@centos7~#snmpwalk -v3 -u fortinet -l authPriv -a SHA -A forti3389 -x AES -X forti5566 192.168.77.1 .1.3.6.1.4.1.12356.100.1.1.1.0 // 主防火墙
SNMPv2-SMI::enterprises.12356.100.1.1.1.0 = STRING: "FGVM08TM22000173"
[Tue Aug 11 15:37:23 root@centos7~#snmpwalk -v3 -u fortinet -l authPriv -a SHA -A forti3389 -x AES -X forti5566 192.168.77.2 .1.3.6.1.4.1.12356.100.1.1.1.0 // 备防火墙
SNMPv2-SMI::enterprises.12356.100.1.1.1.0 = STRING: "FGVM08TM22000174"
重要
Net-SNMP v3 参考链接:https://www.thegeekdiary.com/centos-rhel-6-install-and-configure-snmpv3/
SNMPv2 和 SNMPv3 的 SNMP 查询都正常,这个时候 SNMP 的查询就 OK 了,那么现在考虑另外一个问题,SNMP 的 Trap 是否也 OK 呢?我们抓包看一下 SNMP Trap 的情况,可以看到 SNMP Trap 仍然可以通过 HA 独立管理口发送,并不需要在 HA 下开启 ha-direct。
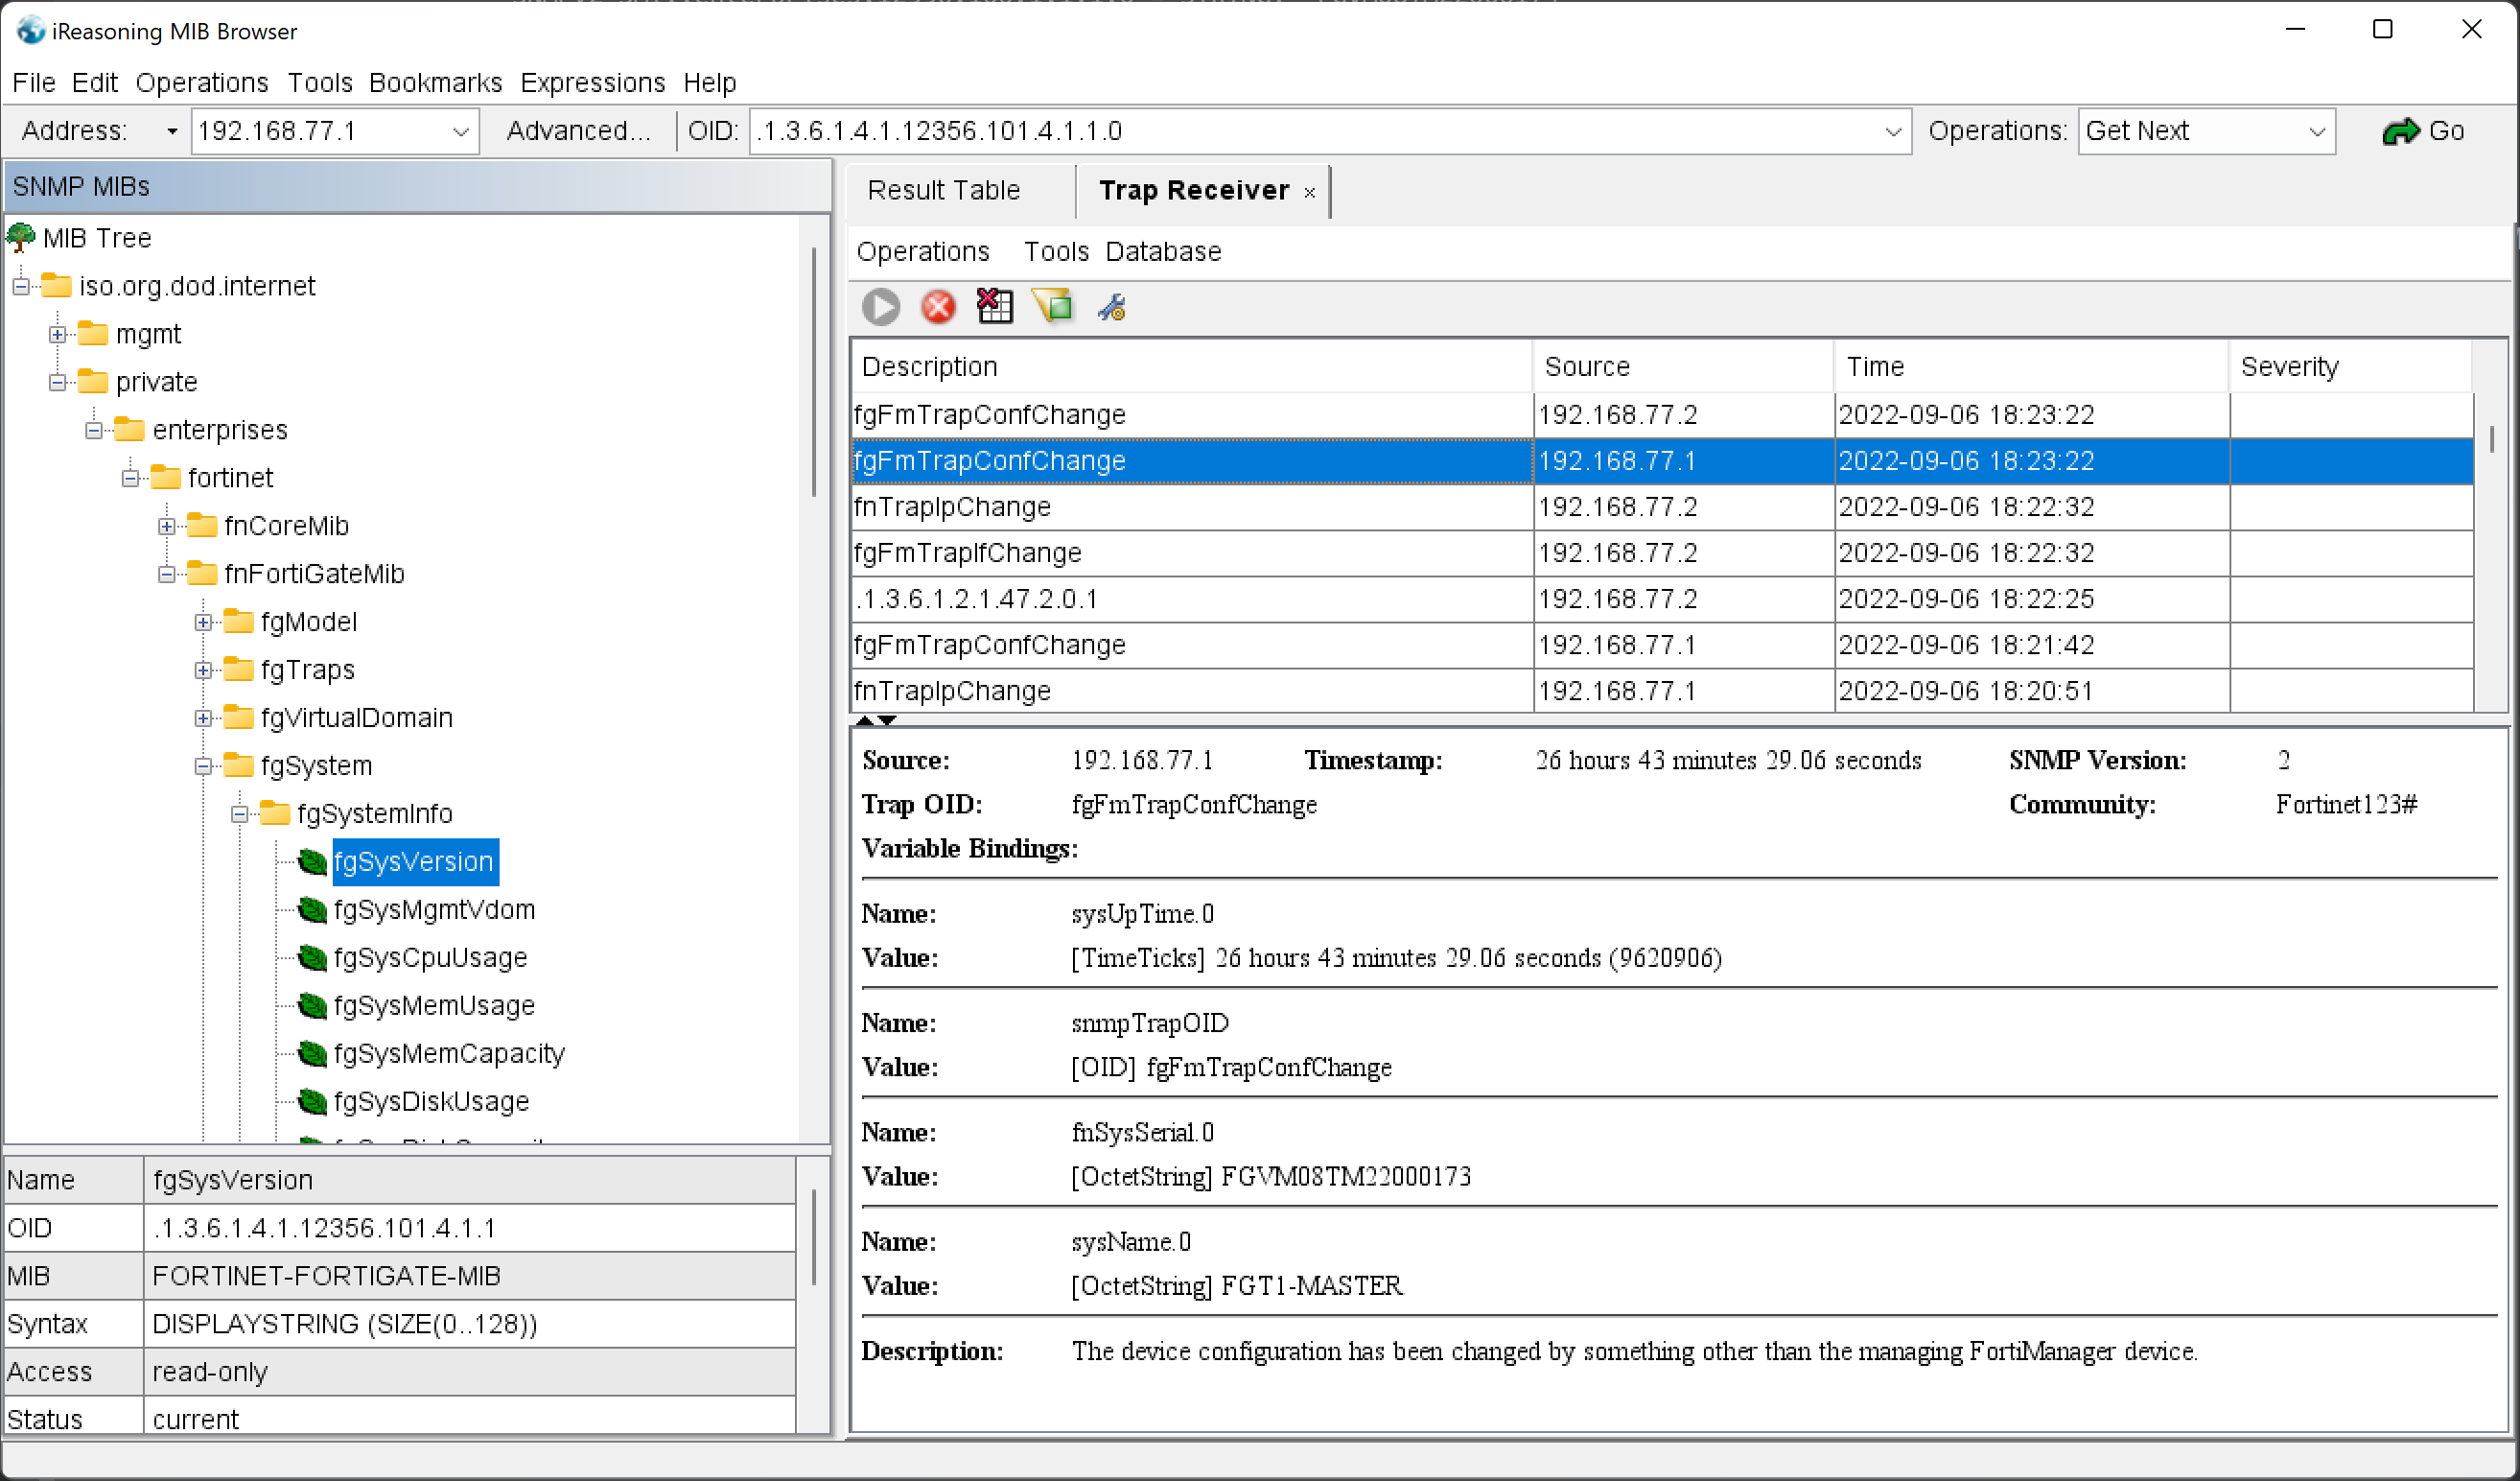
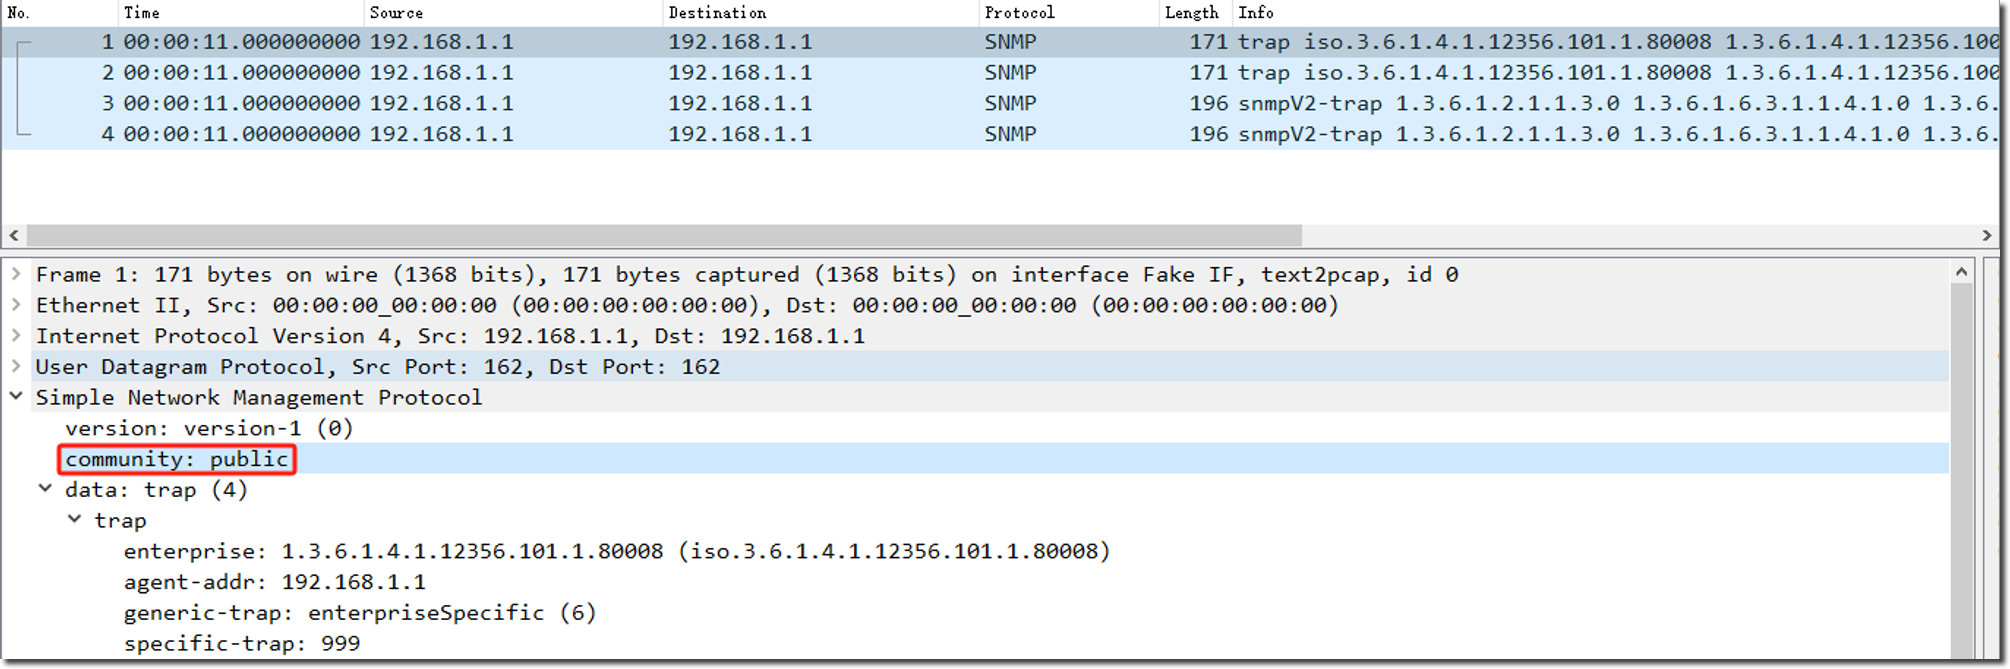
FGT2-SLAVE # diagnose sniffer packet any 'port 162' 4
Using Original Sniffing Mode
interfaces=[any]
filters=[port 162]
15.428042 port1 out 192.168.77.2.162 -> 192.168.77.77.162: udp 138
18.958515 port1 out 192.168.77.2.162 -> 192.168.77.77.162: udp 253
133.104369 port1 out 192.168.77.2.162 -> 192.168.77.77.162: udp 138
查看 IReasoning MIB Browser 上的 Trap Receiver,可以看到主机和备机分别发送的 SNMP Trap。
监控 BGP/OSPF 的注意事项
在 SNMP 启用 ha-direct 的情况下,查询 BGP/OSPF 相关 OID 时请使用“community-vdom”格式。例如,在 root VDOM 中 SNMP 配置的 community 为 public,查询 root VDOM 的 BGP/OSPF 相关 OID 需要使用 public-root 来作为 community(如果未开启 VDOM 功能,默认的 VDOM 就是 root)。
重要
- 未启用 SNMP 的 ha-direct,通过业务口查询 BGP/OSPF 相关 OID,直接使用配置的 community 即可。
- 此特性只适用于 FortiOS 7.2.11/7.4.8 之前版本,在 FortiOS 7.2.11/7.4.8 及以后版本中,只需要使用 community/user 格式,不能使用 user/community-vdom 格式。
config system snmp community
    edit 1
        set name "public"
        config hosts
            edit 1
                set ha-direct enable
            next
        end
    next
end

root@centos7~# snmpwalk -v 2c -c public-root 192.168.88.87 .1.3.6.1.2.1.15.3.1.2
SNMPv2-SMI::mib-2.15.3.1.2.192.168.90.247 = INTEGER: 6
SNMPv2-SMI::mib-2.15.3.1.2.192.168.168.130 = INTEGER: 1
SNMPv3 也要使用一样的格式,如下 FortiGate 配置的 SNMPv3 community 为 user1,查询 root VDOM 的 BGP/OSPF OID 需要使用 public-user1 来作为 community(如果未开启 VDOM 功能,默认的 VDOM 就是 root)。
config system snmp user
    edit "public"
        set ha-direct enable
        set security-level auth-priv
        set auth-pwd fortinet
        set priv-pwd fortinet
    next
end

root@centos7~# snmpwalk -v3 -u public-root -l authPriv -a sha -A fortinet -x aes -X fortinet 192.168.88.87 .1.3.6.1.2.1.15.3.1.2
SNMPv2-SMI::mib-2.15.3.1.2.192.168.90.247 = INTEGER: 6
SNMPv2-SMI::mib-2.15.3.1.2.192.168.168.130 = INTEGER: 1
针对 SNMP Trap,在 SNMP 启用 ha-direct 的情况下,FortiGate 主动发送的 BGP/OSPF 相关 Trap 报文中的 community 不会使用“community-vdom”格式,而是直接使用 community,如下报文所示。
这样 SNMP 分析软件(如 Zabbix、SolarWinds 等)使用“community-vdom”格式作为 community 时,会由于团体子不匹配而报错。
解决方法是在 FortiGate 上配置两个 Community,格式如下:
- 一个 Community 使用“community”格式(如 public),host-type 为 query,用于 OID 的读取。
- 另一个 Community 使用“community-vdom”格式(如 public-root),host-type 为 trap,用于发送 BGP/OSPF 相关 Trap。
- SNMP 分析软件配置的监控 Community 为“community-vdom”格式(如 public-root)。
config system snmp community
    edit 1
        set name "public"
        config hosts
            edit 1
                set ip 192.168.1.1 255.255.255.255
                set host-type query
            next
        end
    next
    edit 2
        set name "public-root"
        config hosts
            edit 1
                set ip 192.168.1.1 255.255.255.255
                set host-type trap
            next
        end
    next
end