独立管理 VDOM
独立管理 VDOM
网络需求
- 在 HA 集群中,所有集群成员的配置全部相同,通过 IP 只能管理到主设备,无法通过 IP 对每个 slave 设备进行单独的管理。同时为了业务的安全,需要将管理网络与业务网络独立开。包括独立管理,包括 syslog 日志、SNMP、Radius、TACACS + 等。
- DNS 和 FortiGuard 更新等流量默认还是会通过系统管理 VDOM(默认为 root,该默认配置与是否启用 HA、ha-direct、独立管理口无关)进行解析和更新的。
- 如果需要让 DNS、FortiGuard 更新流量也需要通过管理口进行处理,仅使用 HA 独立管理口是无法满足的,这就需要使用到独立管理 VDOM。
重要
该功能主要用于单独的 VDOM 进行 FortiGuard 更新、DNS 查询以及日志/认证/管理业务,HA 成员间独立管理 VDOM 内的配置是不同步的,如果 FortiGate 被 FortiManager 管理,请勿开启此功能,否则 HA 切换后可能导致 FortiManager 配置与 FortiGate 不一致。
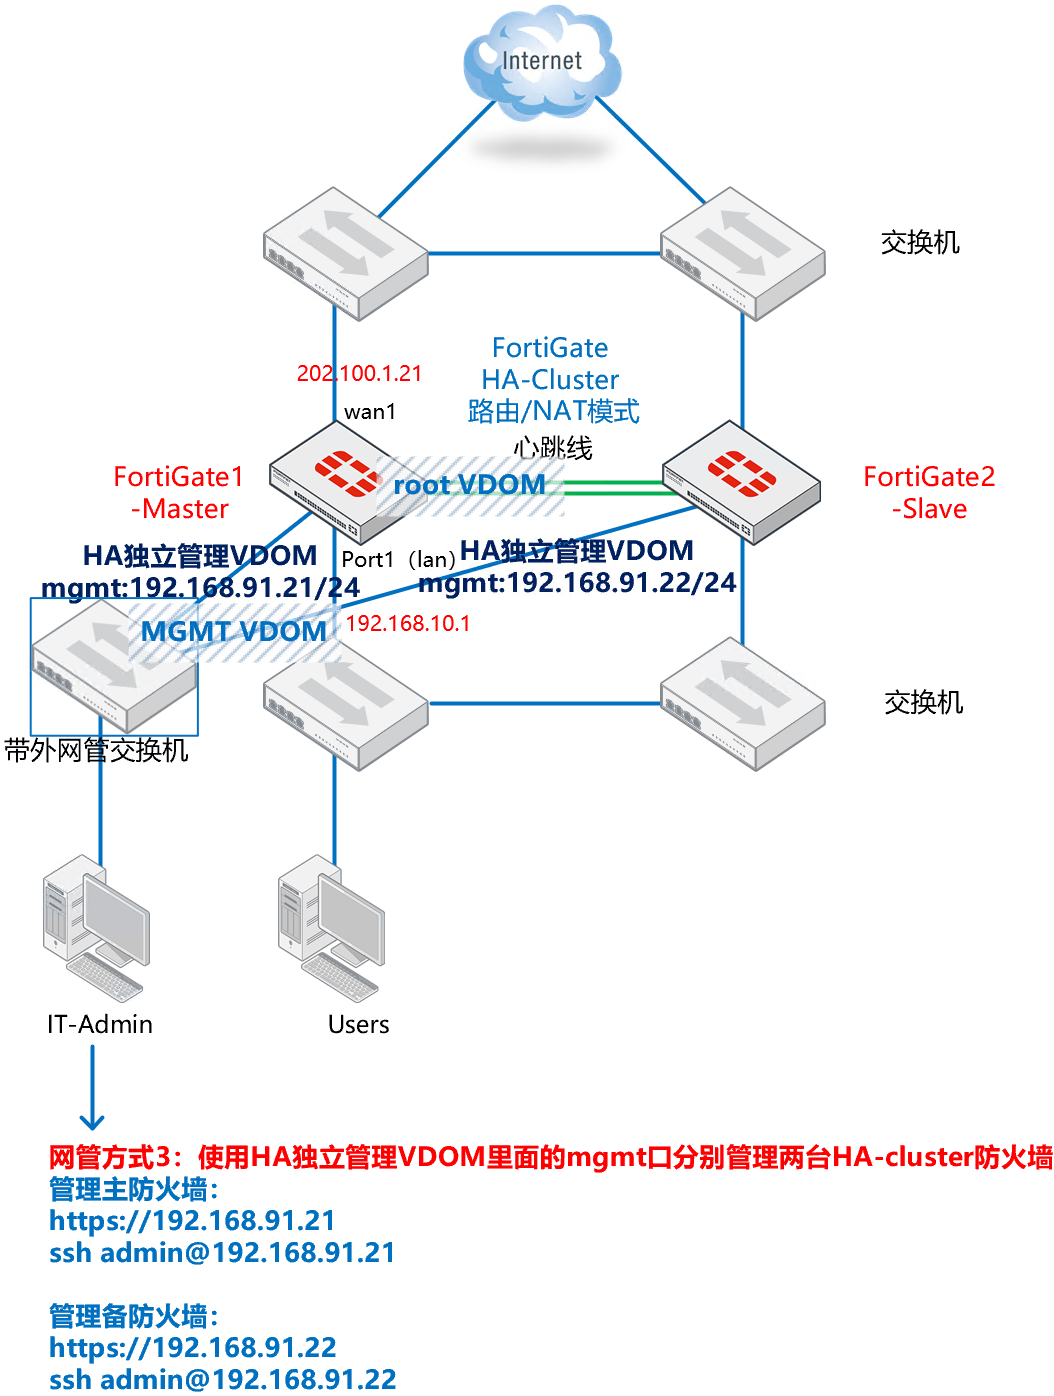
网络拓扑
配置要点
- 配置 HA 基础配置
- 配置基础 LAN/WAN 上网服务
- 配置 HA 独立 VDOM
- 配置防火墙的 SYSLOG、SNMP 和 FMG
配置步骤和结果验证
配置 HA 基础配置,初始化配置防火墙的时候可以通过 mgmt 口登陆到防火墙上,一般 mgmt 口的管理 IP 是 192.168.1.99,第一步可以通过此 IP 登陆防火墙(参考系统管理 → 管理方式 → Web 管理章节),或者通过 console 口管理防火墙(参考系统管理 → 管理方式 → Console 管理章节)。具体型号初始化如果网管和接口的网管 IP 信息等可参考 https://docs.fortinet.com/product/fortigate/hardware 或 https://docs.fortinet.com/document/fortigate/hardware/fortigate-quickstart-guide-high-end?model = all 。
按照以上方式登陆第一次开箱的防火墙。先登陆主防火墙,并配置进行 HA 的基础配置,然后登陆到备防火墙,配置备防火墙的 HA 基础配置。
分别配置主防火墙和备防火墙的 HA,主防火墙优先级调整为 150,备防火墙的优先级保持默认的 120,配置 HA-cluster 组名字和密码,监控业务接口 wan1 和 port1,使用 HA1 和 HA2 接口将二者互联。
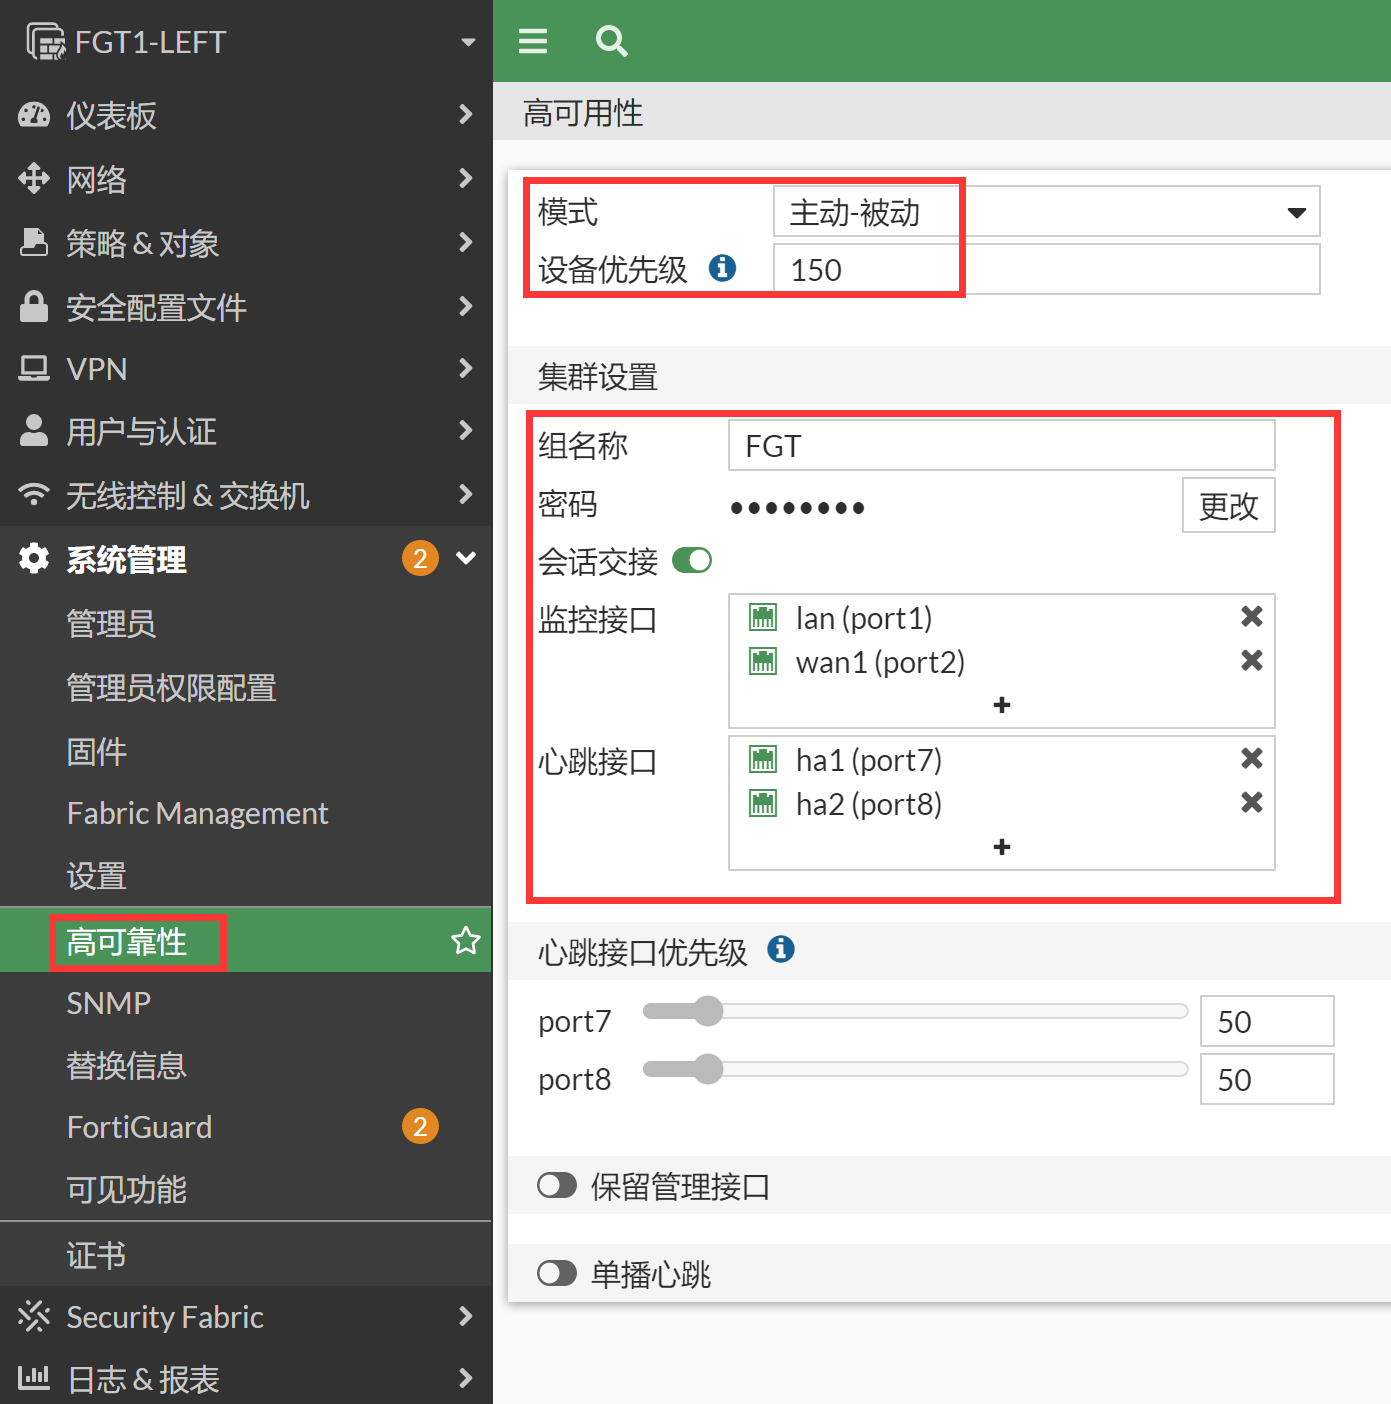
config system ha
    set group-name "FGT"
    set mode a-p
    set password ENC XU4Yv532eMH20TXkbxDMQWRNs+ChZrIVXcotCFVP2C86QBl2zhznTNU+0PDKw5Vlvtm6B+NCZ+f+1EiT3MsUteDHW82Aten6q+Yu6zAT5NuXYYIKnVpG=
    set hbdev "port7" 50 "port8" 50
    set session-pickup enable
    set override disable
    set priority 150
    set monitor "port1" "port2"
end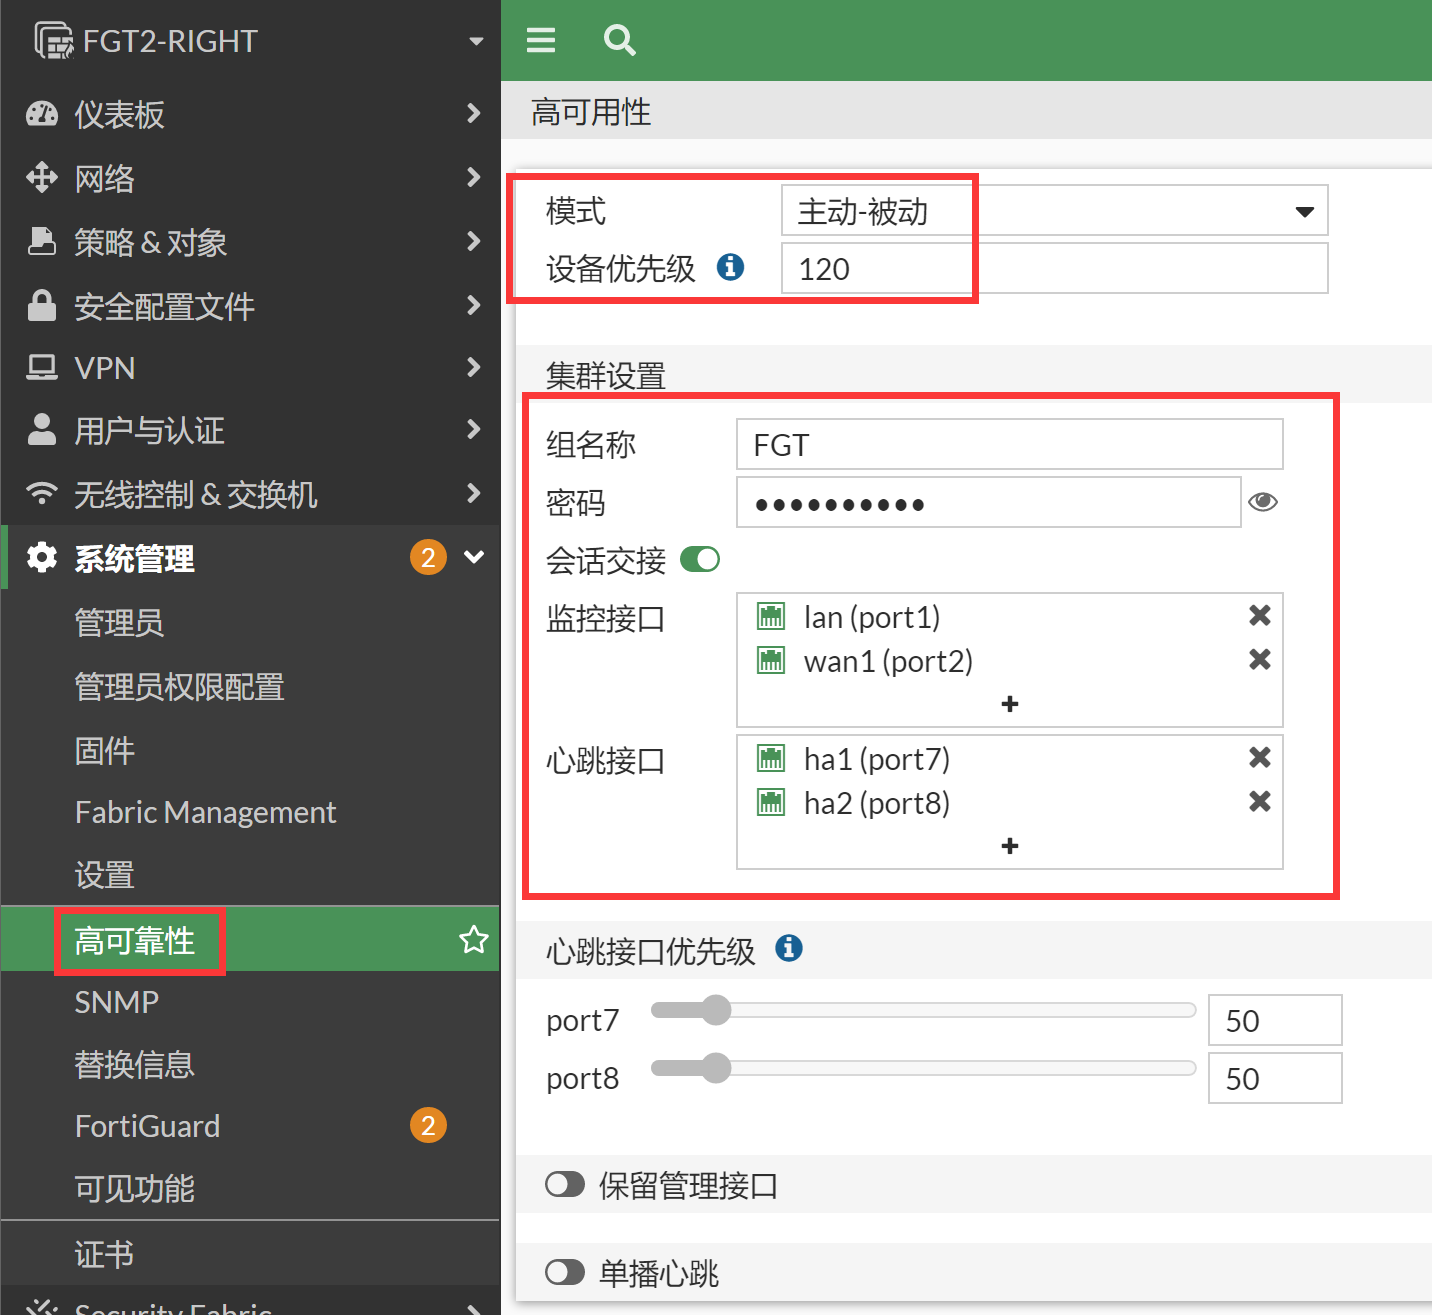
config system ha
    set group-name "FGT"
    set mode a-p
    set password ENC HzpTLoO69D1nrZ9QZbKFDbuUmCefmDRbZqTvgSseAgh2zU8JOHq1bthC750a+p5S/rkfRSROmhVMqOKRbBZkir3C8VWW9l+h7jl7Xp4N5sdA1CmDSUzX=
    set hbdev "port7" 50 "port8" 50
    set session-pickup enable
    set override disable
    set priority 120
    set monitor "port1" "port2"
end
双方的 HA 配置完毕之后将 ha1 和 ha2 线相互直连,将会进行 HA 的选举,此时优先级 150 高的 FGT 将成为主防火墙,优先级低的 120 的 FGT 将成为备防火墙。然后备防火墙的配置将会和主防火墙进行同步,备防火墙所有配置和主防火墙一致,此时备防火墙也将不再可以 WEB/SSH 登录,仅仅可以 Console 登录。后续所有的操作和配置都在主防火墙上的 GUI、SSH 或 Console 完成。
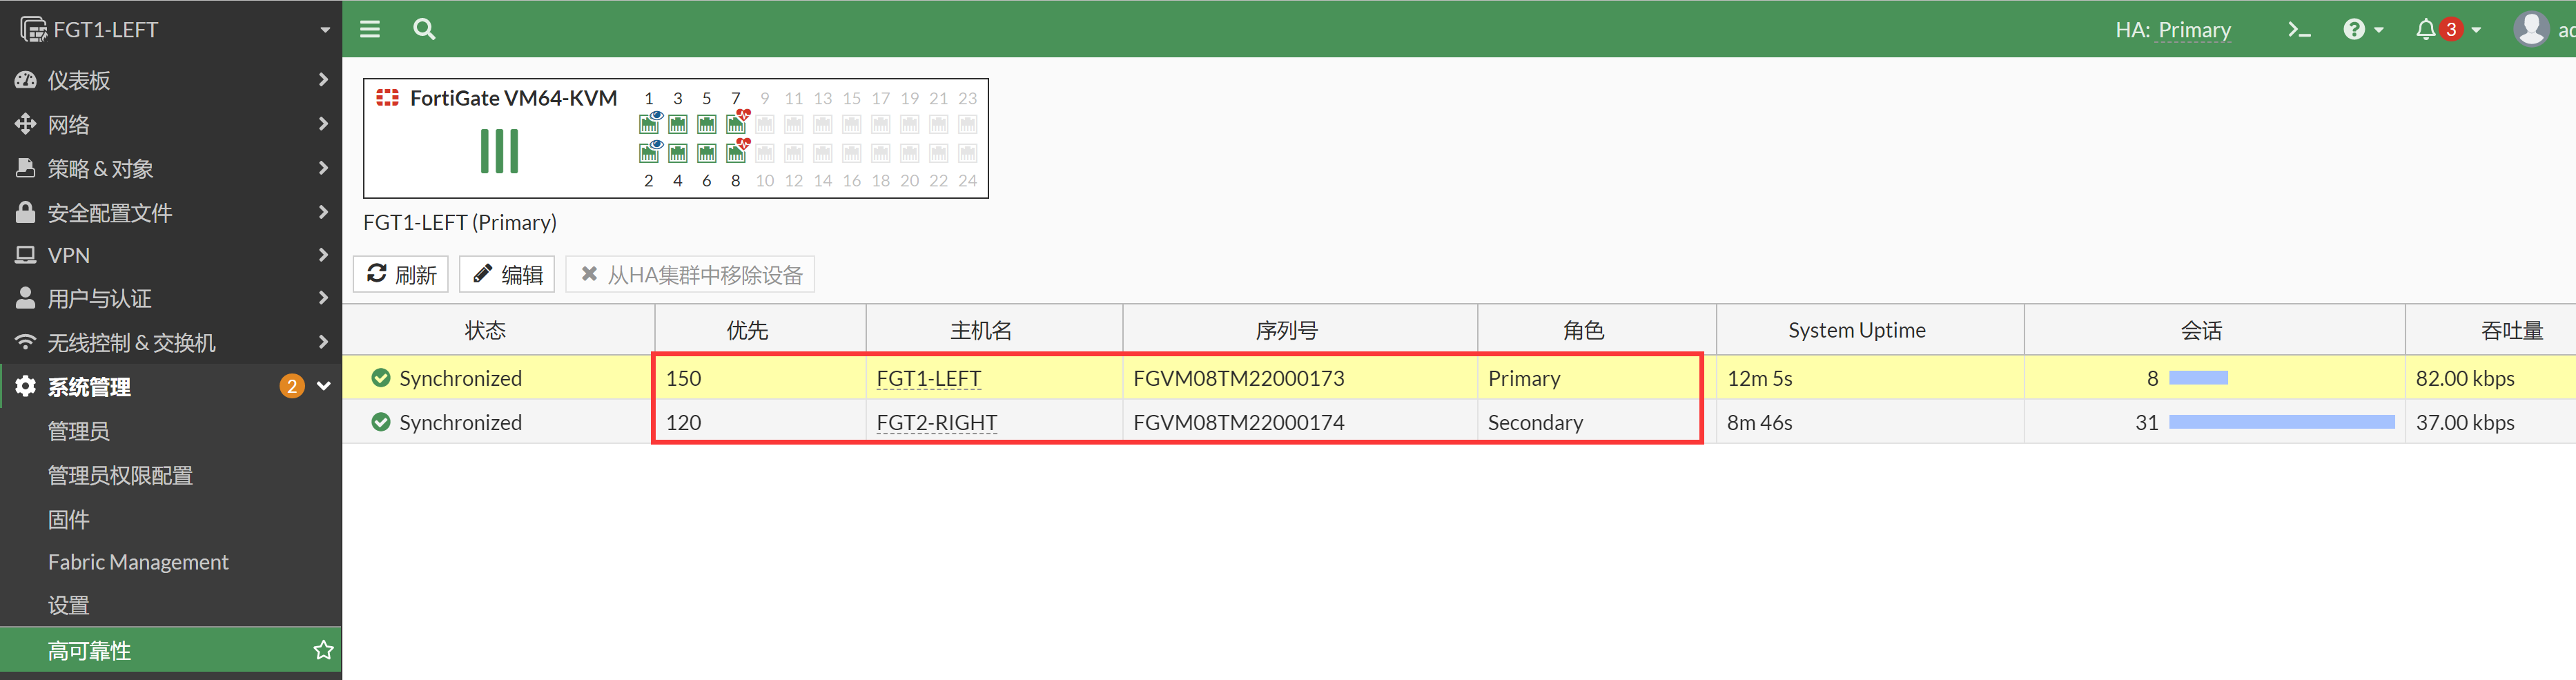
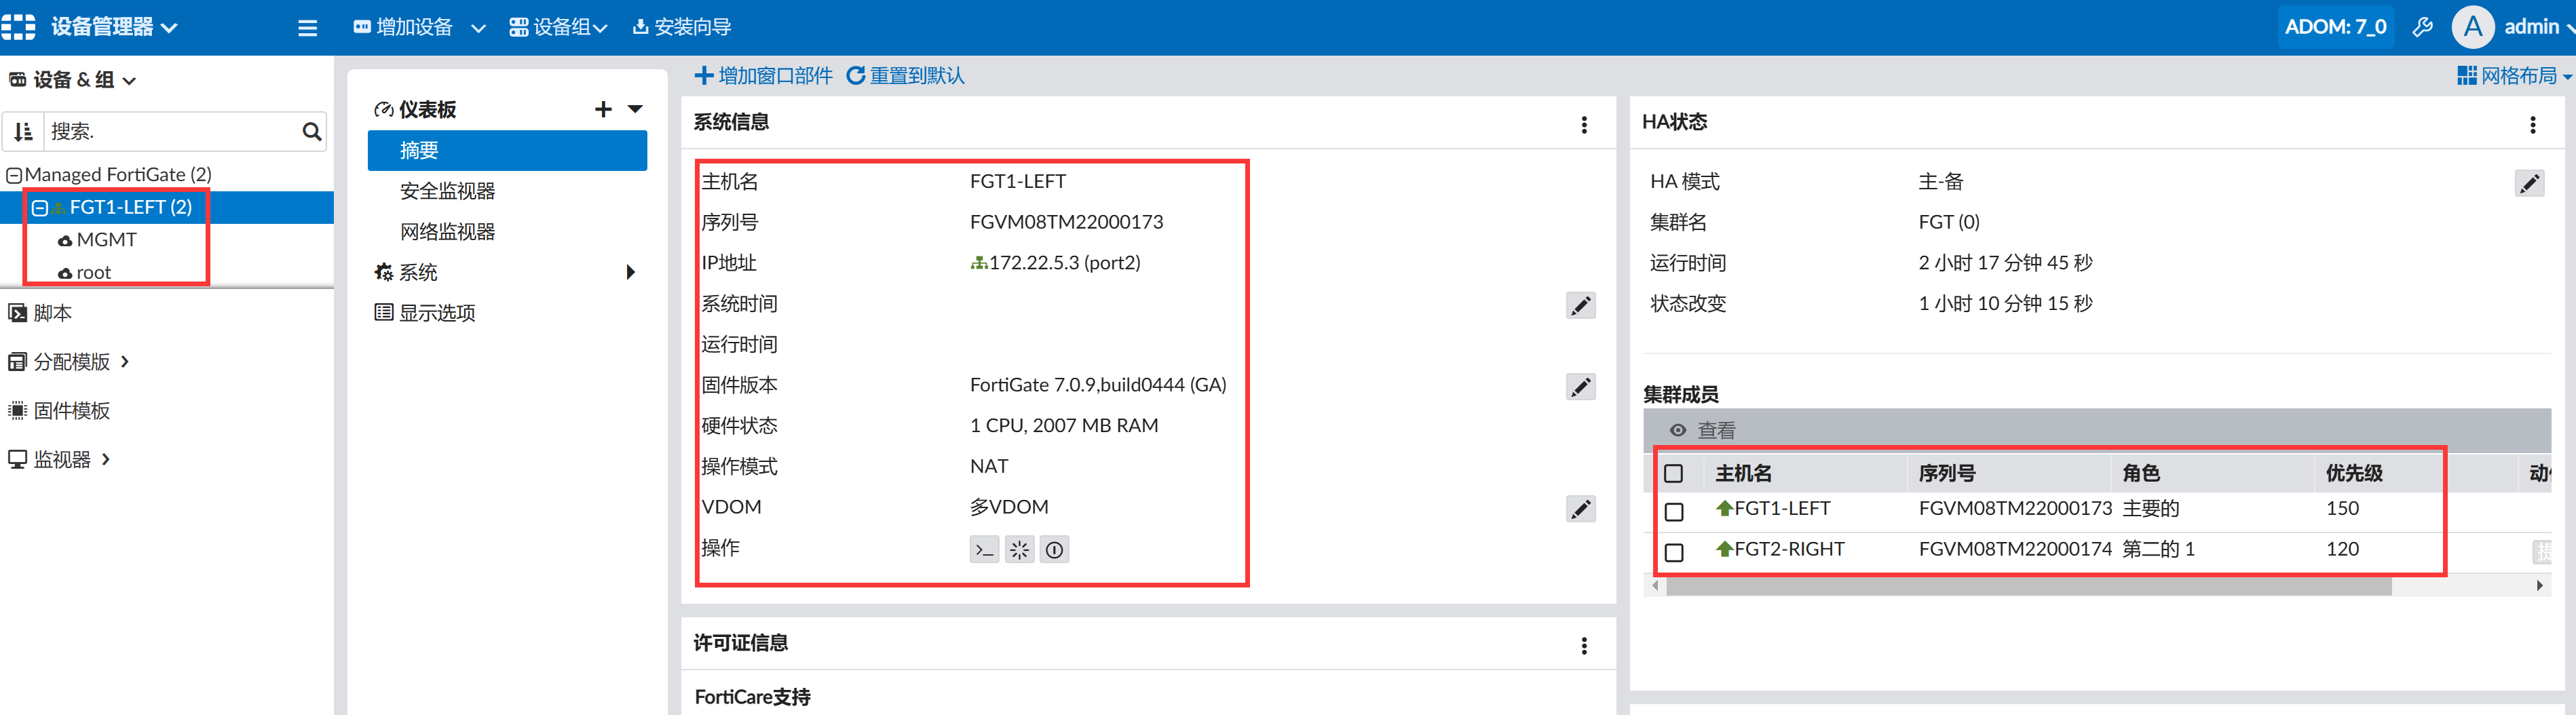
选举结果如下,FGT1-LEFT 成为主设备。
FGT1-LEFT # diagnose sys ha status
HA information
Statistics
        traffic.local = s:0 p:22783 b:12890083
        traffic.total = s:0 p:22793 b:12890691
        activity.ha_id_changes = 2
        activity.fdb  = c:0 q:0

Model=80008, Mode=2 Group=0 Debug=0
nvcluster=1, ses_pickup=1, delay=0

[Debug_Zone HA information]
HA group member information: is_manage_primary=1.
FGVM08TM22000173:      Primary, serialno_prio=1, usr_priority=150, hostname=FGT1-LEFT
FGVM08TM22000174:    Secondary, serialno_prio=0, usr_priority=120, hostname=FGT2-RIGHT

[Kernel HA information]
vcluster 1, state=work, primary_ip=169.254.0.2, primary_id=0:
FGVM08TM22000173:      Primary, ha_prio/o_ha_prio=0/0
FGVM08TM22000174:    Secondary, ha_prio/o_ha_prio=1/1
这三个命令都可以看到 HA 的选举结果和 HA 状态。
# diagnose sys ha status
# get system status
# get system ha status
GUI 查看 HA 的选举结果和状态。
配置基础 LAN/WAN 上网服务。此步骤为正常上网的基础配置,大概的步骤是配置接口 IP、配置默认路由、配置策略即可实现防火墙的简单上网配置。(所有配置都在主防火墙上完成,备防火墙此时不可以登陆)
配置接口 IP。

config system interface
    edit "port1"
        set vdom "root"
        set ip 192.168.10.1 255.255.255.0
        set allowaccess ping https ssh snmp http fgfm
        set type physical
        set alias "lan"
        set snmp-index 1
    next
    edit "port2"
        set vdom "root"
        set ip 202.100.1.21 255.255.255.0
        set type physical
        set alias "wan1"
        set snmp-index 2
    next
end
配置默认路由。
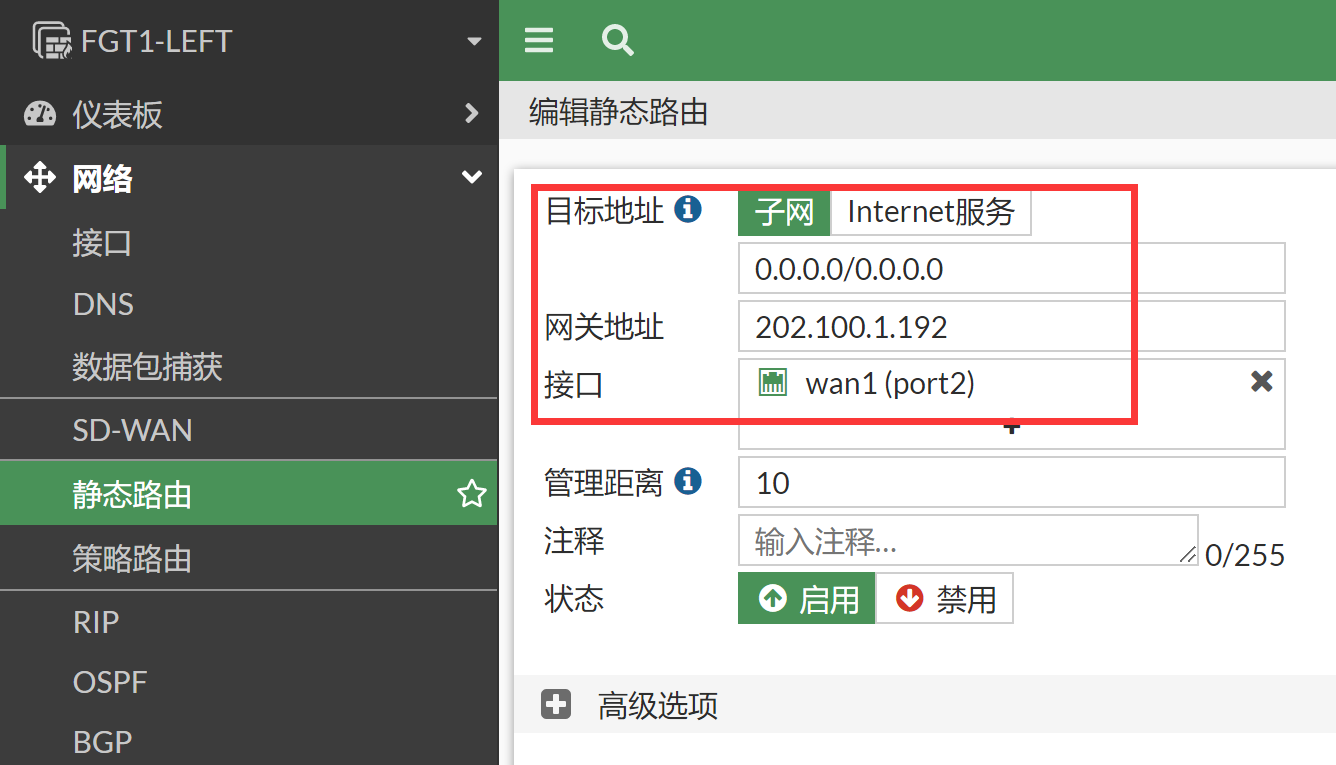
config router static
    edit 1
        set gateway 202.100.1.192
        set device "port2"
    next
end
配置上网策略。
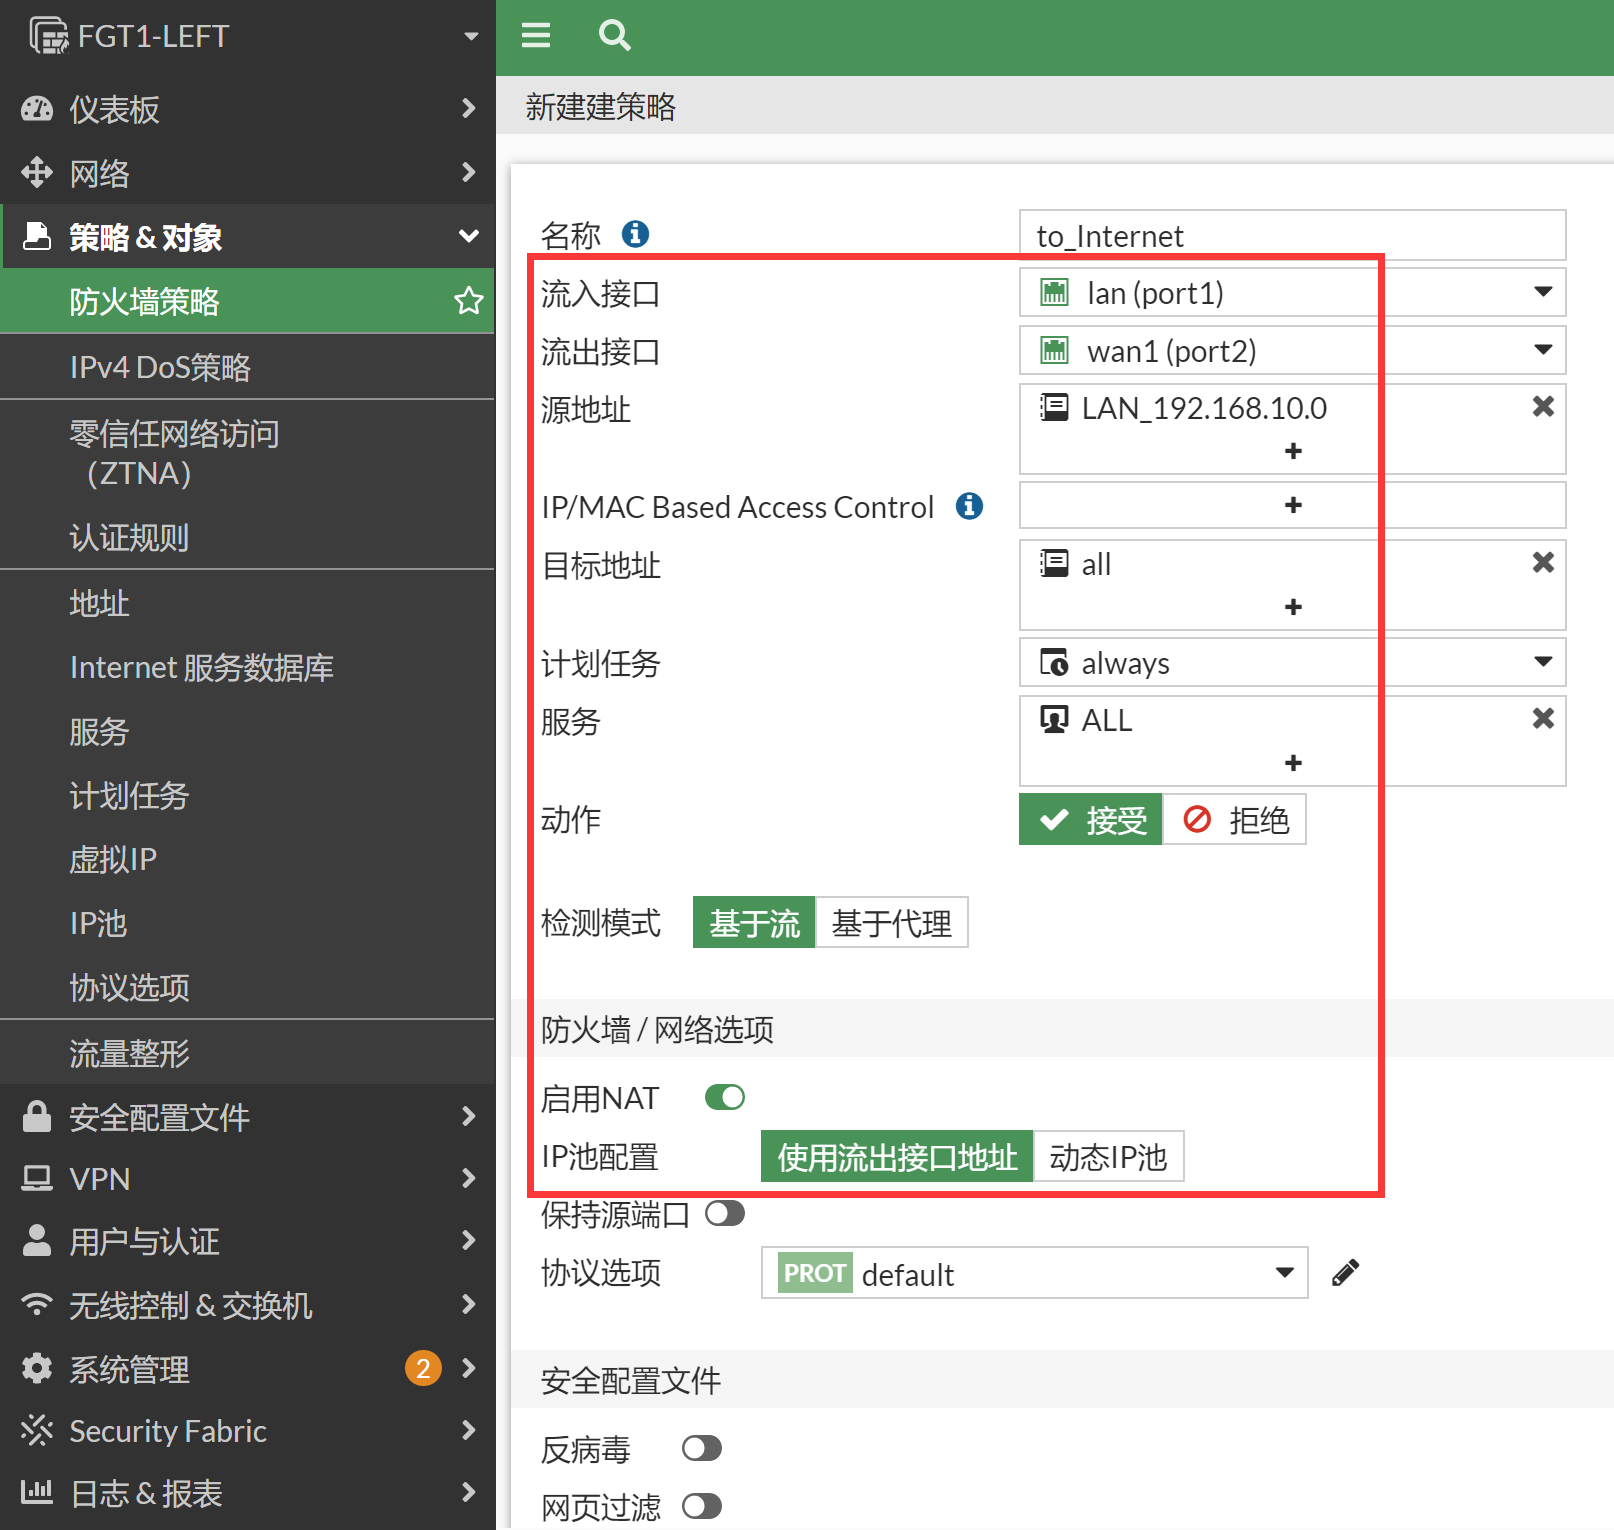
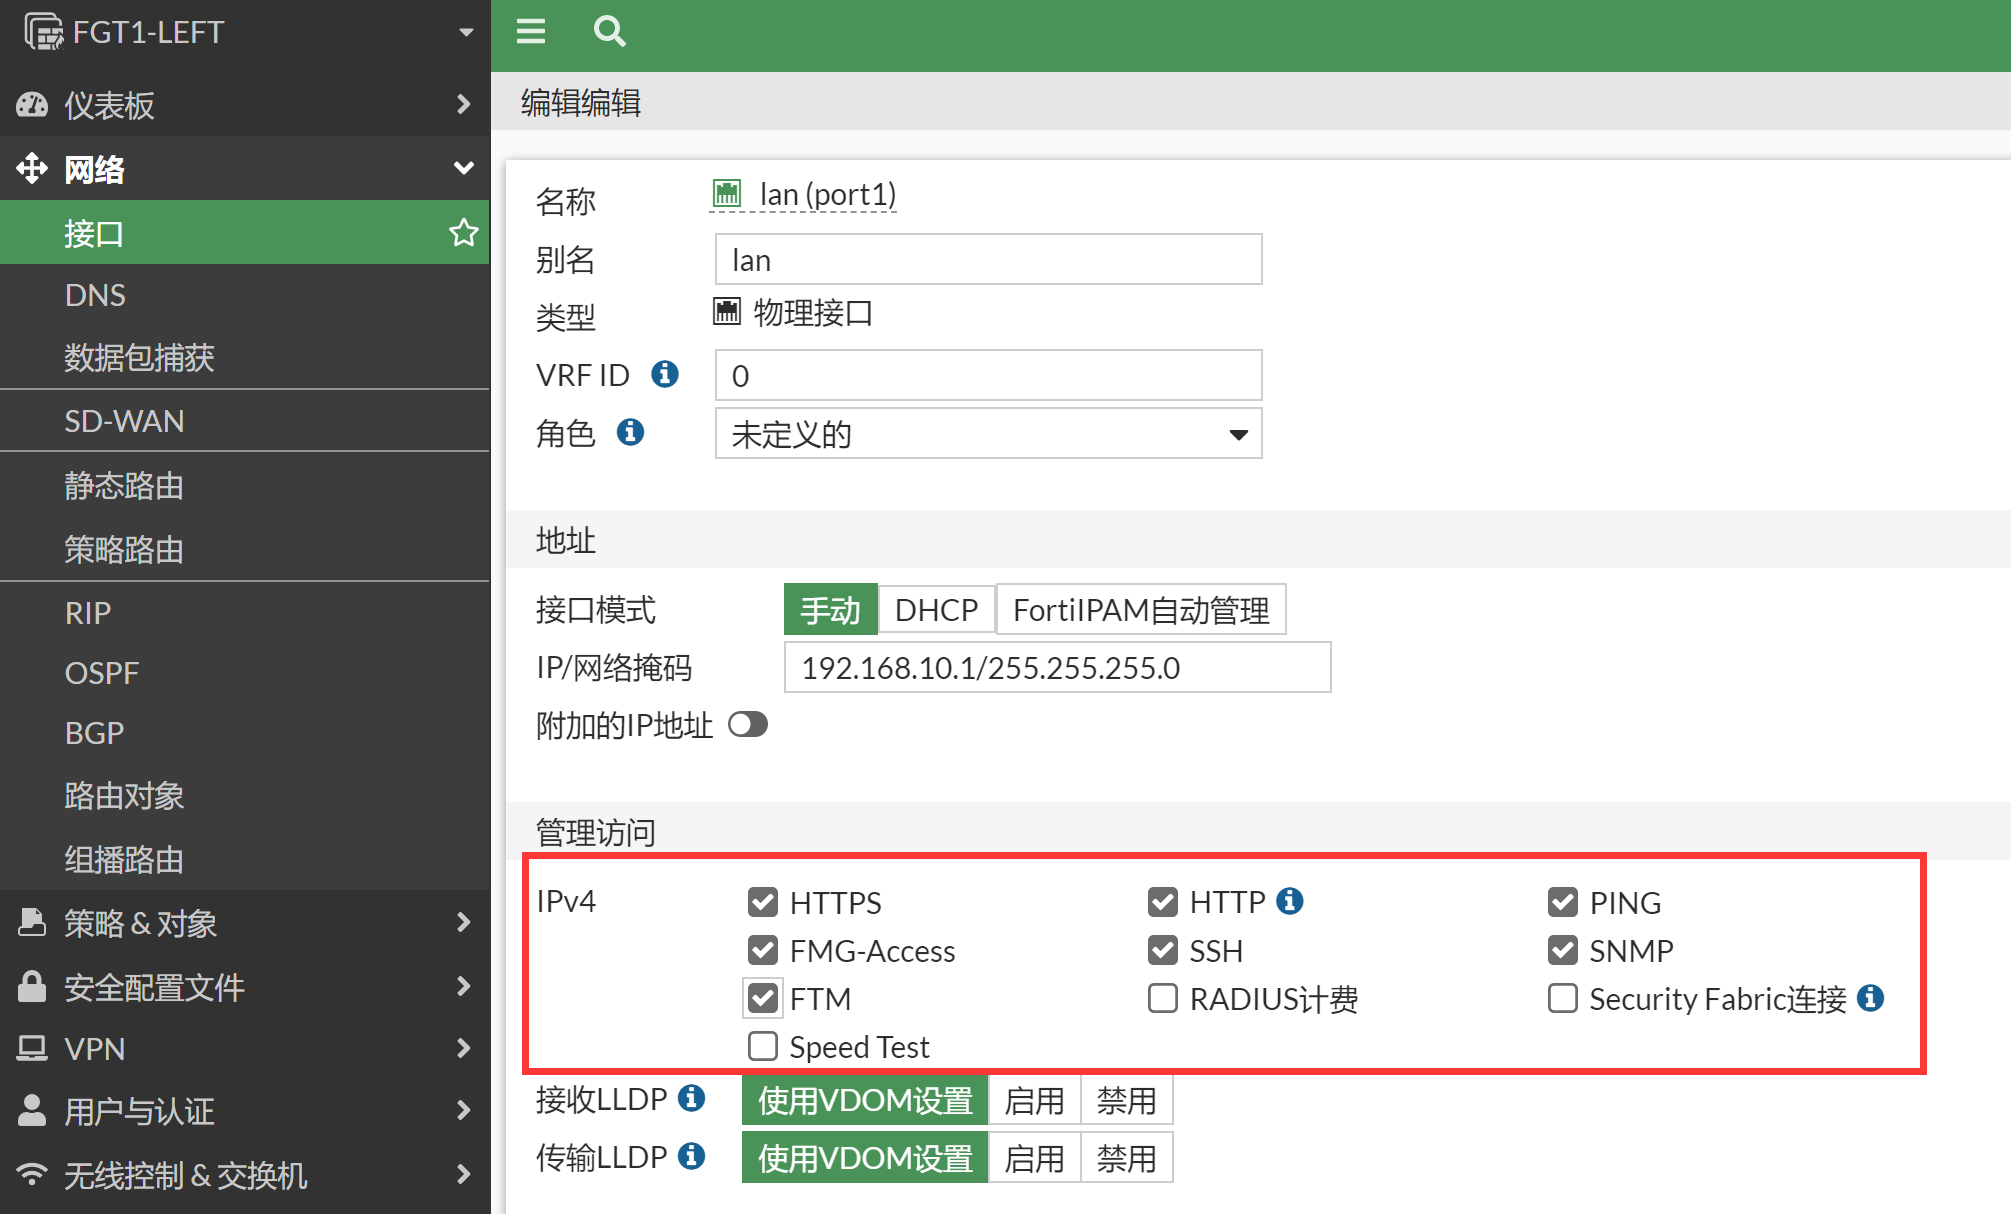
config firewall policy
    edit 1
        set name "to_Internet"
        set srcintf "port1"
        set dstintf "port2"
        set action accept
        set srcaddr "LAN_192.168.10.0"
        set dstaddr "all"
        set schedule "always"
        set service "ALL"
        set nat enable
    next
end
配置 LAN 口网管相关参数,关于网管目前可以通过 port1(lan)的 192.168.10.1 进行管理,比较关键的网管因素是:
port1 接口下开启了网管的协议,比如 https、http、ssh、snmp 等。
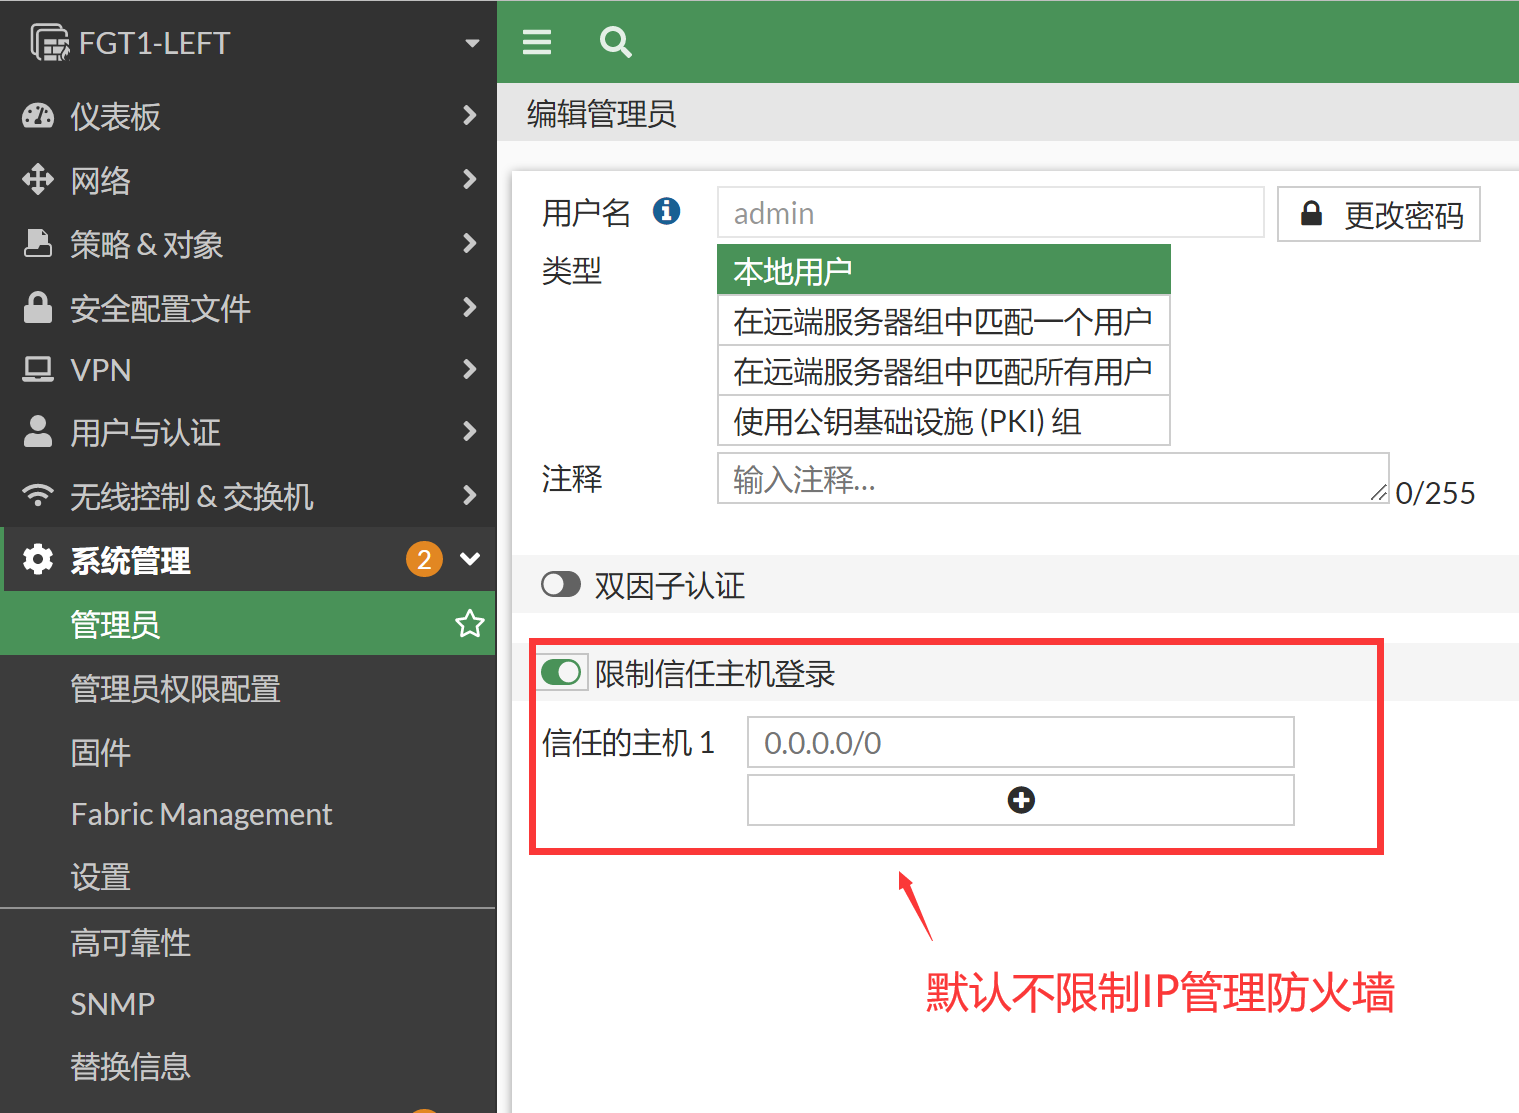
管理员可信任主机如果配置了的话,需要包含发起管理请求的主机 IP 或网段。
客户端 PC 到 FGT 的来回路由可达,可以通过 ping 和 tracert 测试。
上面 1、2 点确认没有问题之后,还是遇到不通的情况,可以通过 sniffer 抓包和 debug flow 确认问题所在。
FGT # diagnose sniffer packet any "host 192.168.10.1" 4 0 l如果跨接口管理防火墙,比如处于 port1 的 PC 要通过防火墙 port2 接口的 IP 管理防火墙,则需要主要有 port1 到 port2 的放通策略,否则数据也是不通的。
出现网管不了的情况,99% 就是以上的原因了。
配置 HA 独立 VDOM,首先需要开启 VDOM 特性(主设备上配置,会自动同步到备机)。
FGT1-LEFT # config sys global
FGT1-LEFT (global) # set vdom-mode
FGT1-LEFT (global) # set vdom-mode multi-vdom
FGT1-LEFT (global) # end

You will be logged out for the operation to take effect.
Do you want to continue? (y/n)y
exit

FGT1-LEFT login: admin
Password:
Welcome!
创建新的 MGMT 独立管理 VDOM(主设备上配置,会自动同步到备机)。

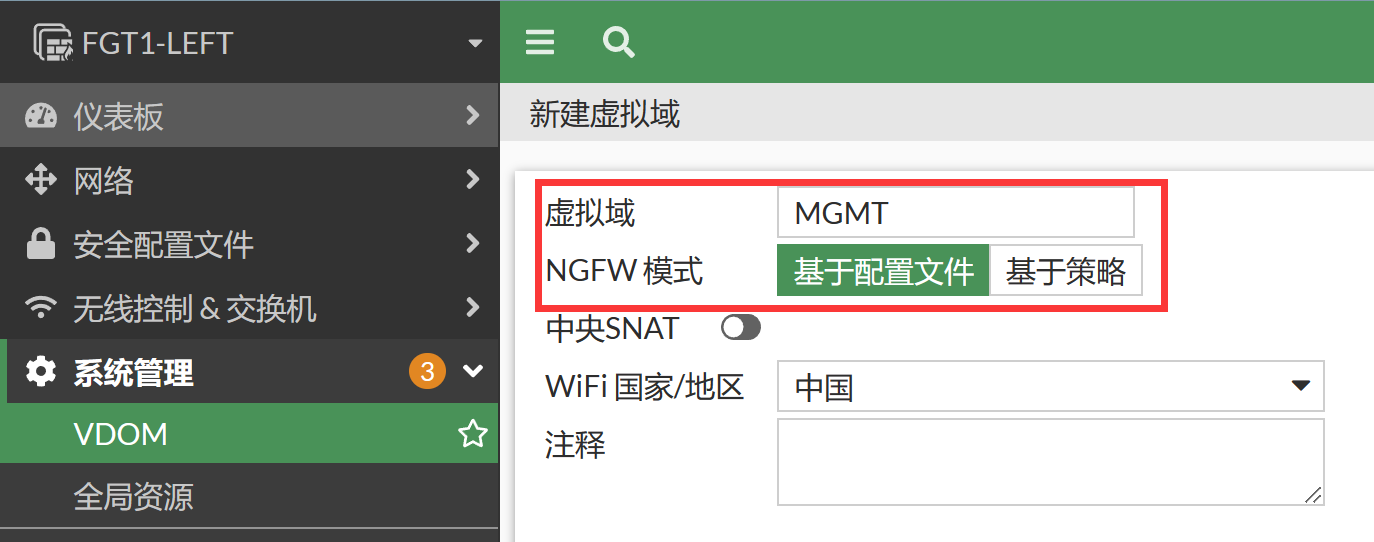

FGT1-LEFT # config vdom
FGT1-LEFT (vdom) # edit MGMT
FGT1-LEFT (MGMt) # end
将 MGMT 独立管理 VDOM 修改为管理 VDOM(只能命令行修改),该配置主备会同步。
FGT1-LEFT # config global
FGT1-LEFT (global) # config system global
FGT1-LEFT (global) # set management-vdom MGMT    //设置MGMT为管理VDOM,也就是说fortiguard、dns、ntp...等等主动更新,都是从MGMT这个VDOM发起,是一个管理的VDOM
FGT1-LEFT (global) # end
FGT1-LEFT (global) # end
HA 里面开启独立管理 VDOM,该配置主备会同步。
FGT1-LEFT # config global
FGT1-LEFT (global) # config system ha
FGT1-LEFT (ha) # set standalone-mgmt-vdom enable
FGT1-LEFT (ha) # end
FGT1-LEFT (global) # end
将 mgmt(port6)接口加入到 MGMT VDOM 中,并配置上管理 IP 和默认路由。
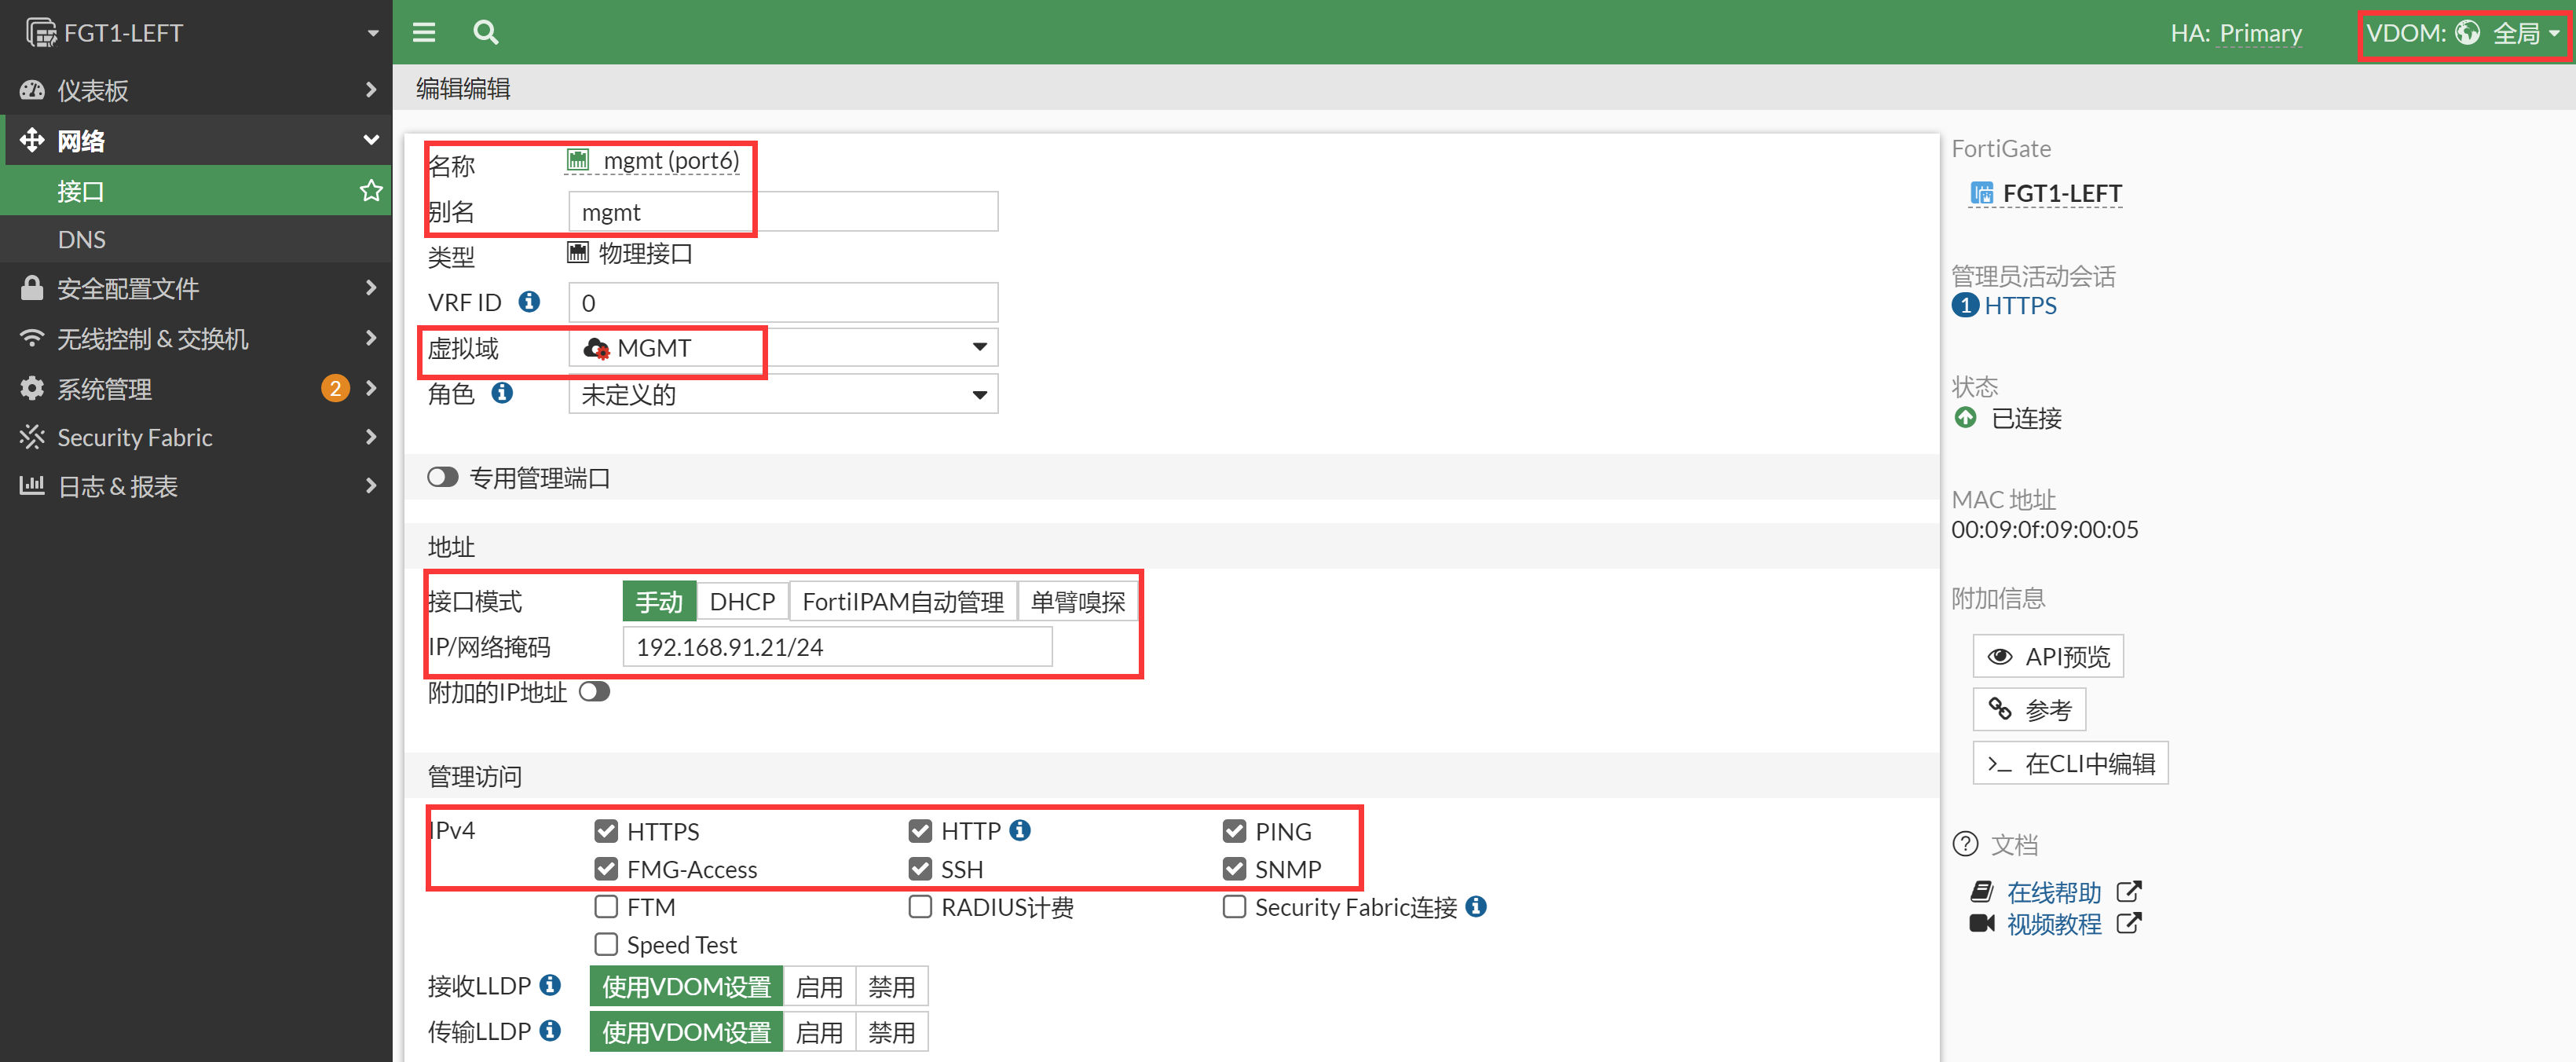

config global
config system interface
    edit "port6"
        set vdom "MGMT"
        set ip 192.168.91.21 255.255.255.0
        set allowaccess ping https ssh snmp http fgfm
        set type physical
        set alias "mgmt"
        set snmp-index 6
    next
end

FGT1-LEFT # config vdom
FGT1-LEFT (vdom) # edit MGMT
current vf=MGMT:4
config router static
    edit 1
        set gateway 192.168.91.254
        set device "port6"
    next
end
在主机的 MGMT VDOM 中 ping 网关 192.168.91.254。
FGT1-LEFT # config vdom
FGT1-LEFT (vdom) # edit MGMT
current vf=MGMT:4

FGT1-LEFT (MGMT) # exe ping 192.168.91.254
PING 192.168.91.254 (192.168.91.254): 56 data bytes
64 bytes from 192.168.91.254: icmp_seq=0 ttl=128 time=1.3 ms
64 bytes from 192.168.91.254: icmp_seq=1 ttl=128 time=0.6 ms
64 bytes from 192.168.91.254: icmp_seq=2 ttl=128 time=0.6 ms
64 bytes from 192.168.91.254: icmp_seq=3 ttl=128 time=0.5 ms
64 bytes from 192.168.91.254: icmp_seq=4 ttl=128 time=0.8 ms
--- 192.168.91.254 ping statistics ---
5 packets transmitted, 5 packets received, 4 duplicates, 0% packet loss
round-trip min/avg/max = 0.5/0.7/1.4 ms
此时备机是无法 WEB/SSH 登陆的需要通过主机的命令(或者 Console 线)连到备机的命令行界面。
FGT1-LEFT # config global
FGT1-LEFT (global) # exe ha manage ?
<id>    please input peer box index.
<0>     Subsidiary unit FGVM08TM22000174

FGT1-LEFT (global) # exe ha manage 0 admin
Warning: Permanently added '169.254.0.1' (ED25519) to the list of known hosts.
admin@169.254.0.1's password:
FGT2-RIGHT #
备防火墙那边会自动同步 VDOM 和 mgmt 加入到 MGMT 的配置(如果配置同步不正常,可以将备机重启,并等待配置同步完成,再操作),而独立管理 MGMT - VDOM 内部的配置是不会同步的,因此只需要修改备防火墙的 mgmt 的接口 IP 和路由即可。
FGT2-RIGHT # config vdom
FGT2-RIGHT (vdom) # edit MGMT
current vf=MGMT:4

FGT2-RIGHT (MGMT) # config system interface
FGT2-RIGHT (interface) # edit port6
FGT2-RIGHT (port6) # set ip 192.168.91.22/24
FGT2-RIGHT (port6) # set allowaccess ping https ssh snmp http fgfm
FGT2-RIGHT (port6) # set alias "mgmt"
FGT2-RIGHT (port6) # end
FGT2-RIGHT (MGMT) # end
备机使用 MGMT VDOM ping 网关 192.168.91.254。
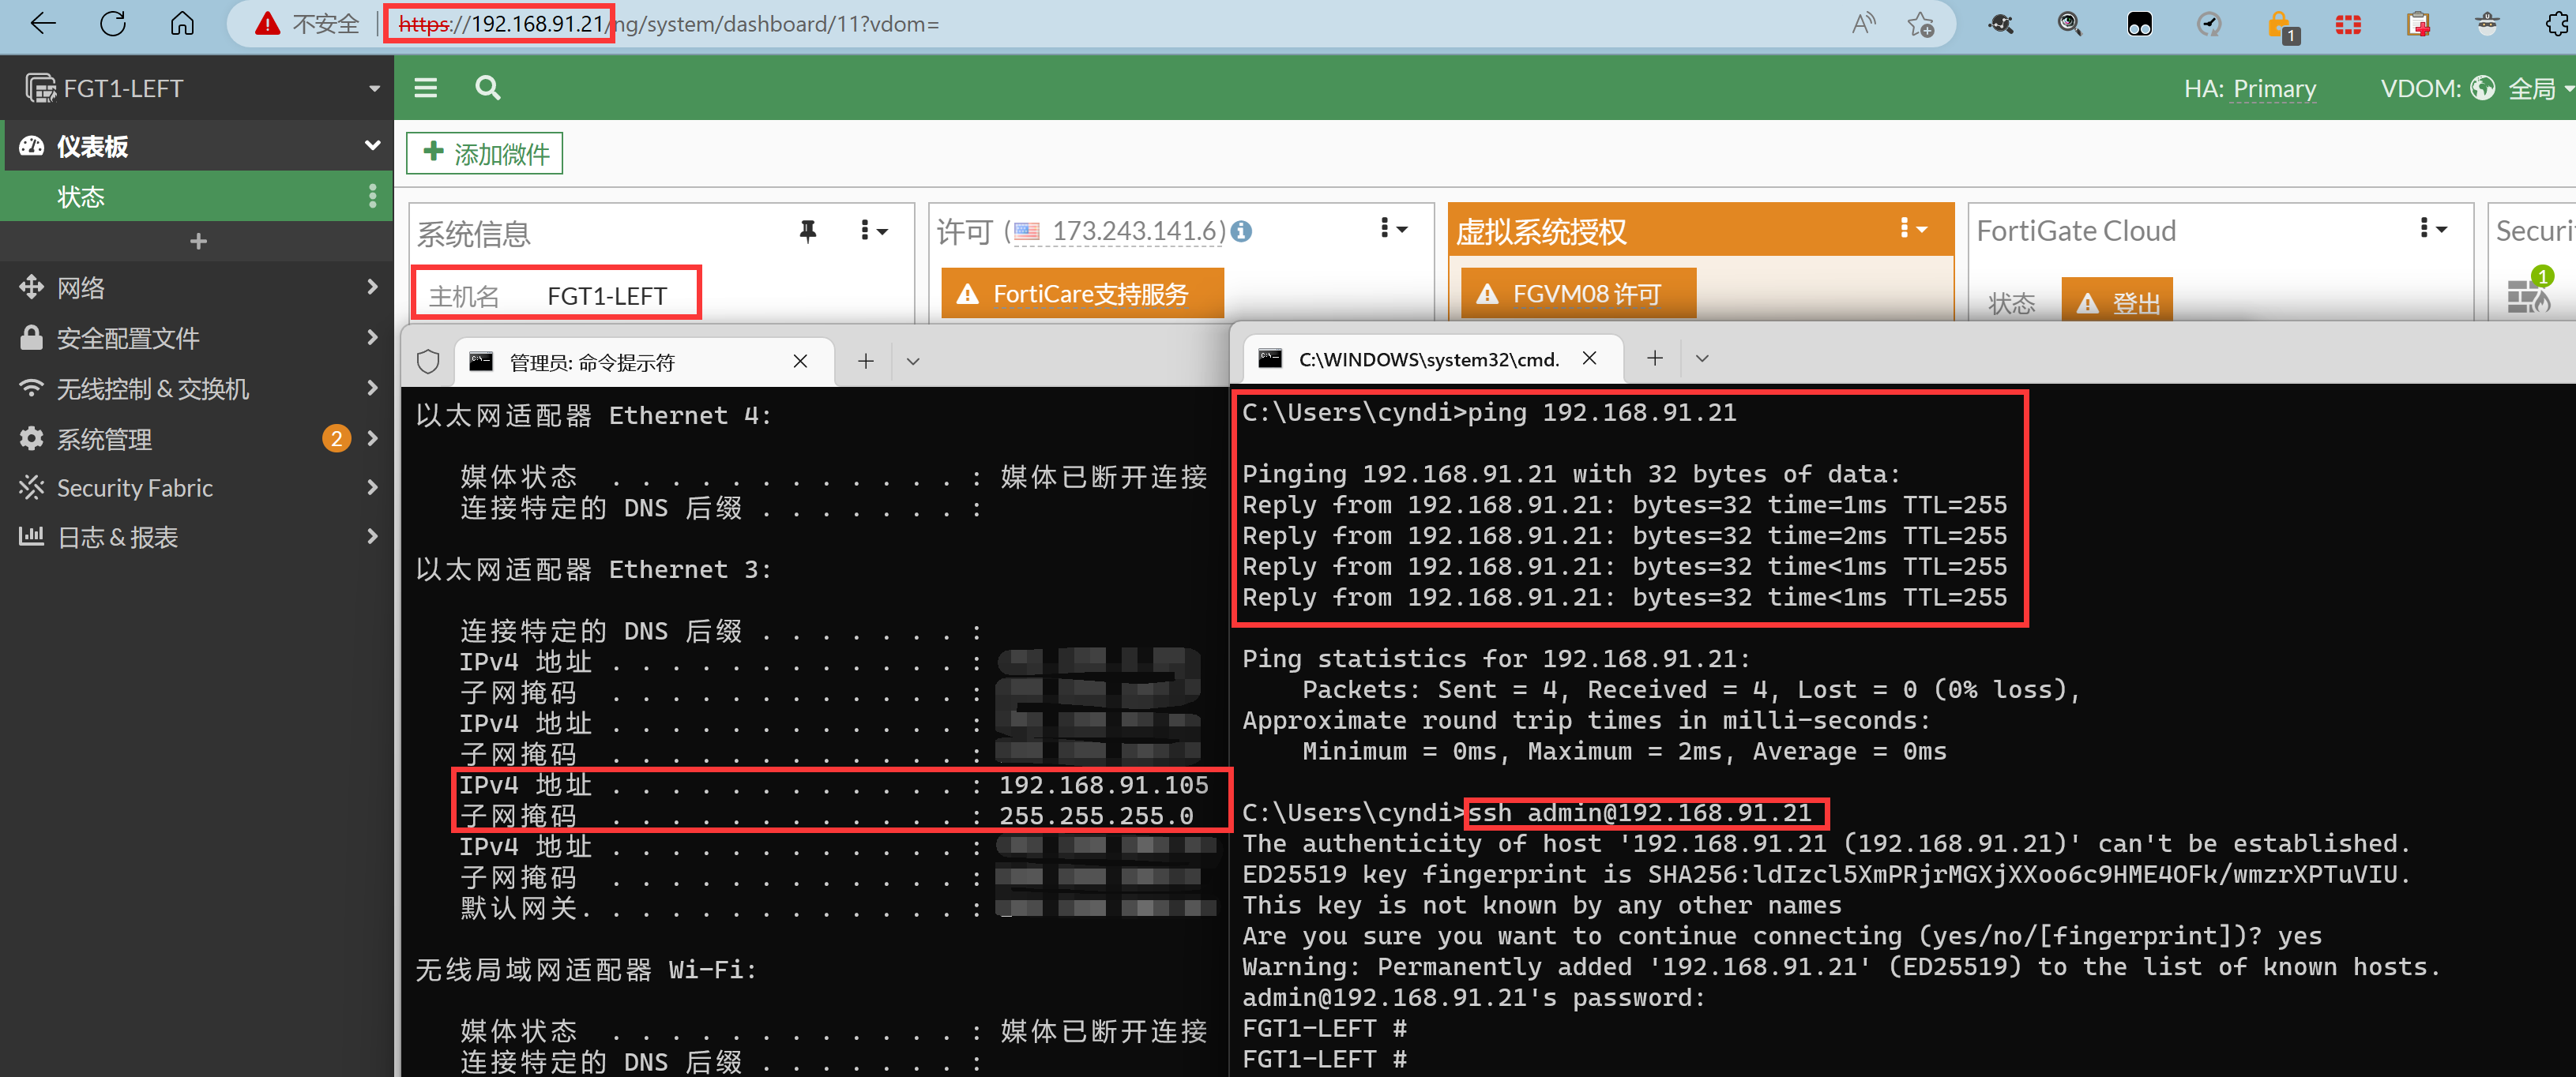
FGT2-RIGHT # config vdom
FGT2-RIGHT (vdom) # edit MGMT
current vf=MGMT:4

FGT2-RIGHT (MGMT) # exe ping 192.168.91.254
PING 192.168.91.254 (192.168.91.254): 56 data bytes
64 bytes from 192.168.91.254: icmp_seq=0 ttl=128 time=2.2 ms
64 bytes from 192.168.91.254: icmp_seq=1 ttl=128 time=0.6 ms
64 bytes from 192.168.91.254: icmp_seq=2 ttl=128 time=0.7 ms
64 bytes from 192.168.91.254: icmp_seq=3 ttl=128 time=0.7 ms
64 bytes from 192.168.91.254: icmp_seq=4 ttl=128 time=0.5 ms
--- 192.168.91.254 ping statistics ---
5 packets transmitted, 5 packets received, 4 duplicates, 0% packet loss
round-trip min/avg/max = 0.5/1.0/2.3 ms
备机也配置完毕,这个时候可以通过 GUI 登录到备机,查看备机的 GUI 配置。可以通过 192.168.91.21 和 192.168.91.22 分别管理到主防火墙和备防火墙了。

SYSLOG
配置 SYSLOG 等本机发出的网管配置。
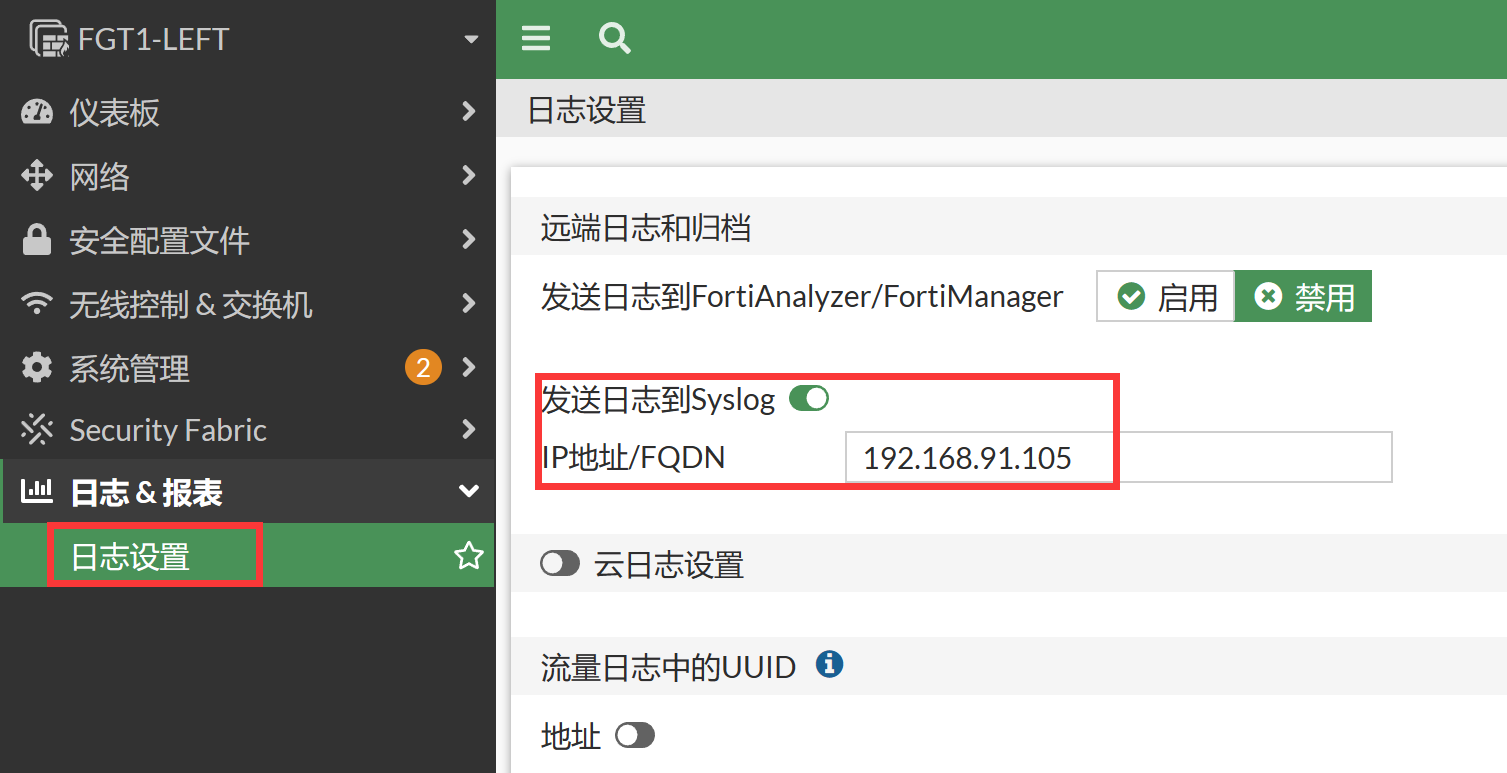
config global
config log syslogd setting
    set status enable
    set server "192.168.91.105"
end
默认情况下 MGMT 和 root 会继承 global 的 syslog 日志配置。
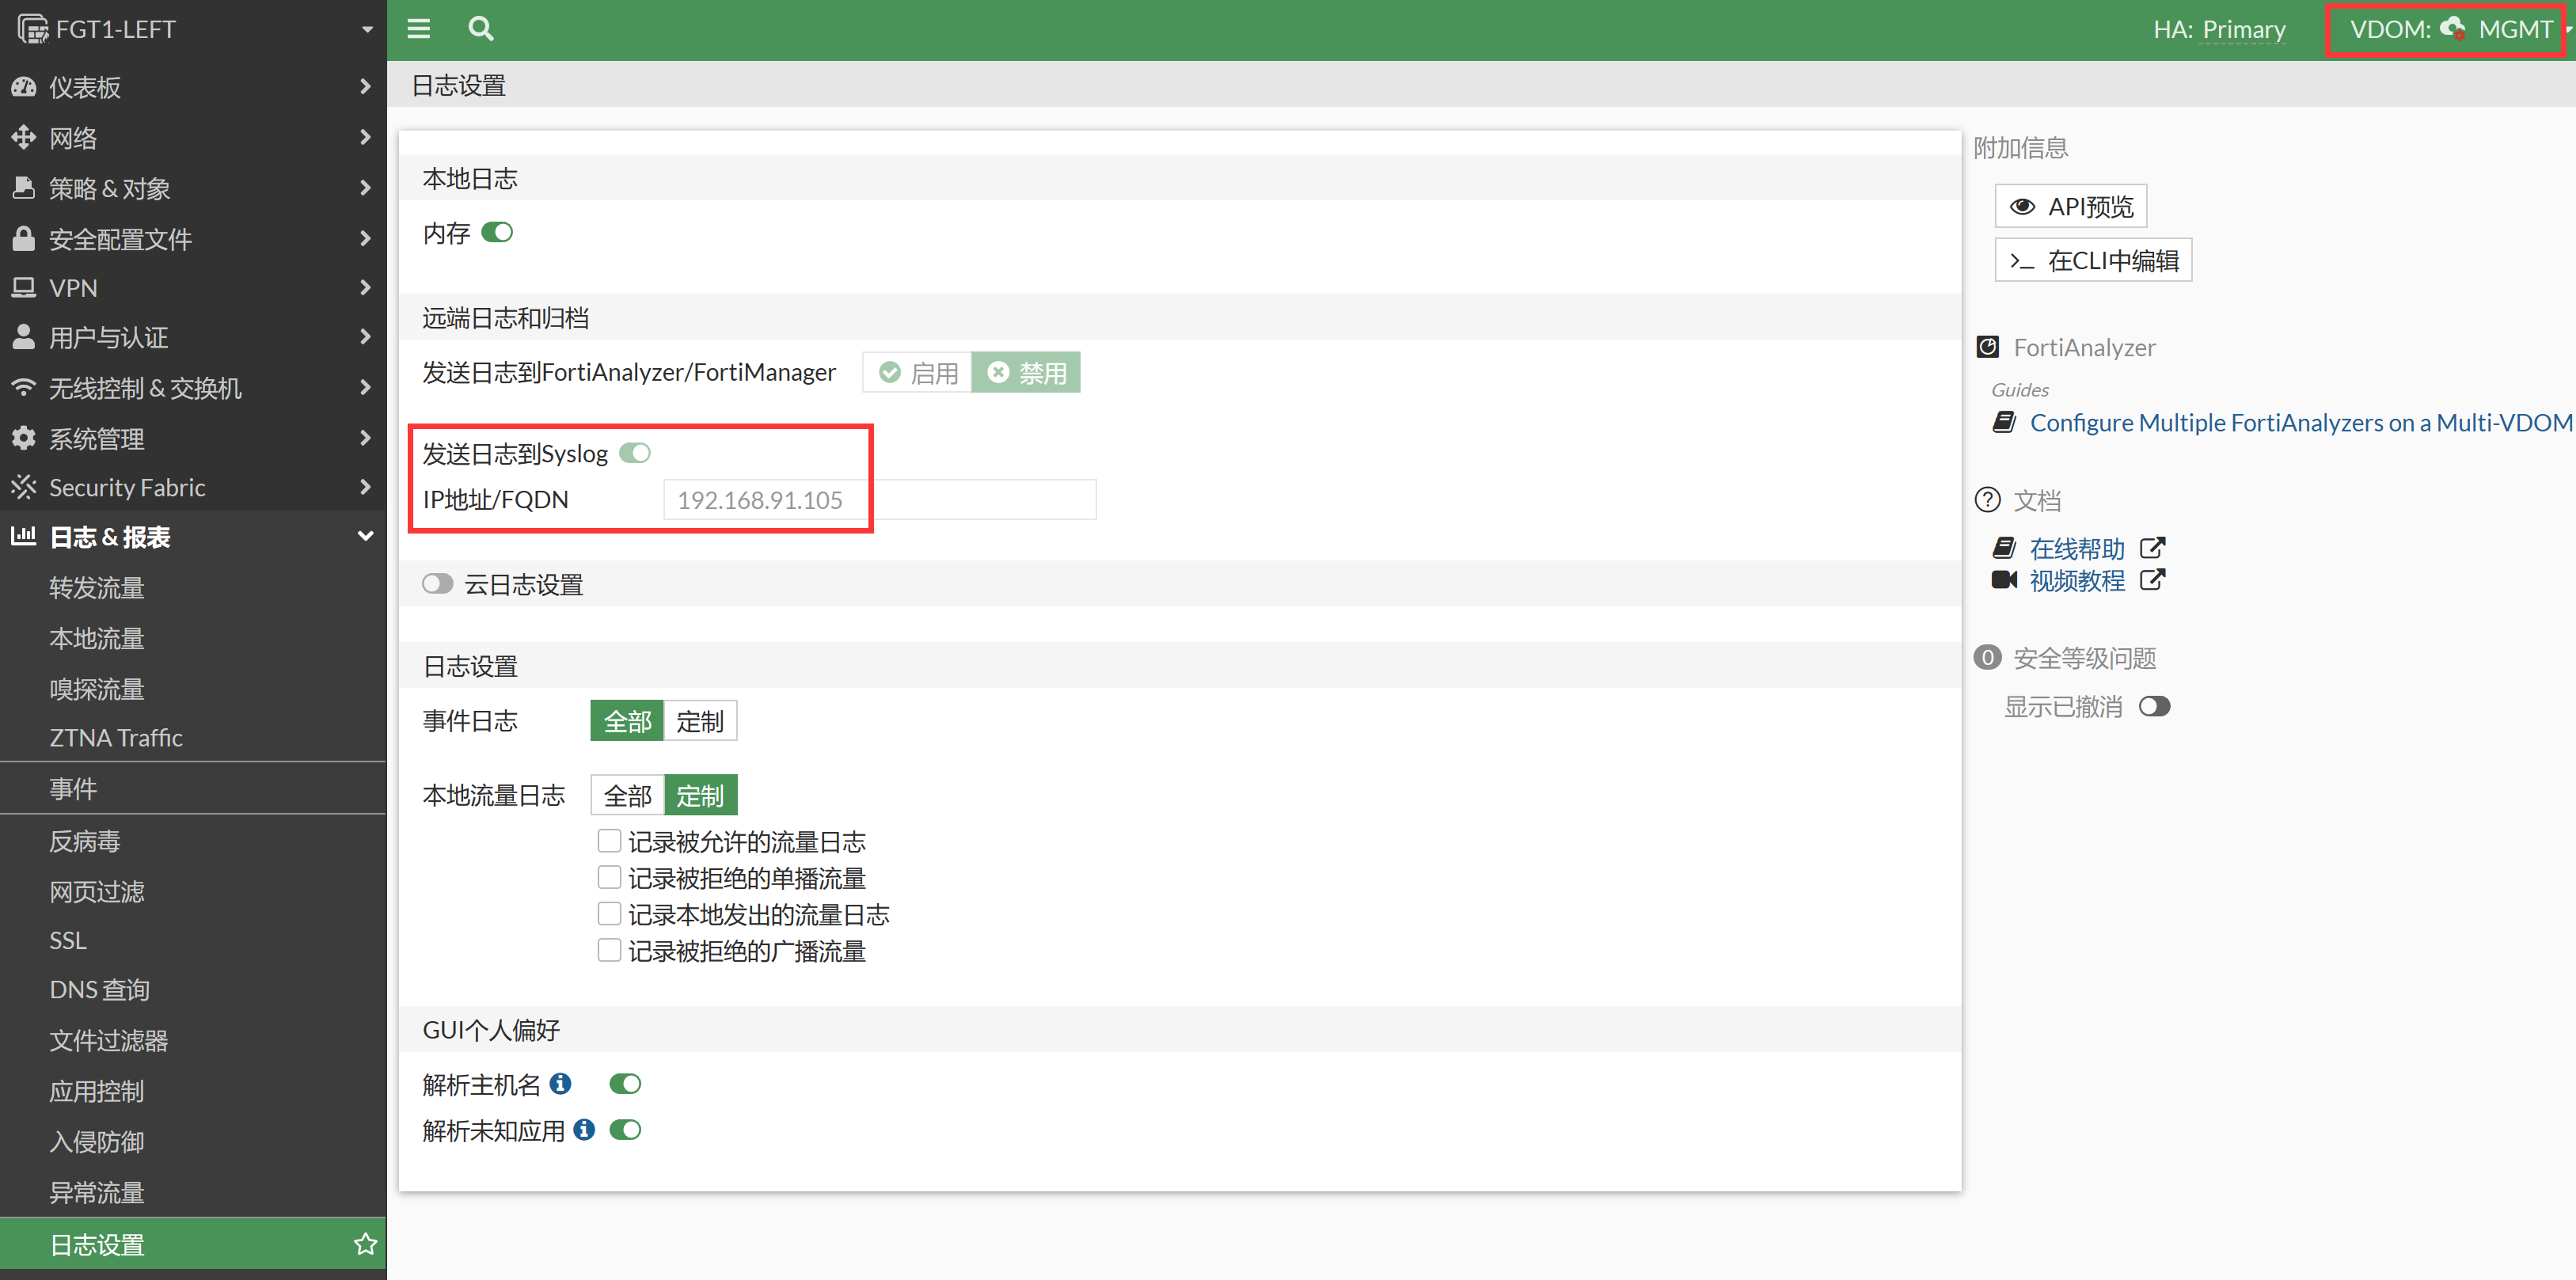
主/备防火墙的日志都会通过独立管理 VDOM 的 mgmt(port6)192.168.91.21 和 192.168.91.22 将 syslog 日志发送出去。
FGT1-LEFT (MGMT) # diagnose sniffer packet any "port 514" 4
Using Original Sniffing Mode
interfaces=[any]
filters=[port 514]
1.159125 port6 out 192.168.91.21.19604 -> 192.168.91.105.514: udp 600
1.159404 port6 out 192.168.91.21.19604 -> 192.168.91.105.514: udp 553
1.159522 port6 out 192.168.91.21.19604 -> 192.168.91.105.514: udp 553
3.158564 port6 out 192.168.91.21.19604 -> 192.168.91.105.514: udp 553
5.159318 port6 out 192.168.91.21.19604 -> 192.168.91.105.514: udp 608
6.158835 port6 out 192.168.91.21.19604 -> 192.168.91.105.514: udp 600

FGT2-RIGHT (MGMT) # diagnose sniffer packet any "port 514" 4
Using Original Sniffing Mode
interfaces=[any]
filters=[port 514]
4.513098 port6 out 192.168.91.22.12931 -> 192.168.91.105.514: udp 554
10.513817 port6 out 192.168.91.22.12931 -> 192.168.91.105.514: udp 554
11.512382 port6 out 192.168.91.22.12931 -> 192.168.91.105.514: udp 554
11.512444 port6 out 192.168.91.22.12931 -> 192.168.91.105.514: udp 554
11.512445 port6 out 192.168.91.22.12931 -> 192.168.91.105.514: udp 554
11.512447 port6 out 192.168.91.22.12931 -> 192.168.91.105.514: udp 554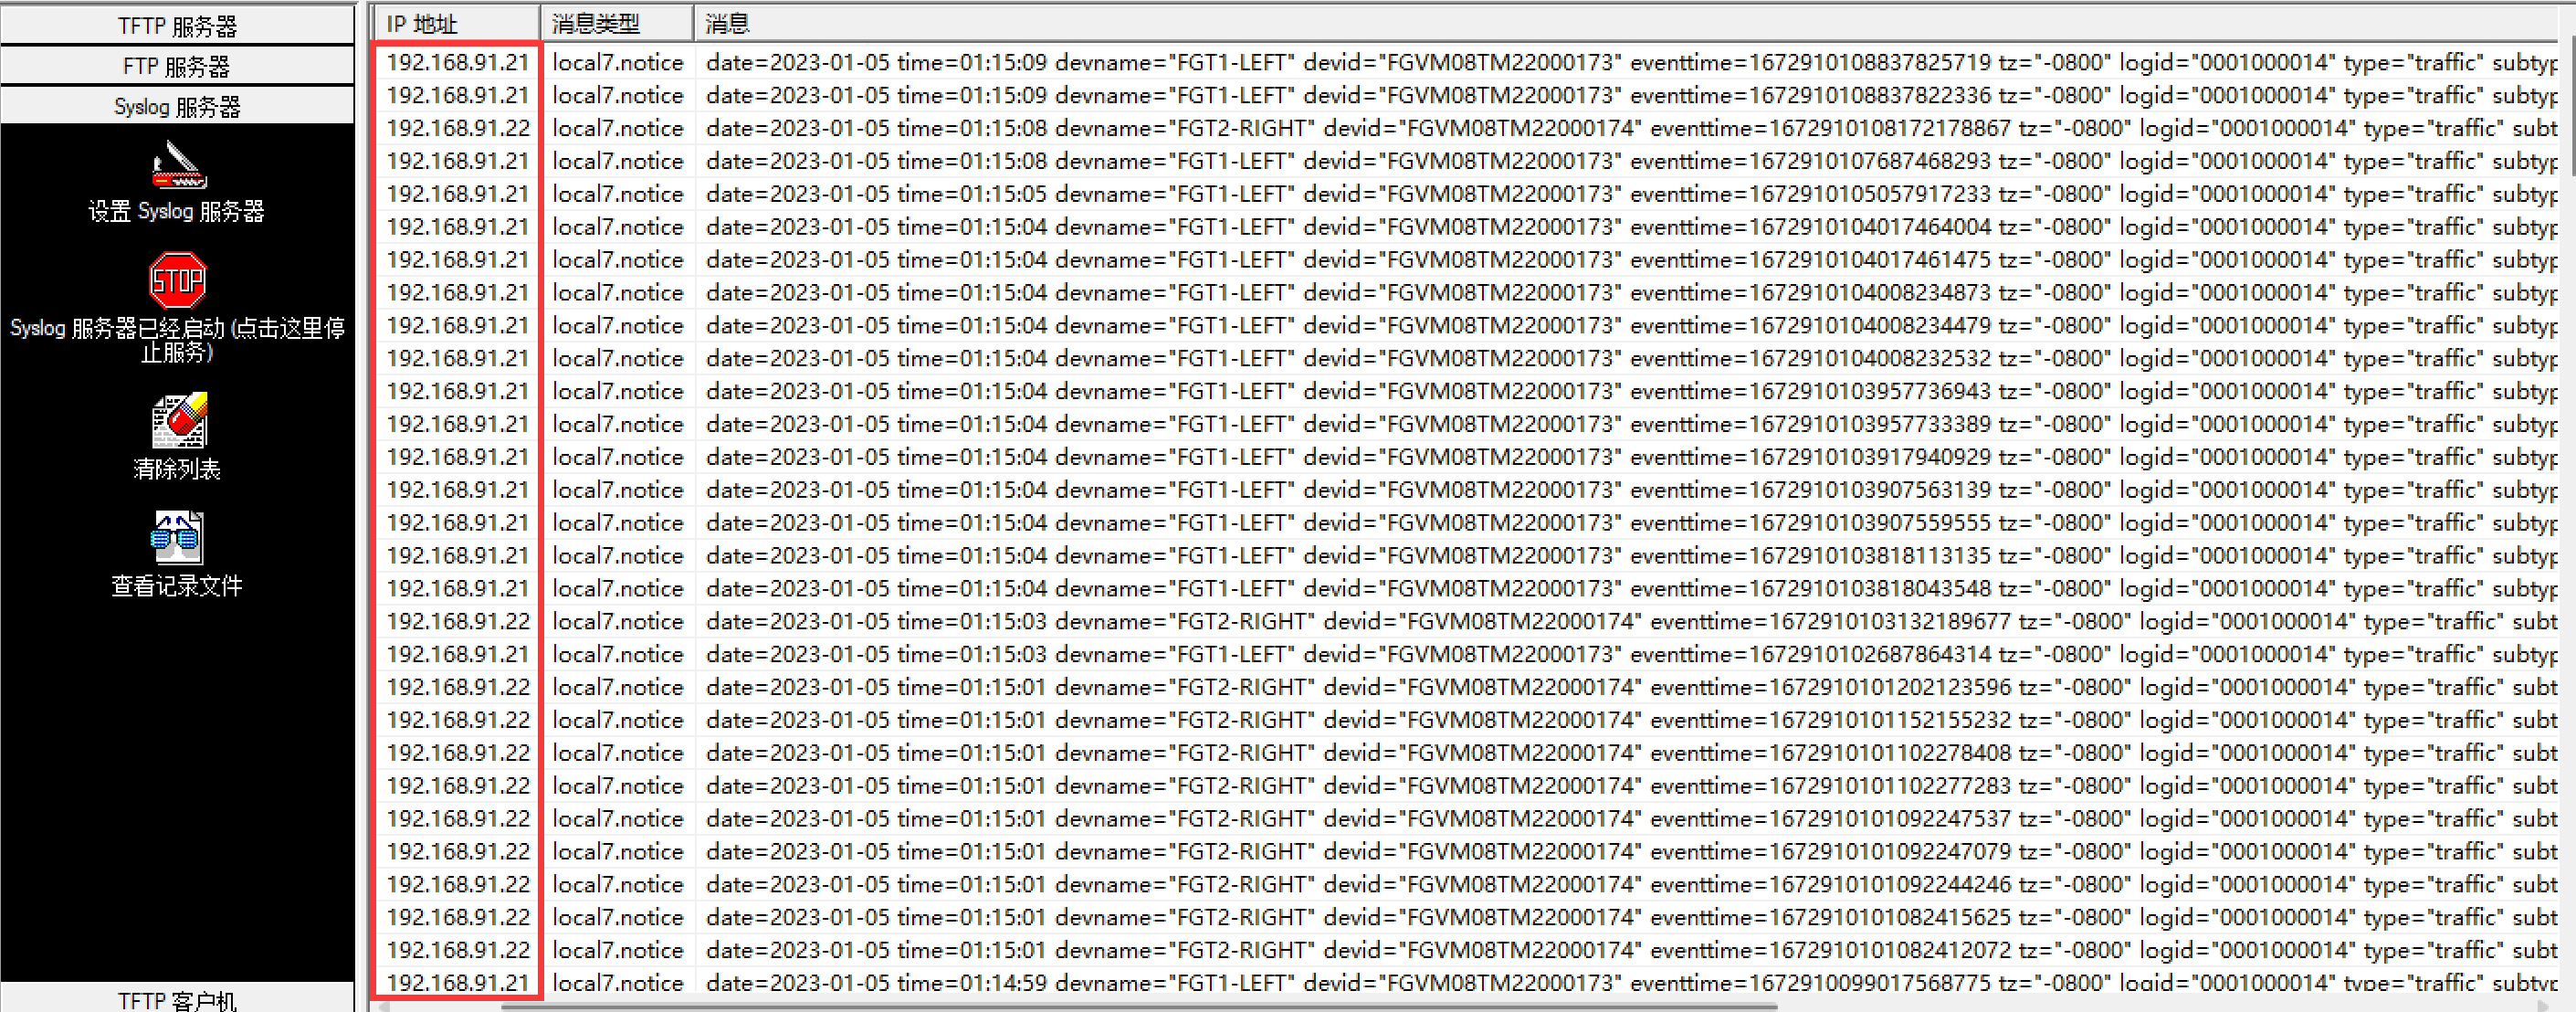
SNMP
VDOM - MGMT 的 mgmt(port6)接口下开启 SNMP 协议,主设备和备设备都要开,VDOM - MGMT 里面的配置不同步。
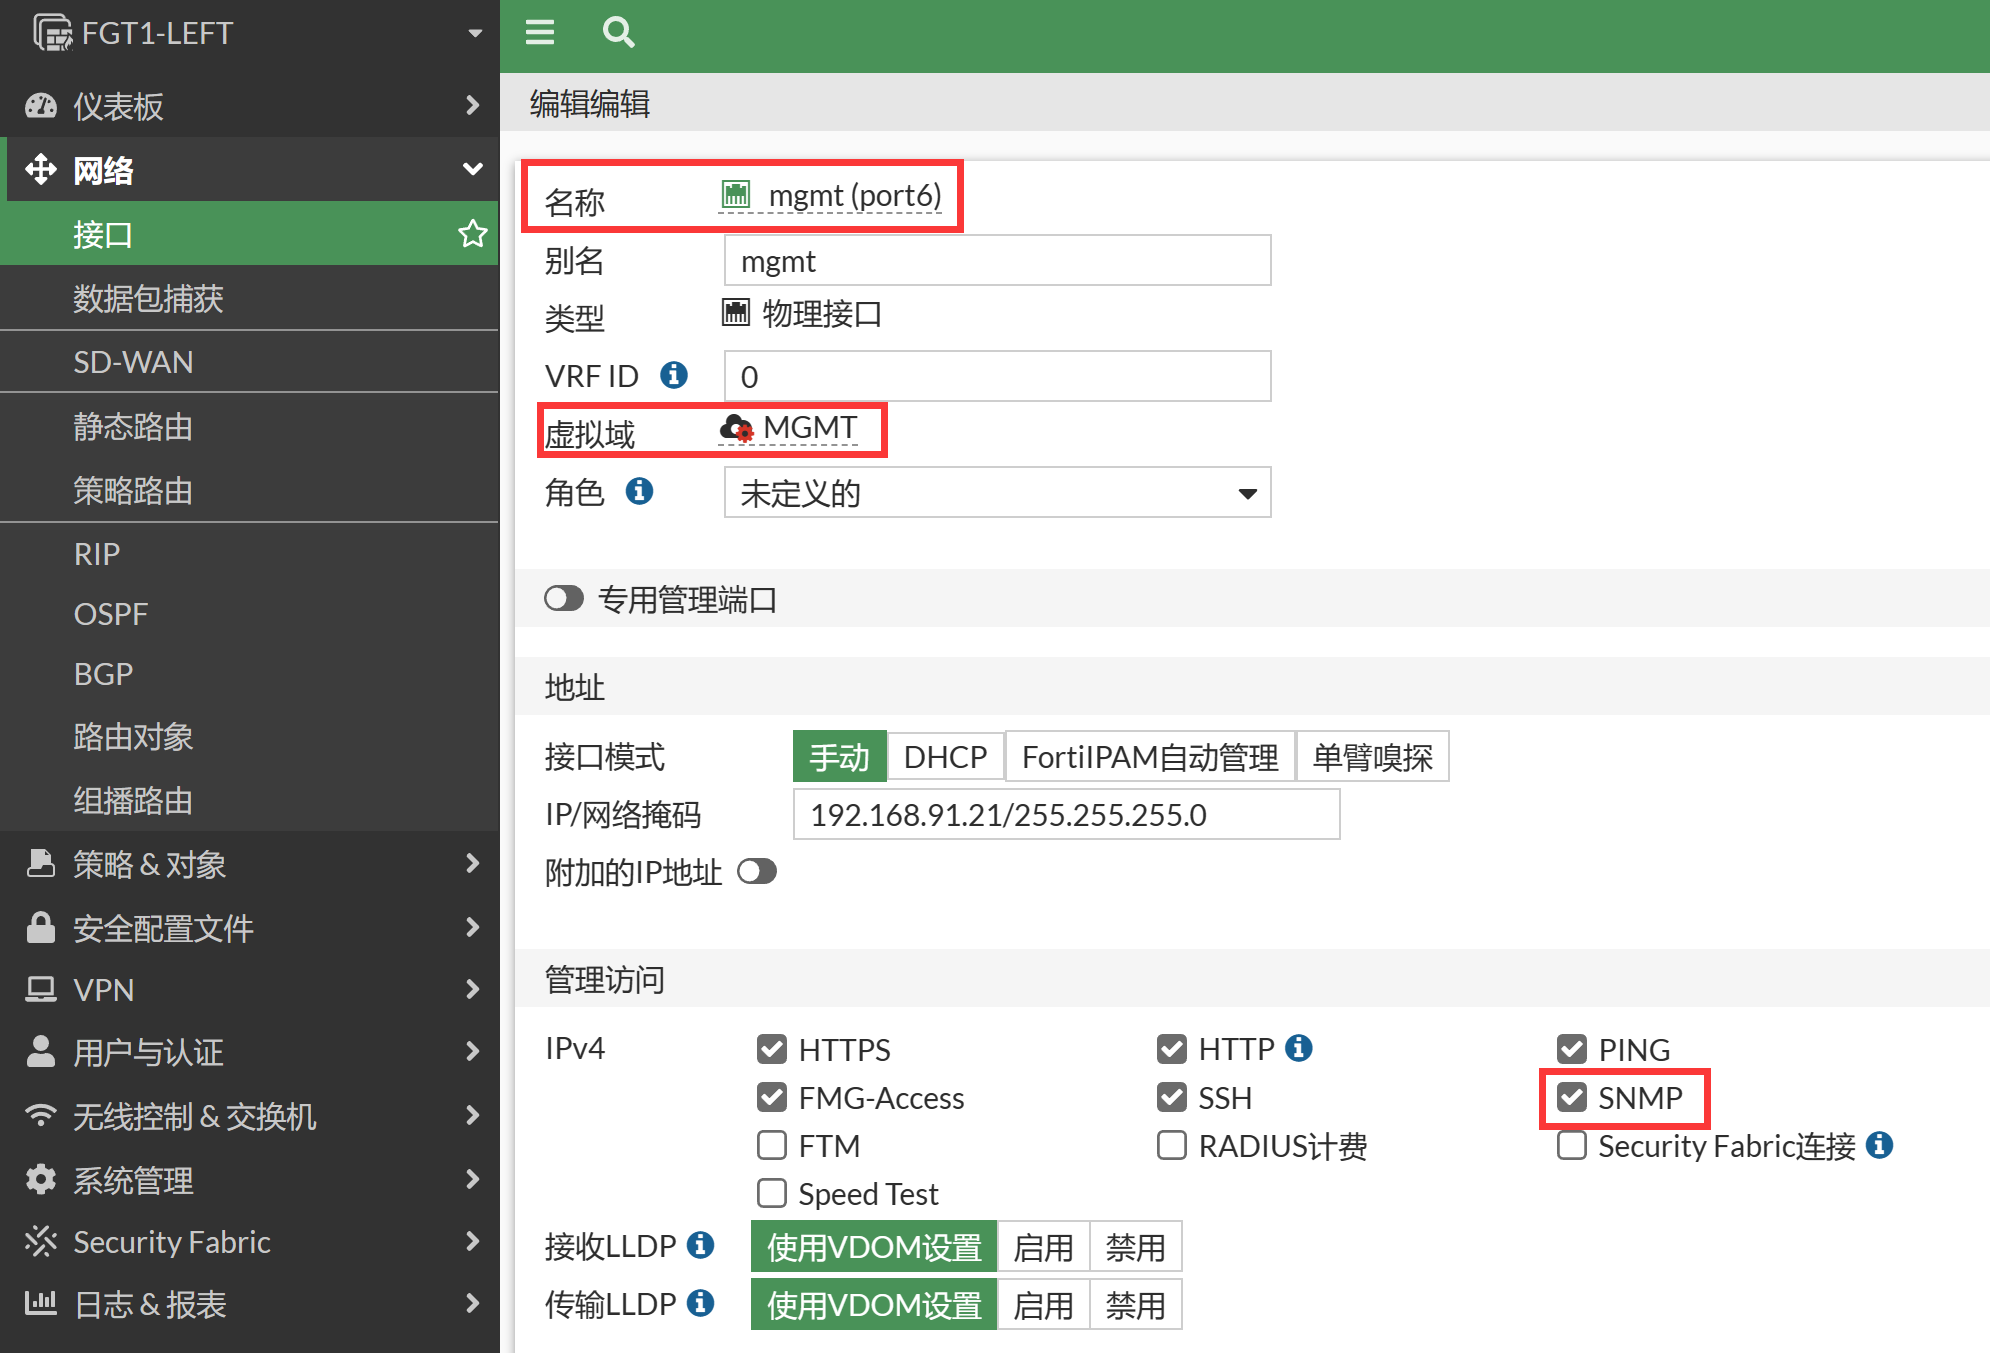
FGT1-LEFT:
config vdom
edit MGMT
config system interface
    edit "port6"
        set vdom "root"
        set ip 192.168.91.21 255.255.255.0
        set allowaccess ping https ssh snmp http fgfm ftm
        set type physical
        set alias "mgmt"
    next
end

FGT2-RIGHT:
config vdom
edit MGMT
config system interface
    edit "port6"
        set vdom "root"
        set ip 192.168.91.22 255.255.255.0
        set allowaccess ping https ssh snmp http fgfm ftm
        set type physical
        set alias "mgmt"
    next
end
进入全局 VDOM,开启 SNMP 功能,此配置主备同步。
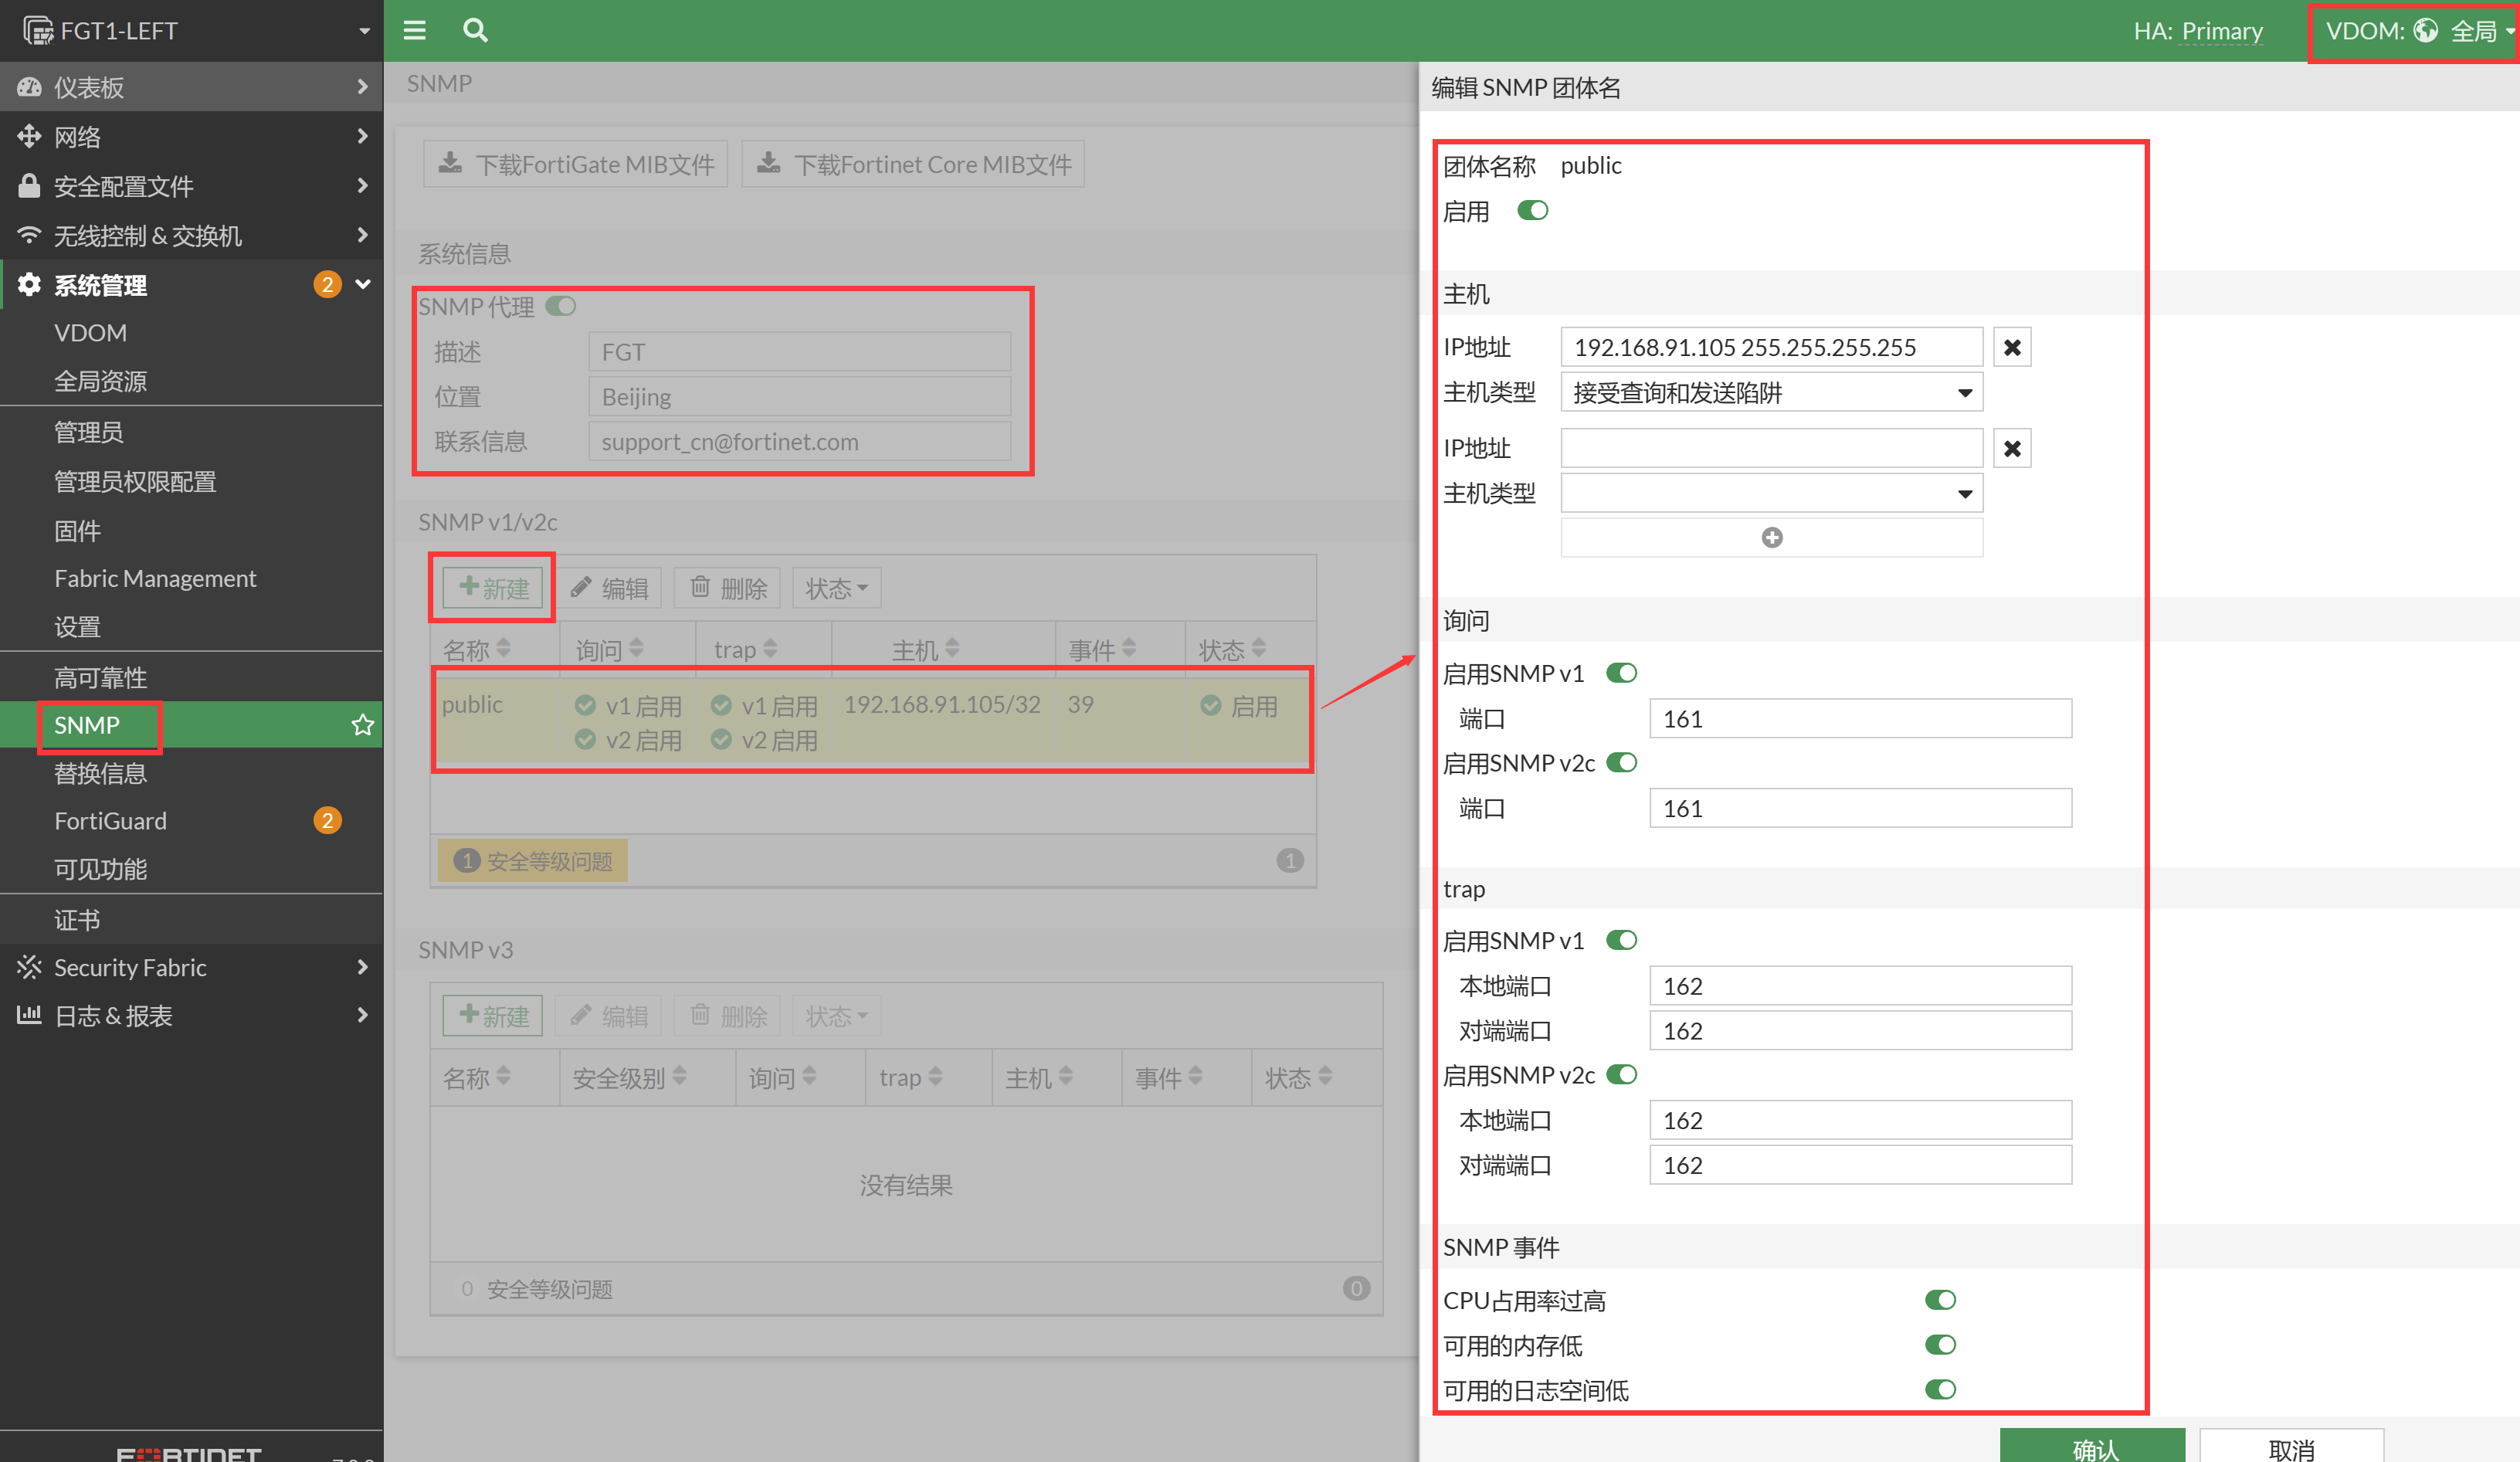
config global
config system snmp sysinfo
    set status enable
    set description "FGT"
    set contact-info "support_cn@fortinet.com"
    set location "Beijing"
end

config system snmp community
    edit 1
        set name "public"
        config hosts
            edit 1
                set ip 192.168.91.105 255.255.255.255
            next
        end
    next
end
在 SNMP 客户端对主设备和备设备的 port6 口进行 get/walk 操作,这里以 iReasoning MIB Browser 为例,可以正常读取 SNMP 节点信息。
FGT1-LEFT (MGMT) # dia sniff pa any "port 161" 4
Using Original Sniffing Mode
interfaces=[any]
filters=[port 161]
44.345632 port6 in 192.168.91.105.50268 -> 192.168.91.21.161: udp 45
44.346025 port6 in 192.168.91.105.50268 -> 192.168.91.21.161: udp 45
44.346912 port6 out 192.168.91.21.161 -> 192.168.91.105.50268: udp 45
44.347040 port6 out 192.168.91.21.161 -> 192.168.91.105.50268: udp 45

FGT2-RIGHT (MGMT) # dia sniff pa any "port 161" 4
Using Original Sniffing Mode
interfaces=[any]
filters=[port 161]
8.956697 port6 in 192.168.91.105.50265 -> 192.168.91.22.161: udp 45
8.957084 port6 in 192.168.91.105.50265 -> 192.168.91.22.161: udp 45
8.958027 port6 out 192.168.91.22.161 -> 192.168.91.105.50265: udp 45
8.958123 port6 out 192.168.91.22.161 -> 192.168.91.105.50265: udp 45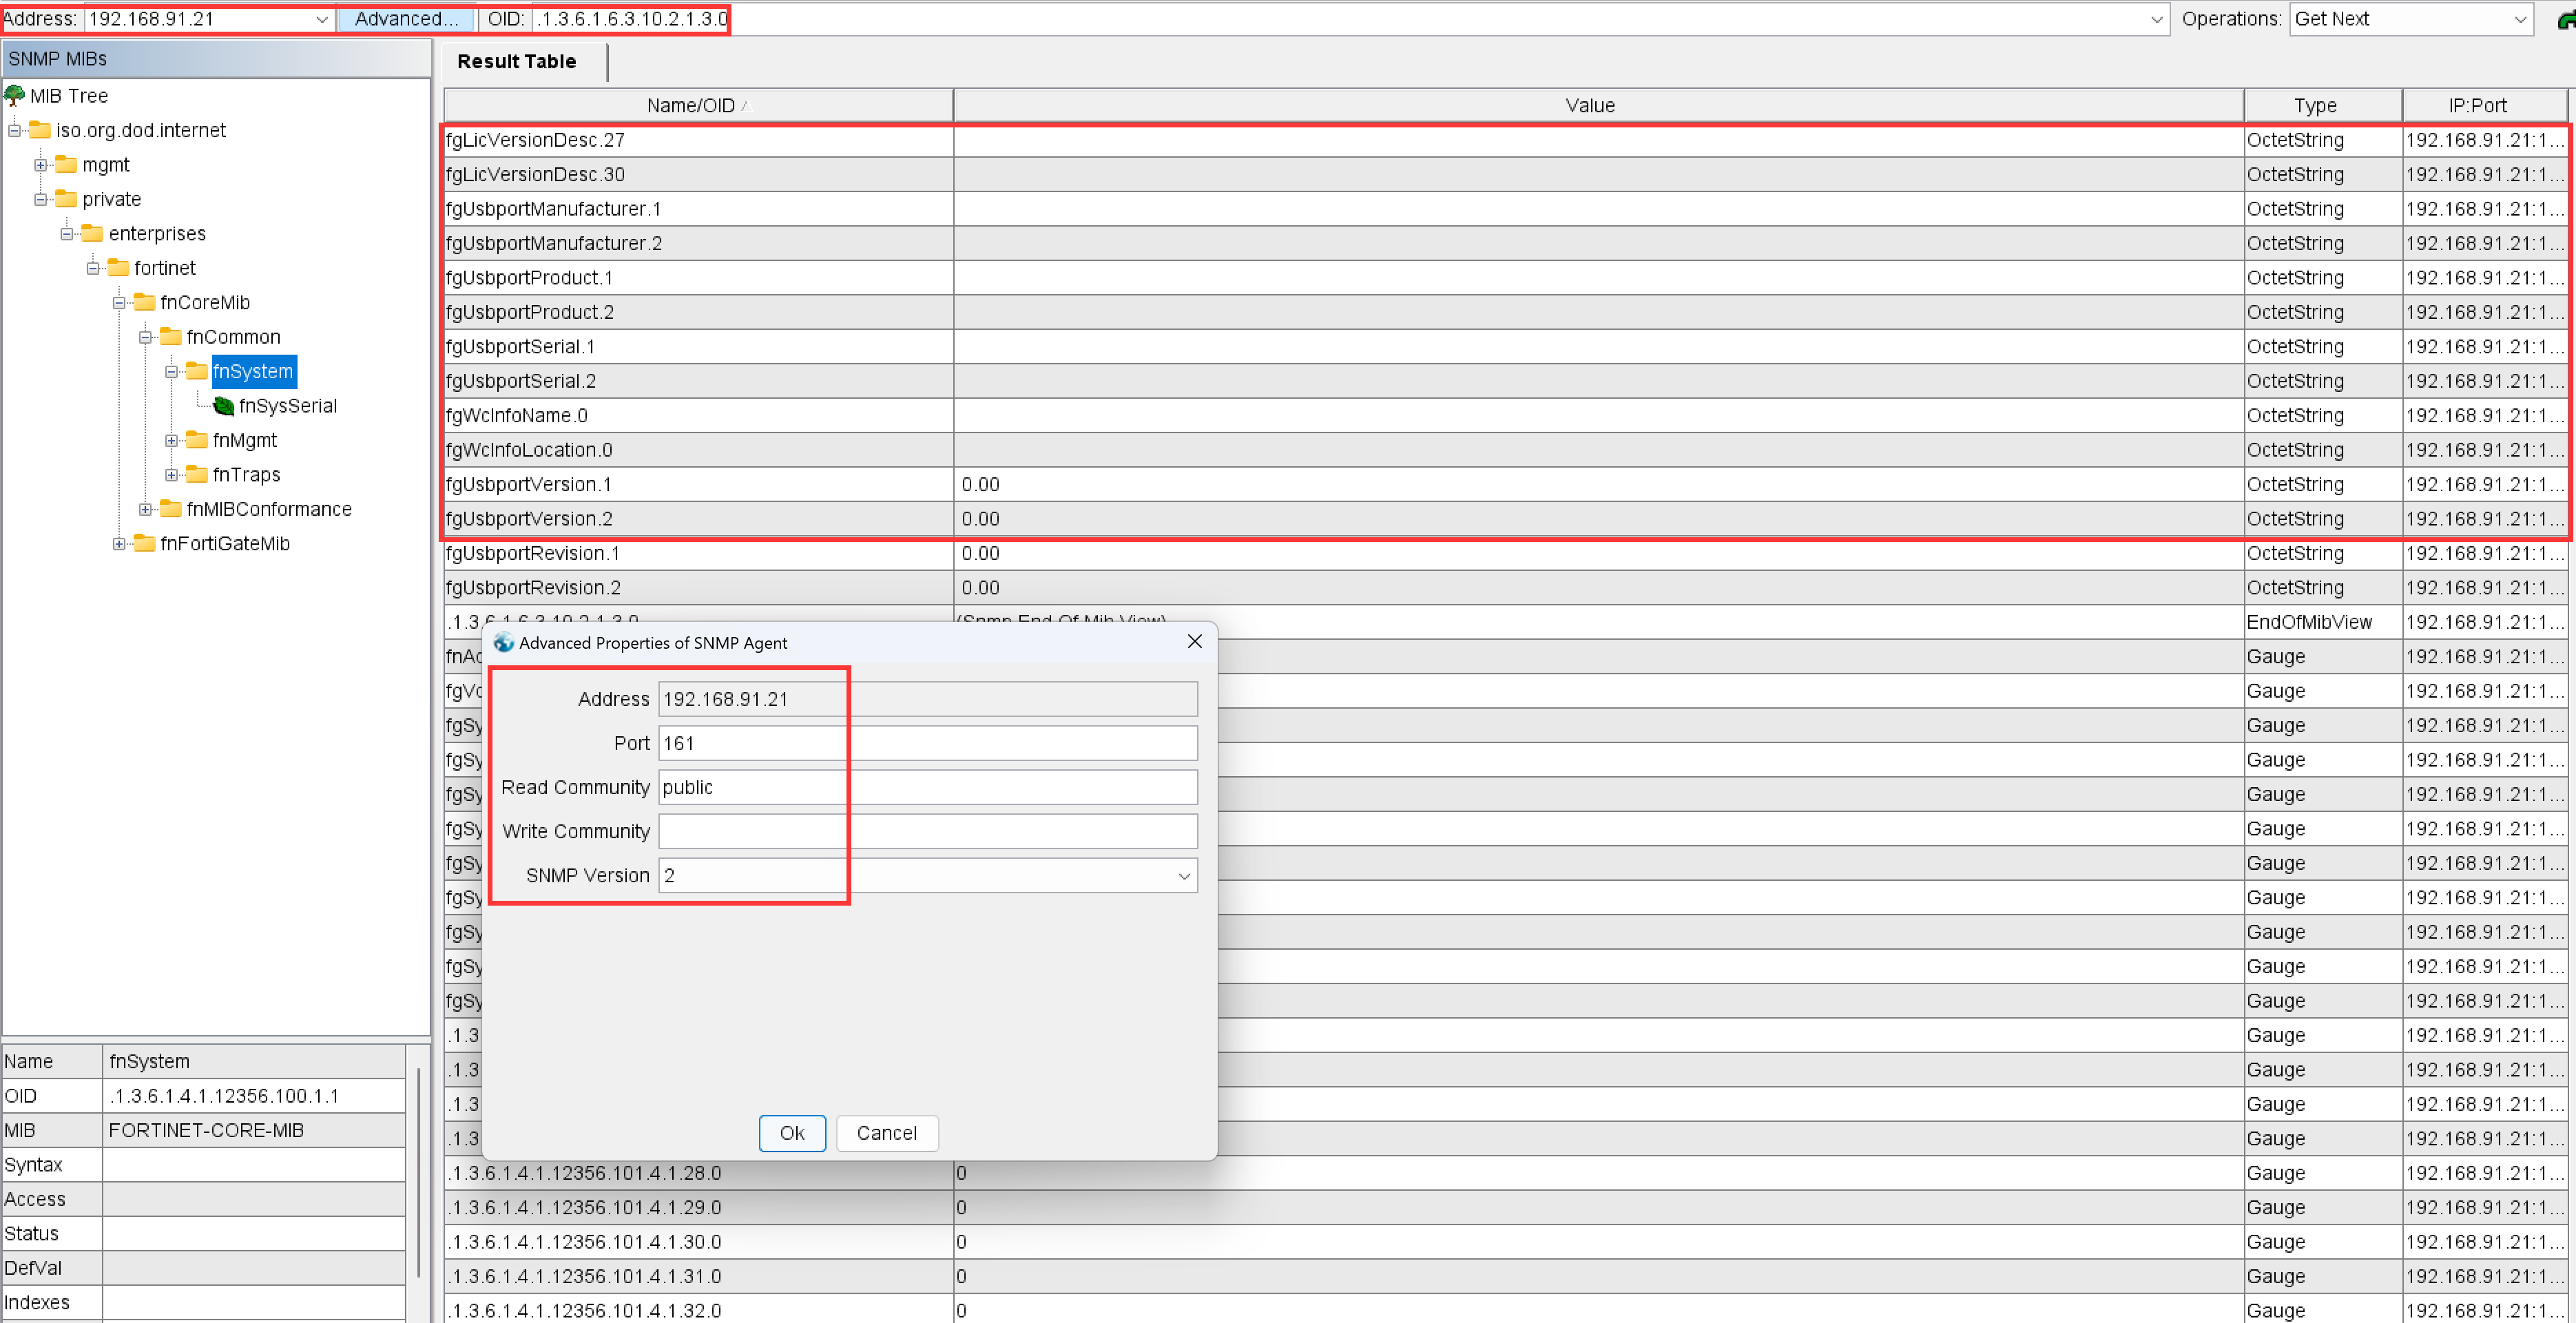

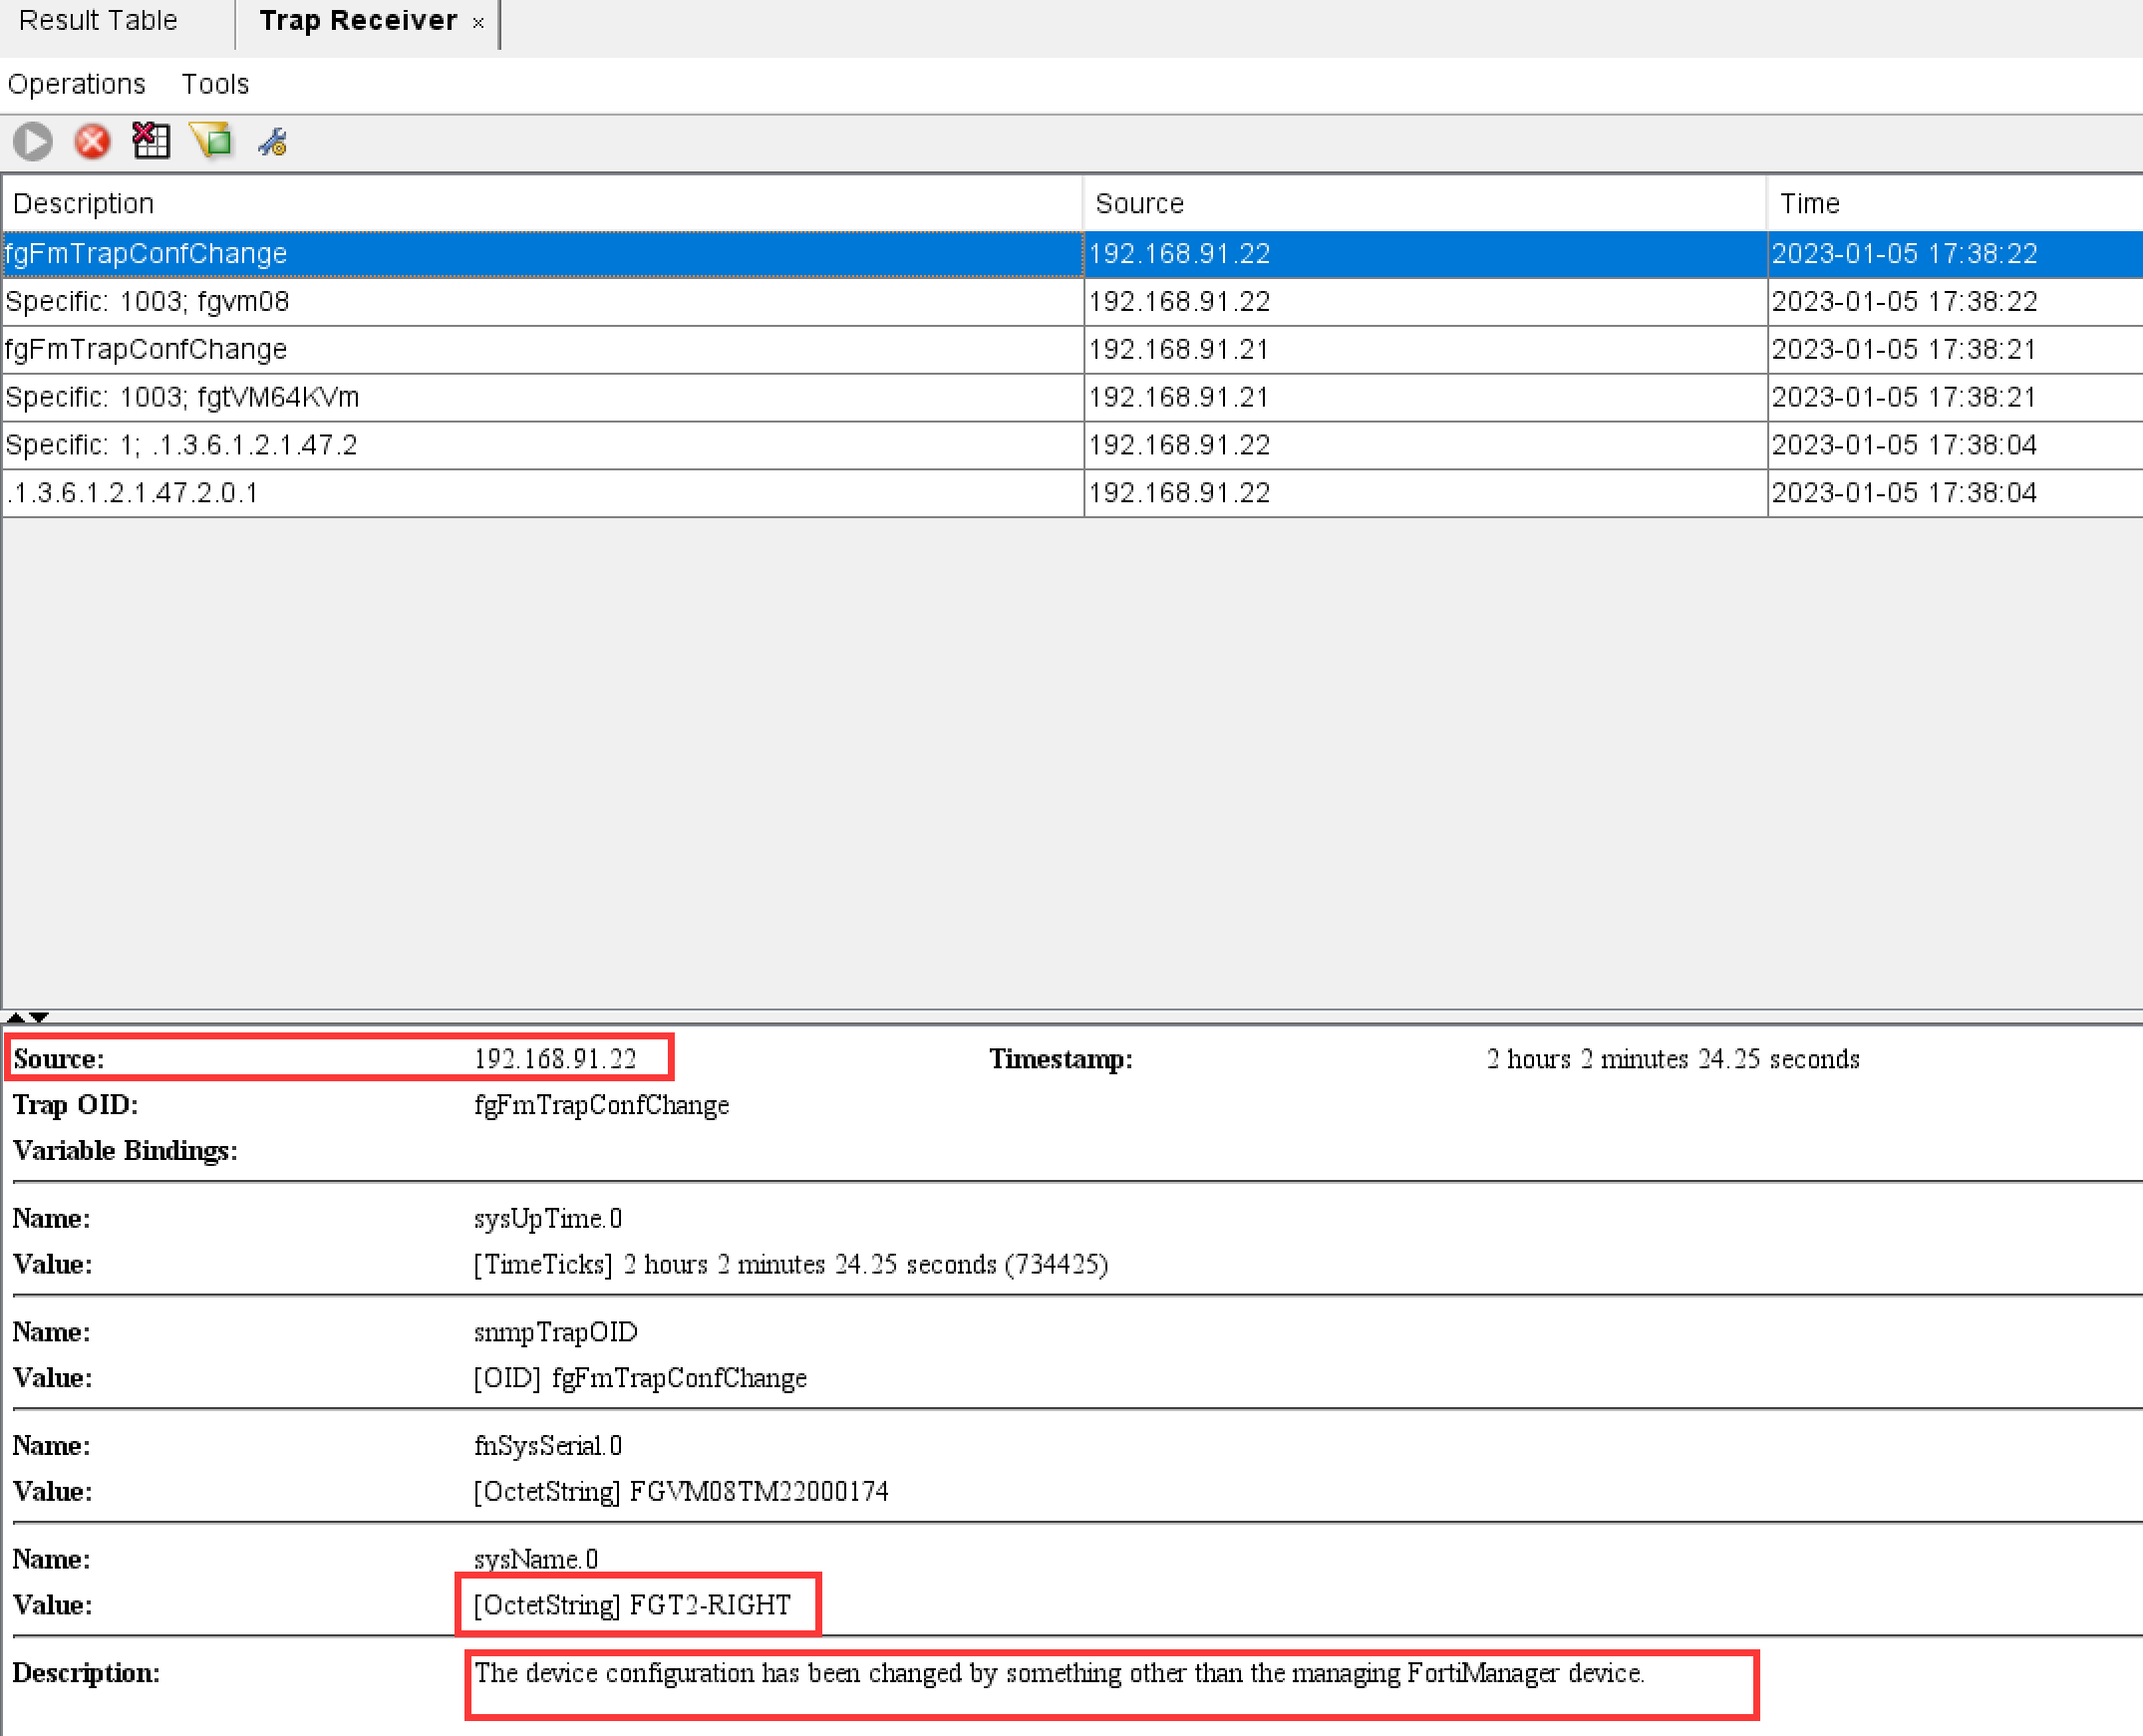
SNMP 客户端接收到的 FGT 发送的 trap 信息,可以看到主备设备均通过自身进行发送。
FGT1-LEFT (MGMT) # dia sniff pa any "port 162" 4
Using Original Sniffing Mode
interfaces=[any]
filters=[port 162]
38.445858 port6 out 192.168.91.21.162 -> 192.168.91.105.162: udp 104
38.446035 port6 out 192.168.91.21.162 -> 192.168.91.105.162: udp 128

FGT2-RIGHT (MGMT) # dia sniff pa any "port 162" 4
Using Original Sniffing Mode
interfaces=[any]
filters=[port 162]
150.833321 port6 out 192.168.91.22.162 -> 192.168.91.105.162: udp 43
150.833537 port6 out 192.168.91.22.162 -> 192.168.91.105.162: udp 68
168.867406 port6 out 192.168.91.22.162 -> 192.168.91.105.162: udp 107
168.867504 port6 out 192.168.91.22.162 -> 192.168.91.105.162: udp 129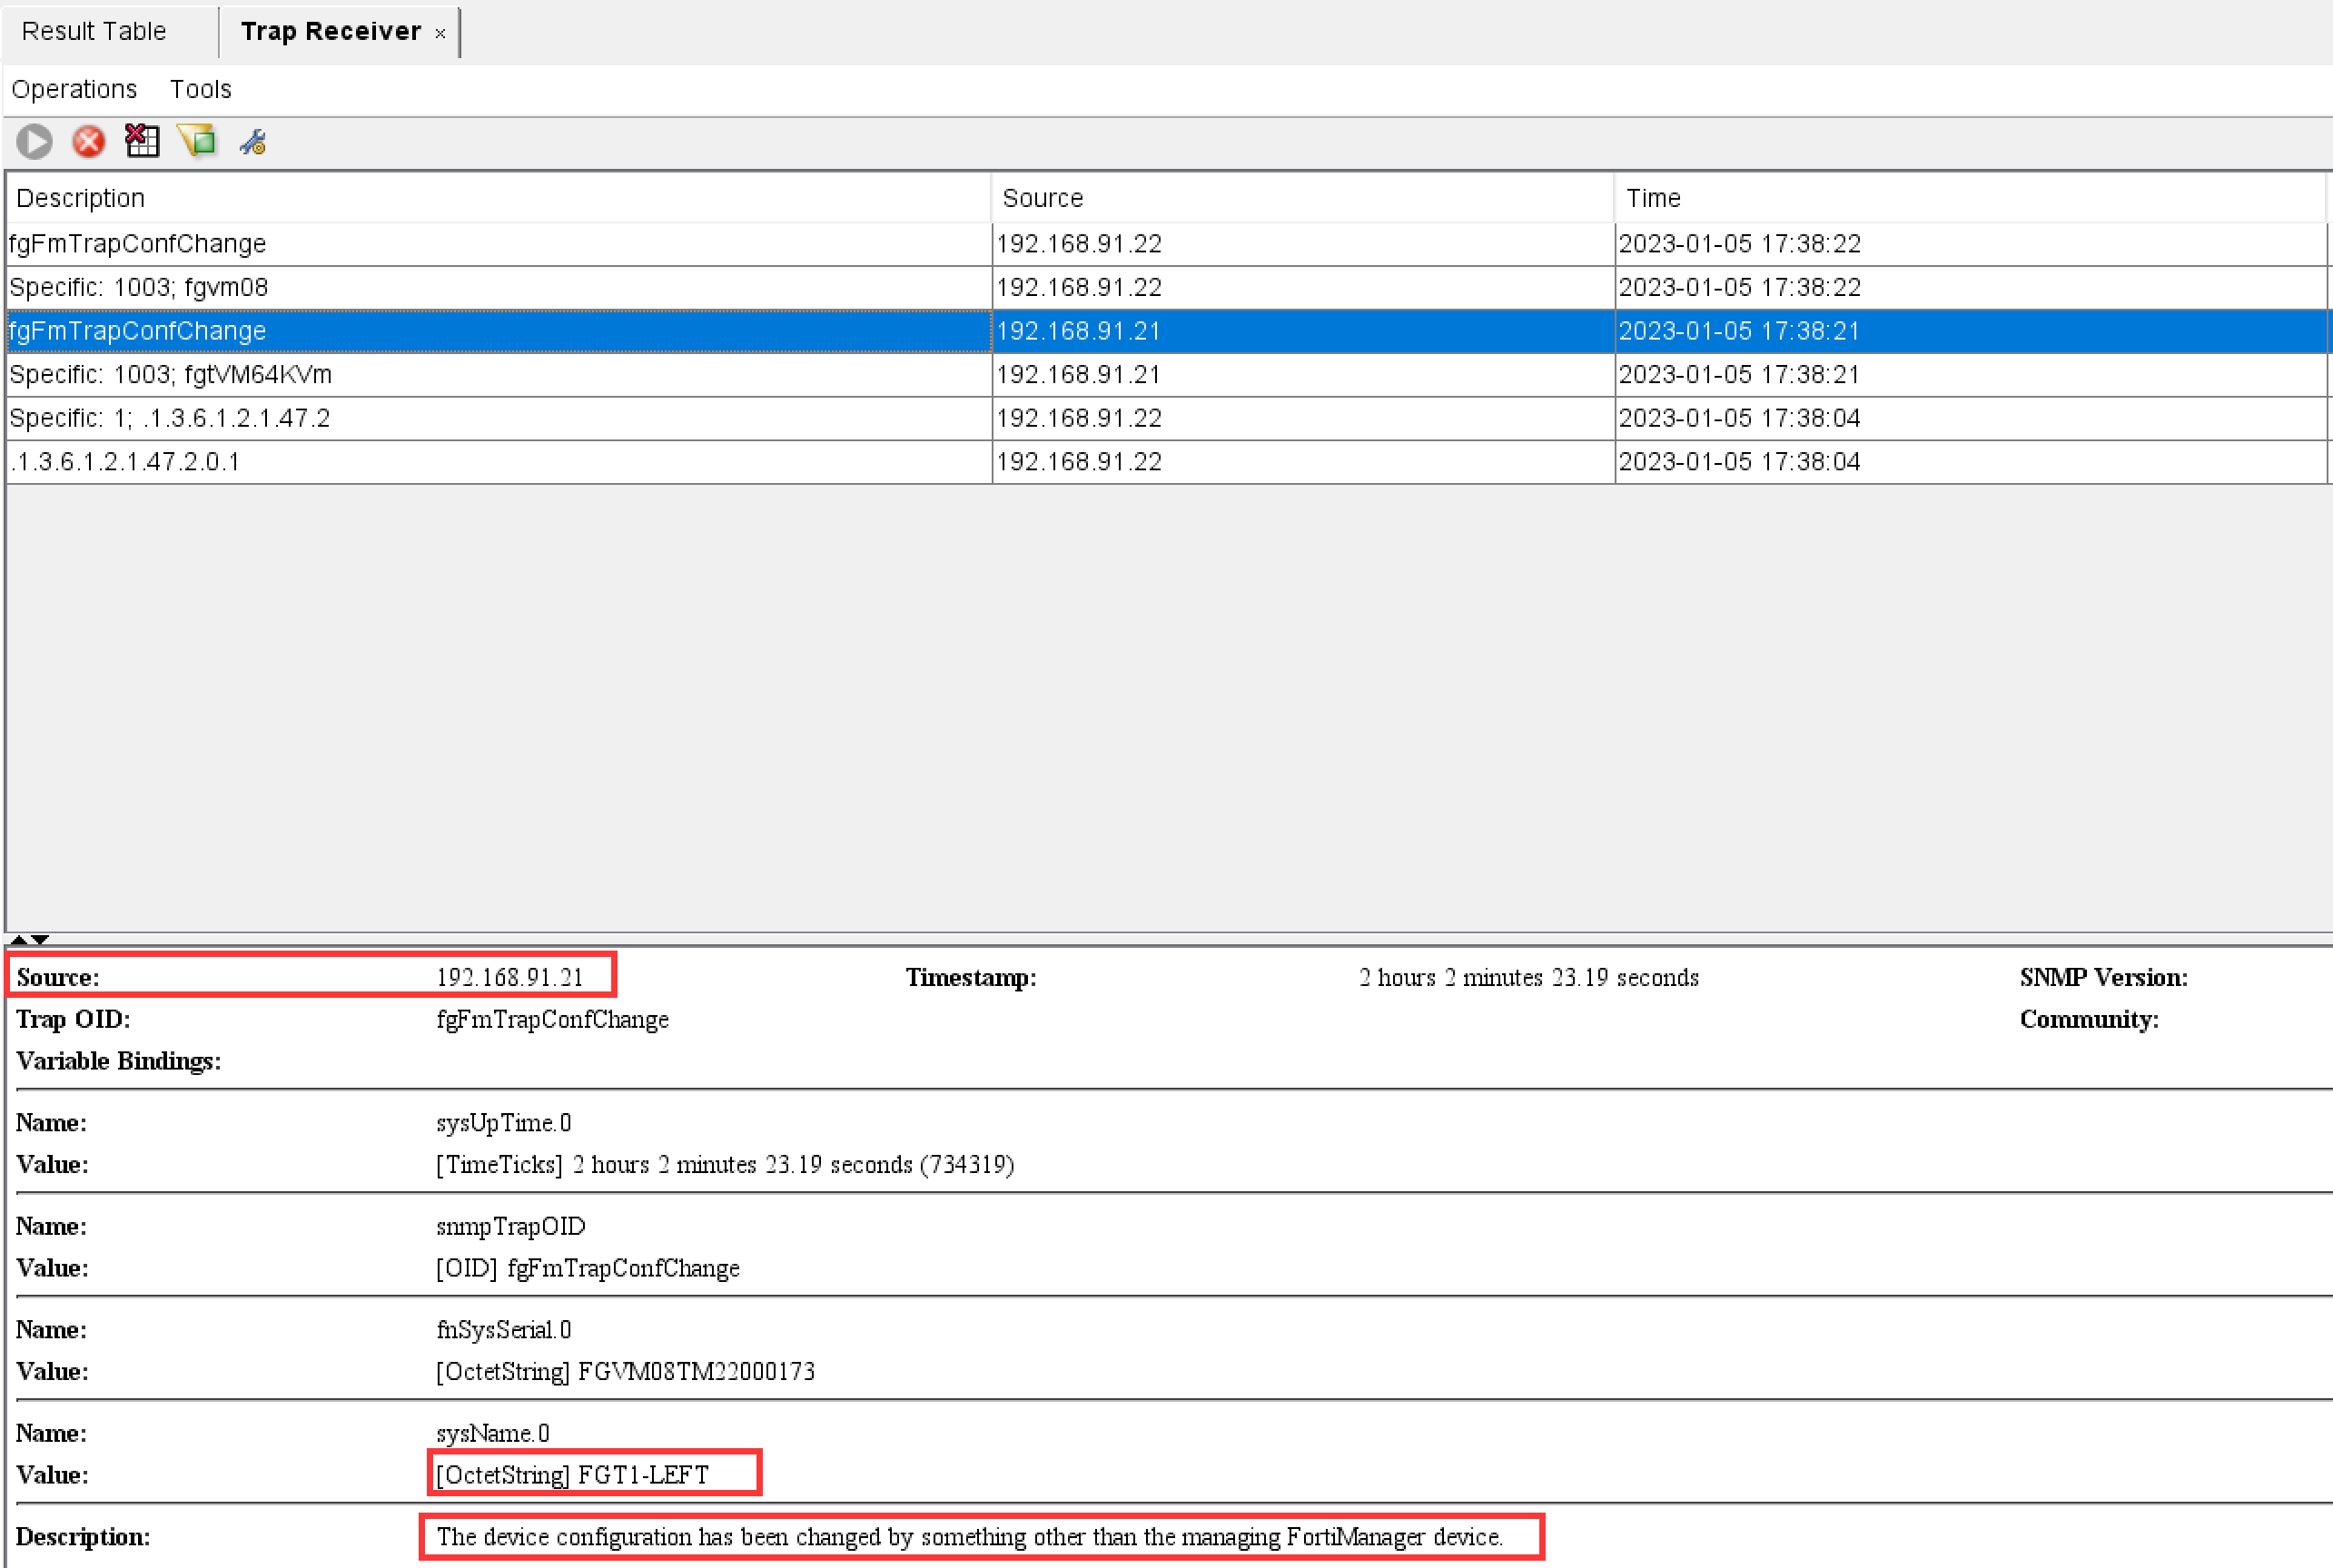
FortiManger 管理
FortiManager 只能通过业务接口添加,通过 FGT 的 port2(wan)口添加设备,在 FGT 的 wan 口下开启 FMG 管理协议。
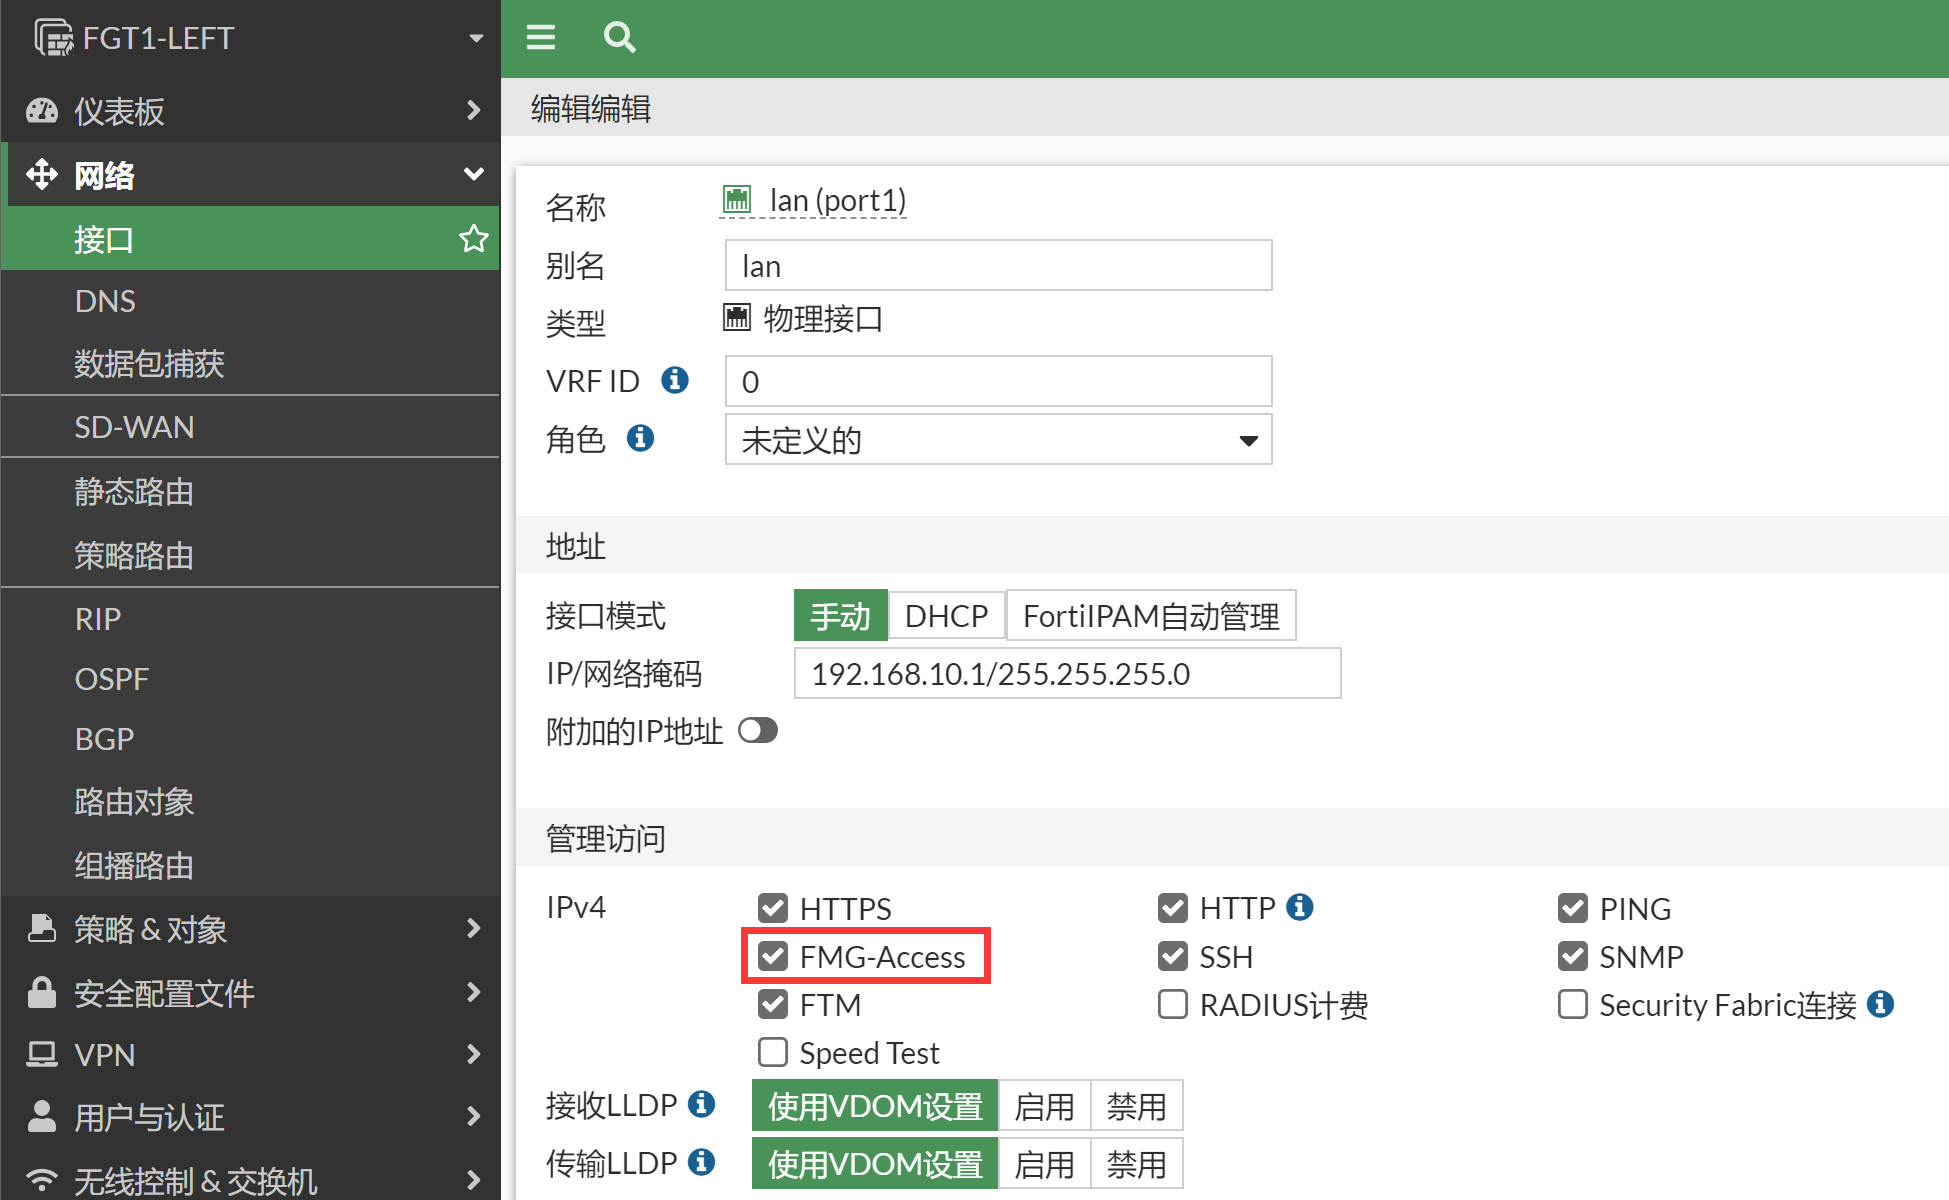
config global
config system interface
    edit "port1"
        set vdom "root"
        set ip 192.168.10.1 255.255.255.0
        set allowaccess ping https ssh snmp http fgfm ftm
        set type physical
        set alias "lan"
        set snmp-index 1
    next
end
配置防火墙主动连接 FMG(如果 FMG 可以主动访问到 FGT,也可以通过 FMG 主动添加 FGT)。
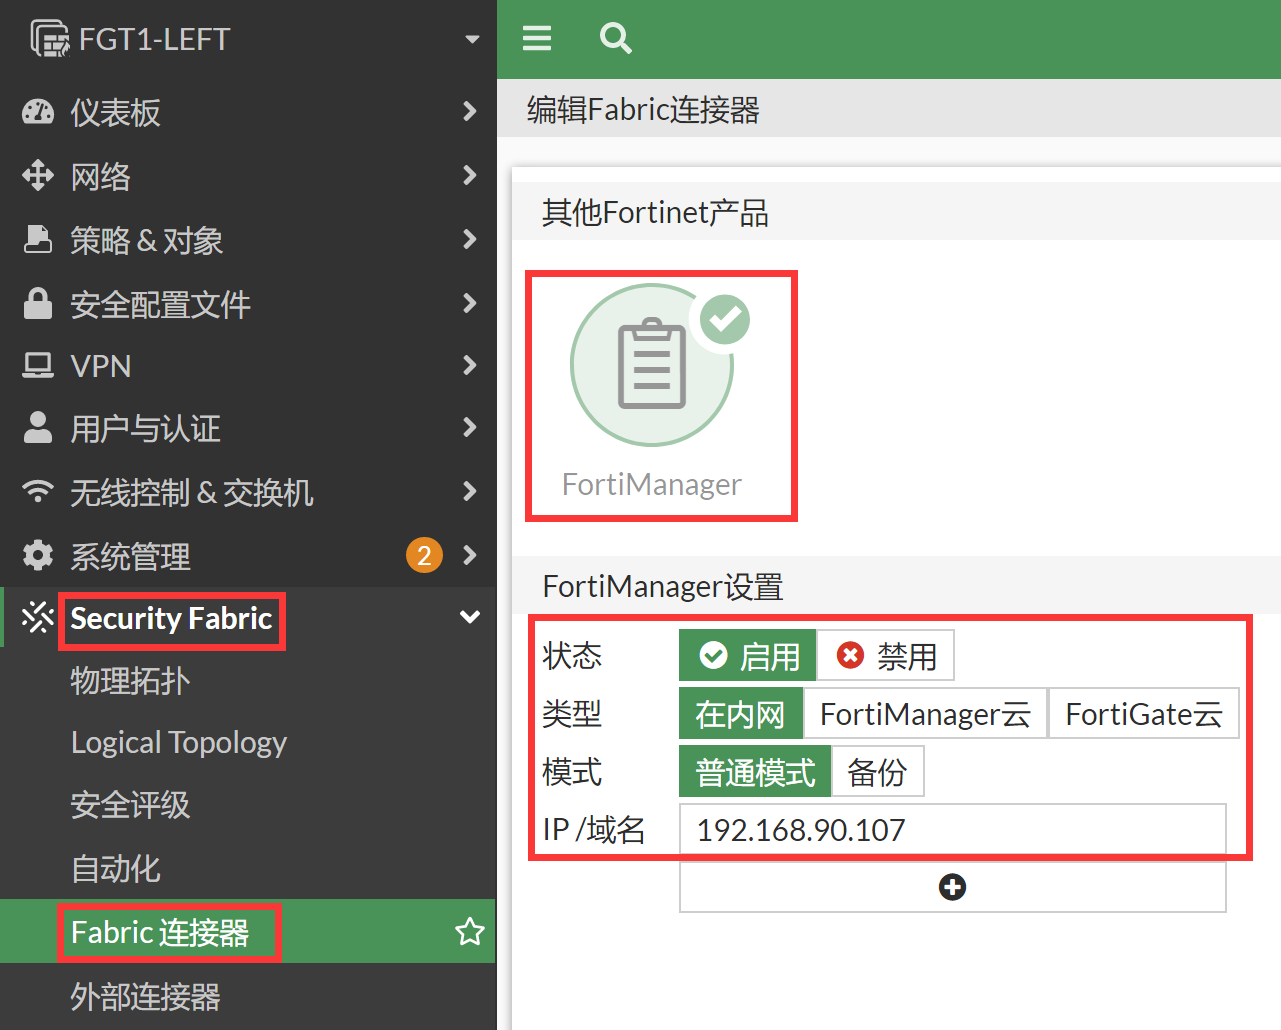
config global
config system central-management
    set type fortimanager
    set fmg "192.168.90.107"
end
如果是 FGT 主动去注册 FMG,则 FMG 会有未注册的设备提示。
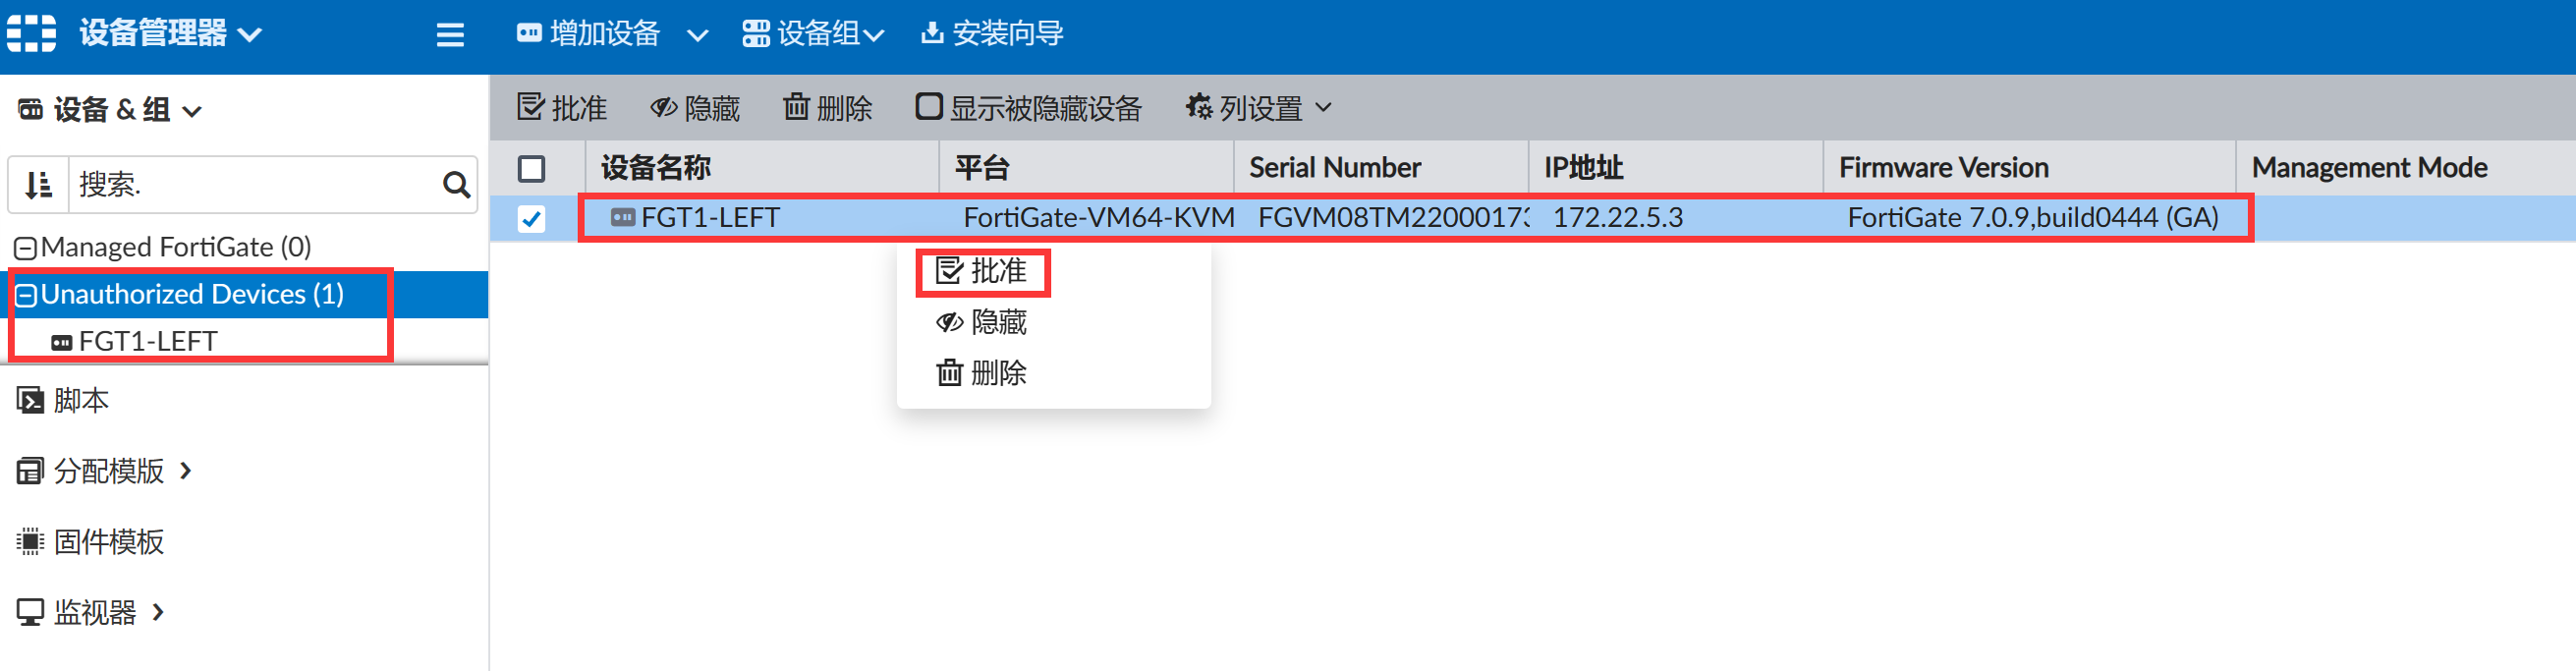
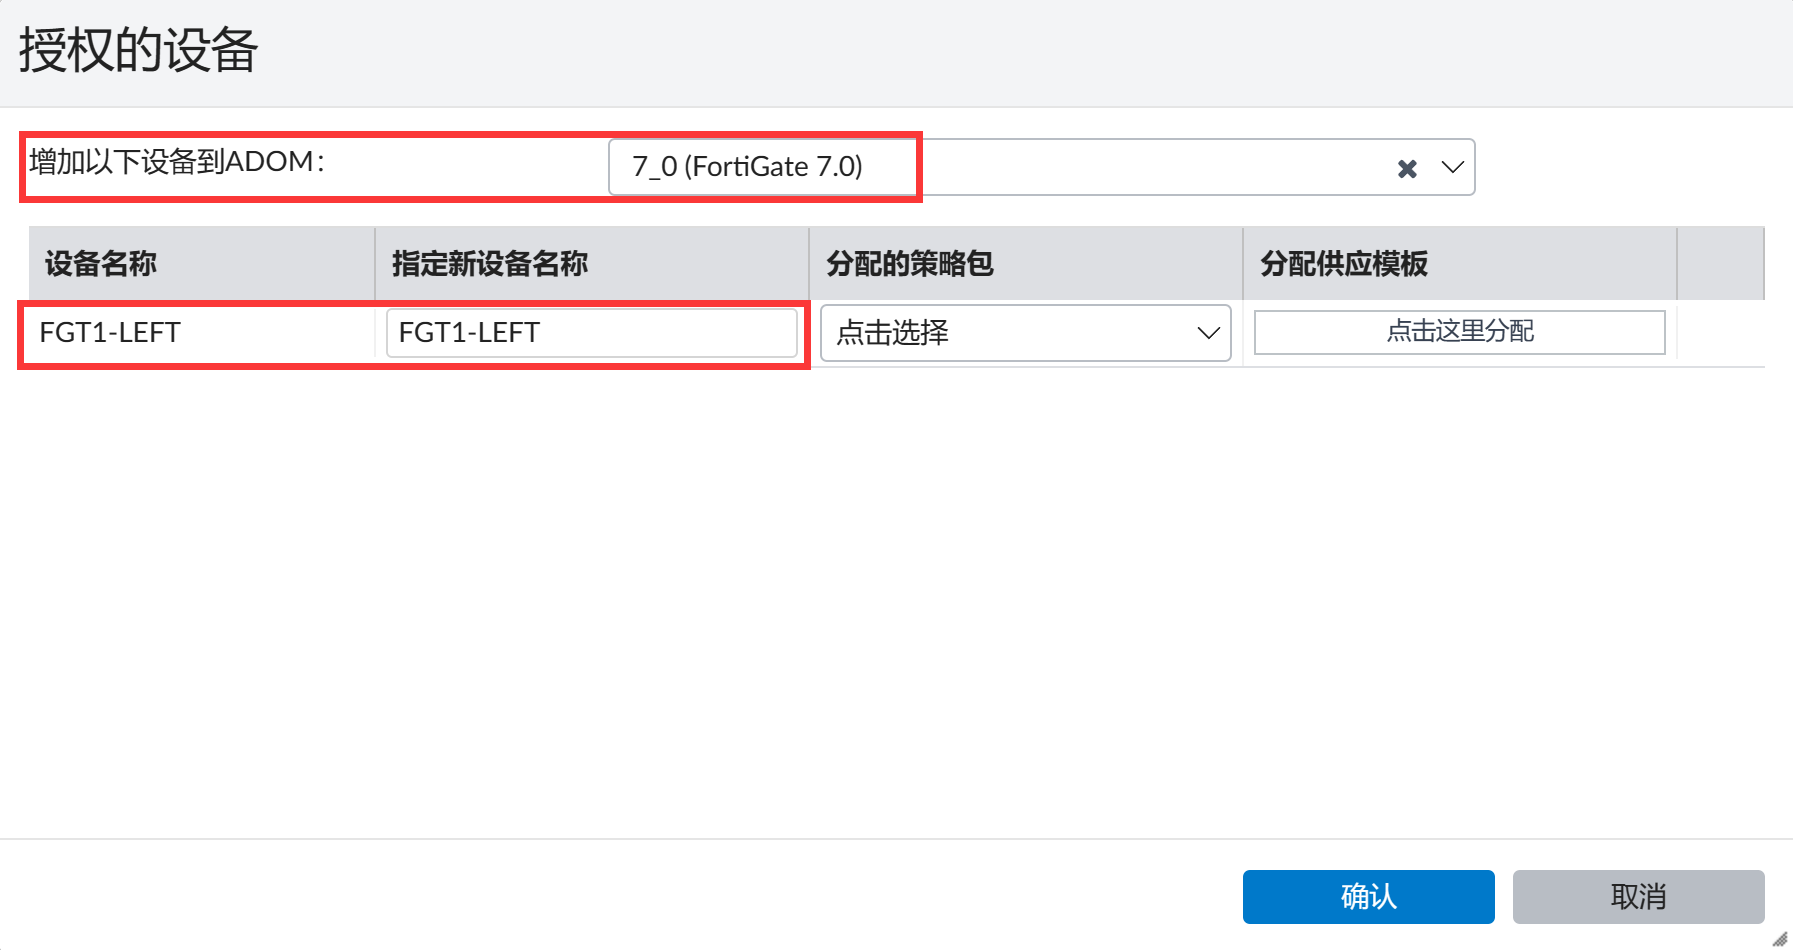
只需要将设备添加到 FMG 的对应 ADOM 的设备管理中即可。
授权完成。
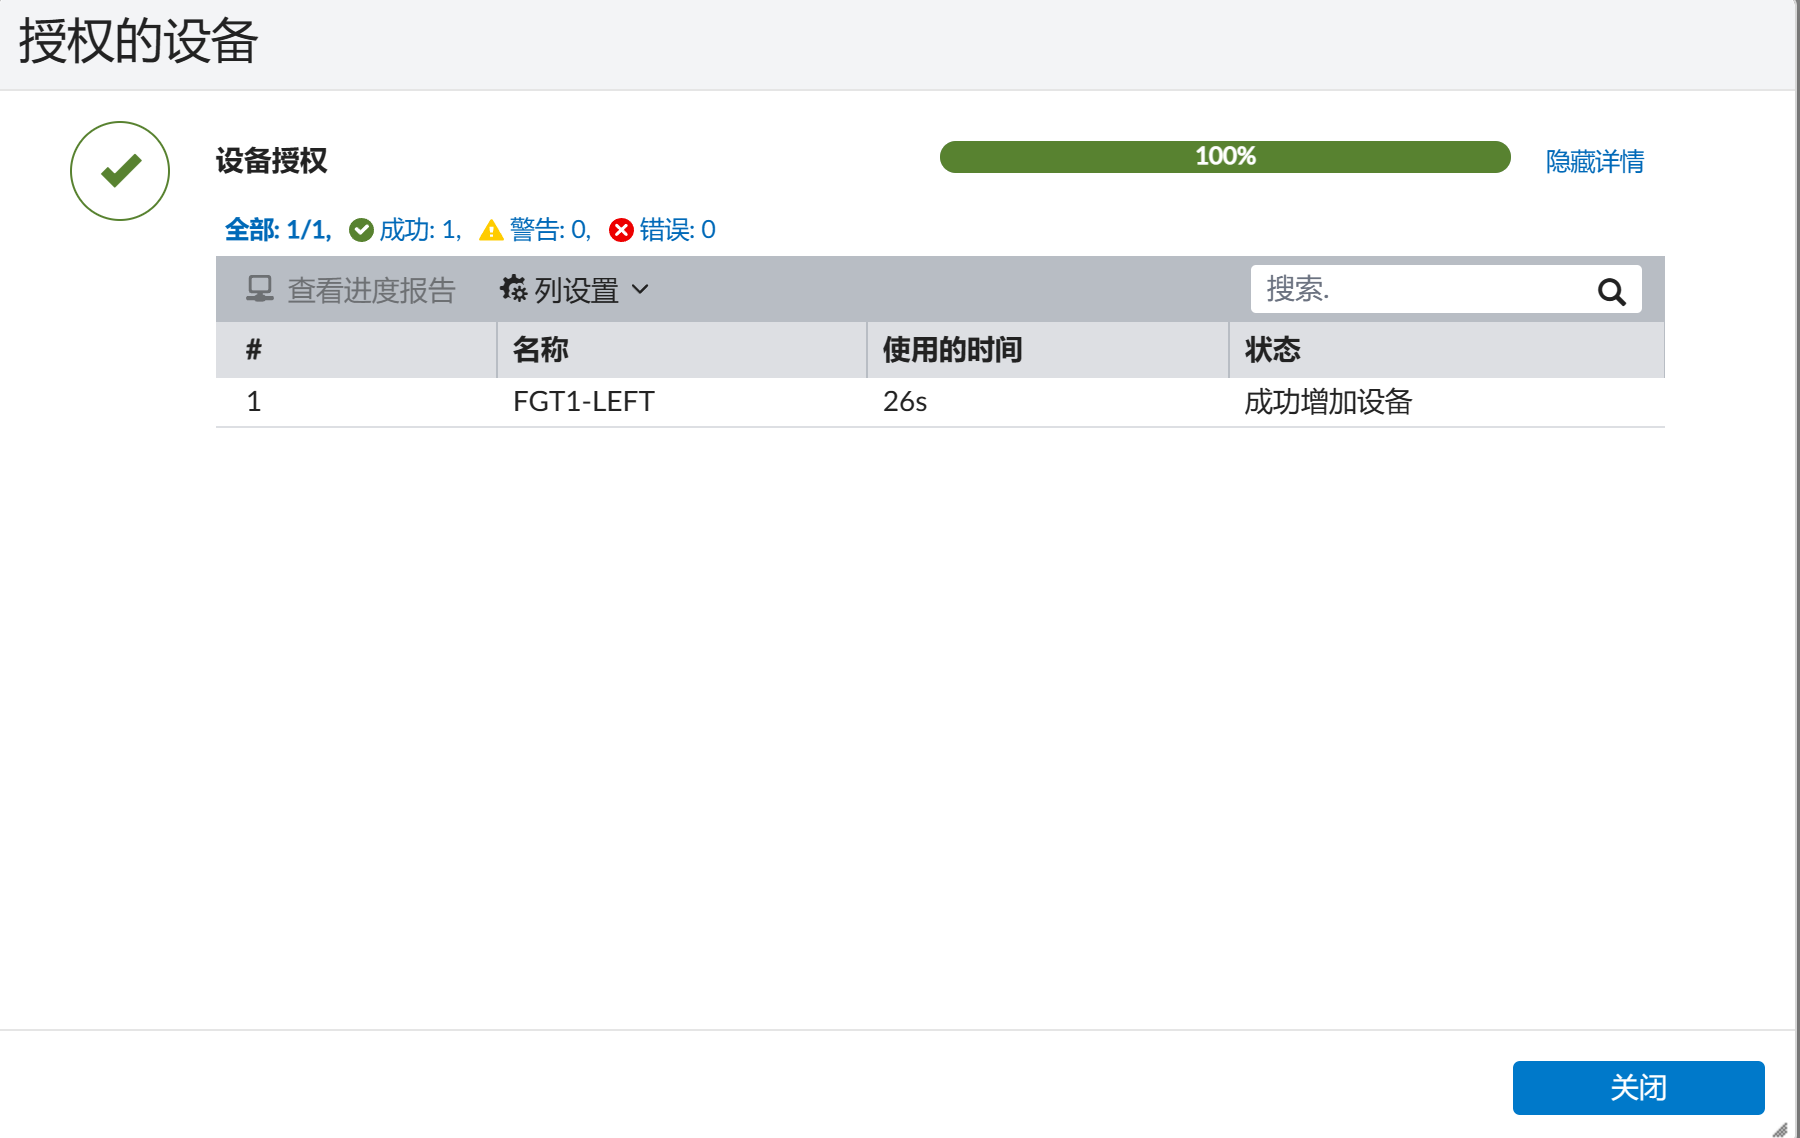
在 FMG 中可以对 FGT 进行管理。
关于 FMG 还是建议使用业务接口进行管理,不能使用独立管理口/独立管理 VDOM 进行管理。对于 FMG 来说 HA-Cluster 就是一台设备,因此需要一个固定的 IP 地址来网管 FGT 会比较合适,可以有效的避免 HA 发生切换的时候,FGT 和 FMG 的 tunnel 中断的情况。
总结
此时所有的 SNMP/Radius/SYSLOG/DNS/FORTGUARD 都是通过 MGMT 这个 VDOM 进行更新的,完全独立于 root 业务 VDOM,彻底的管理是管理,业务是业务。这是 HA 独立管理的终极解决方案。
重要
FortiManger 管理 HA-Cluster 的时候只能通过业务接口进行管理,不能通过独立管理口或者独立管理 VDOM 进行管理。