双线路不同运营商上网配置
双线路不同运营商上网配置
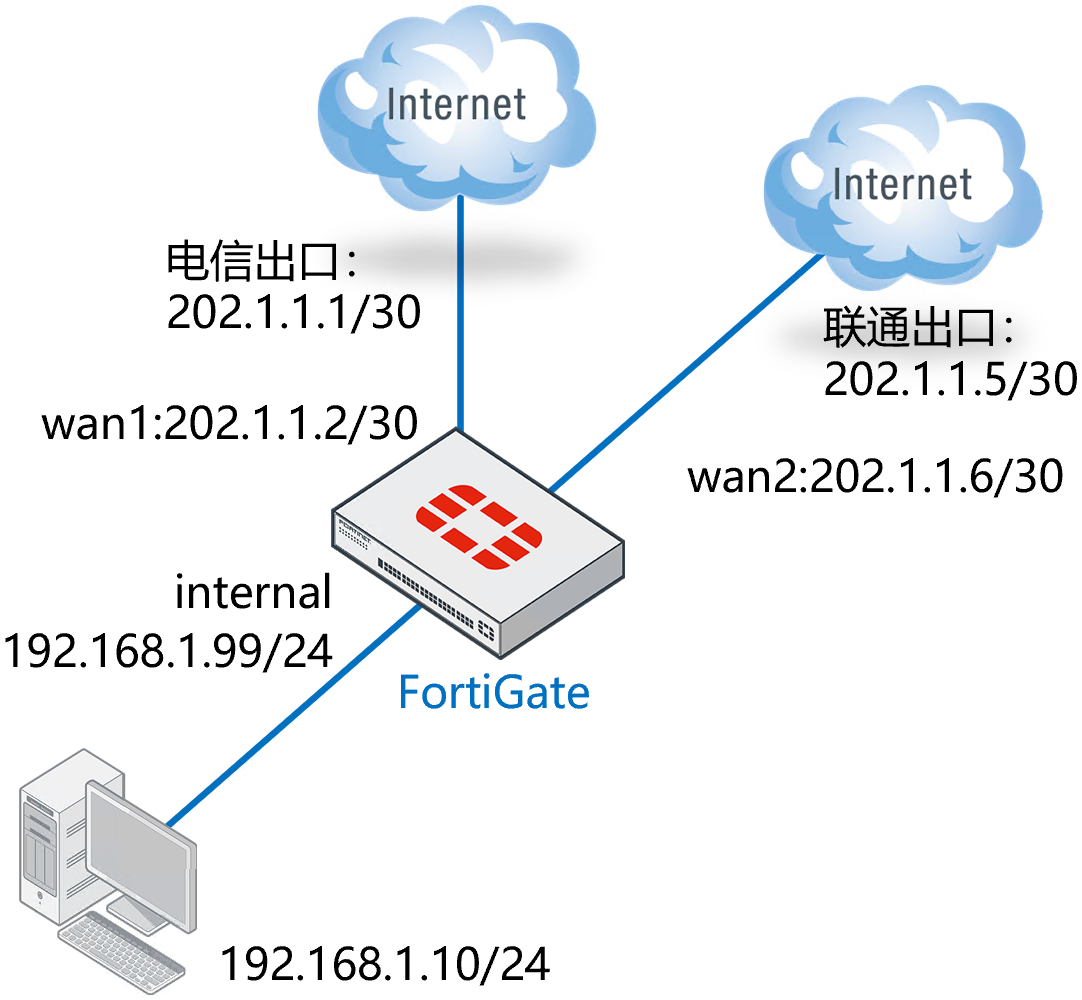
网络需求
防火墙到电信和联通分别有一条链路,去往电信的 IP,通过 wan1(port2)口;去往联通的 IP,通过 wan2(port3)口。
- 电信:wan1(port2)口:202.1.1.2/30,网关为 202.1.1.1,NAT 地址池:202.1.1.1-10
- 联通:wan2(port3)口:102.1.1.2/30,网关为 102.1.1.1,NAT 地址池:200.0.0.1-10
网络拓扑
配置要点
- 配置接口 IP
- 配置路由
- 配置地址池
- 配置策略
- 注意:部分低端型号路由表规格有限,不适用导入运营商路由表的方法
配置步骤
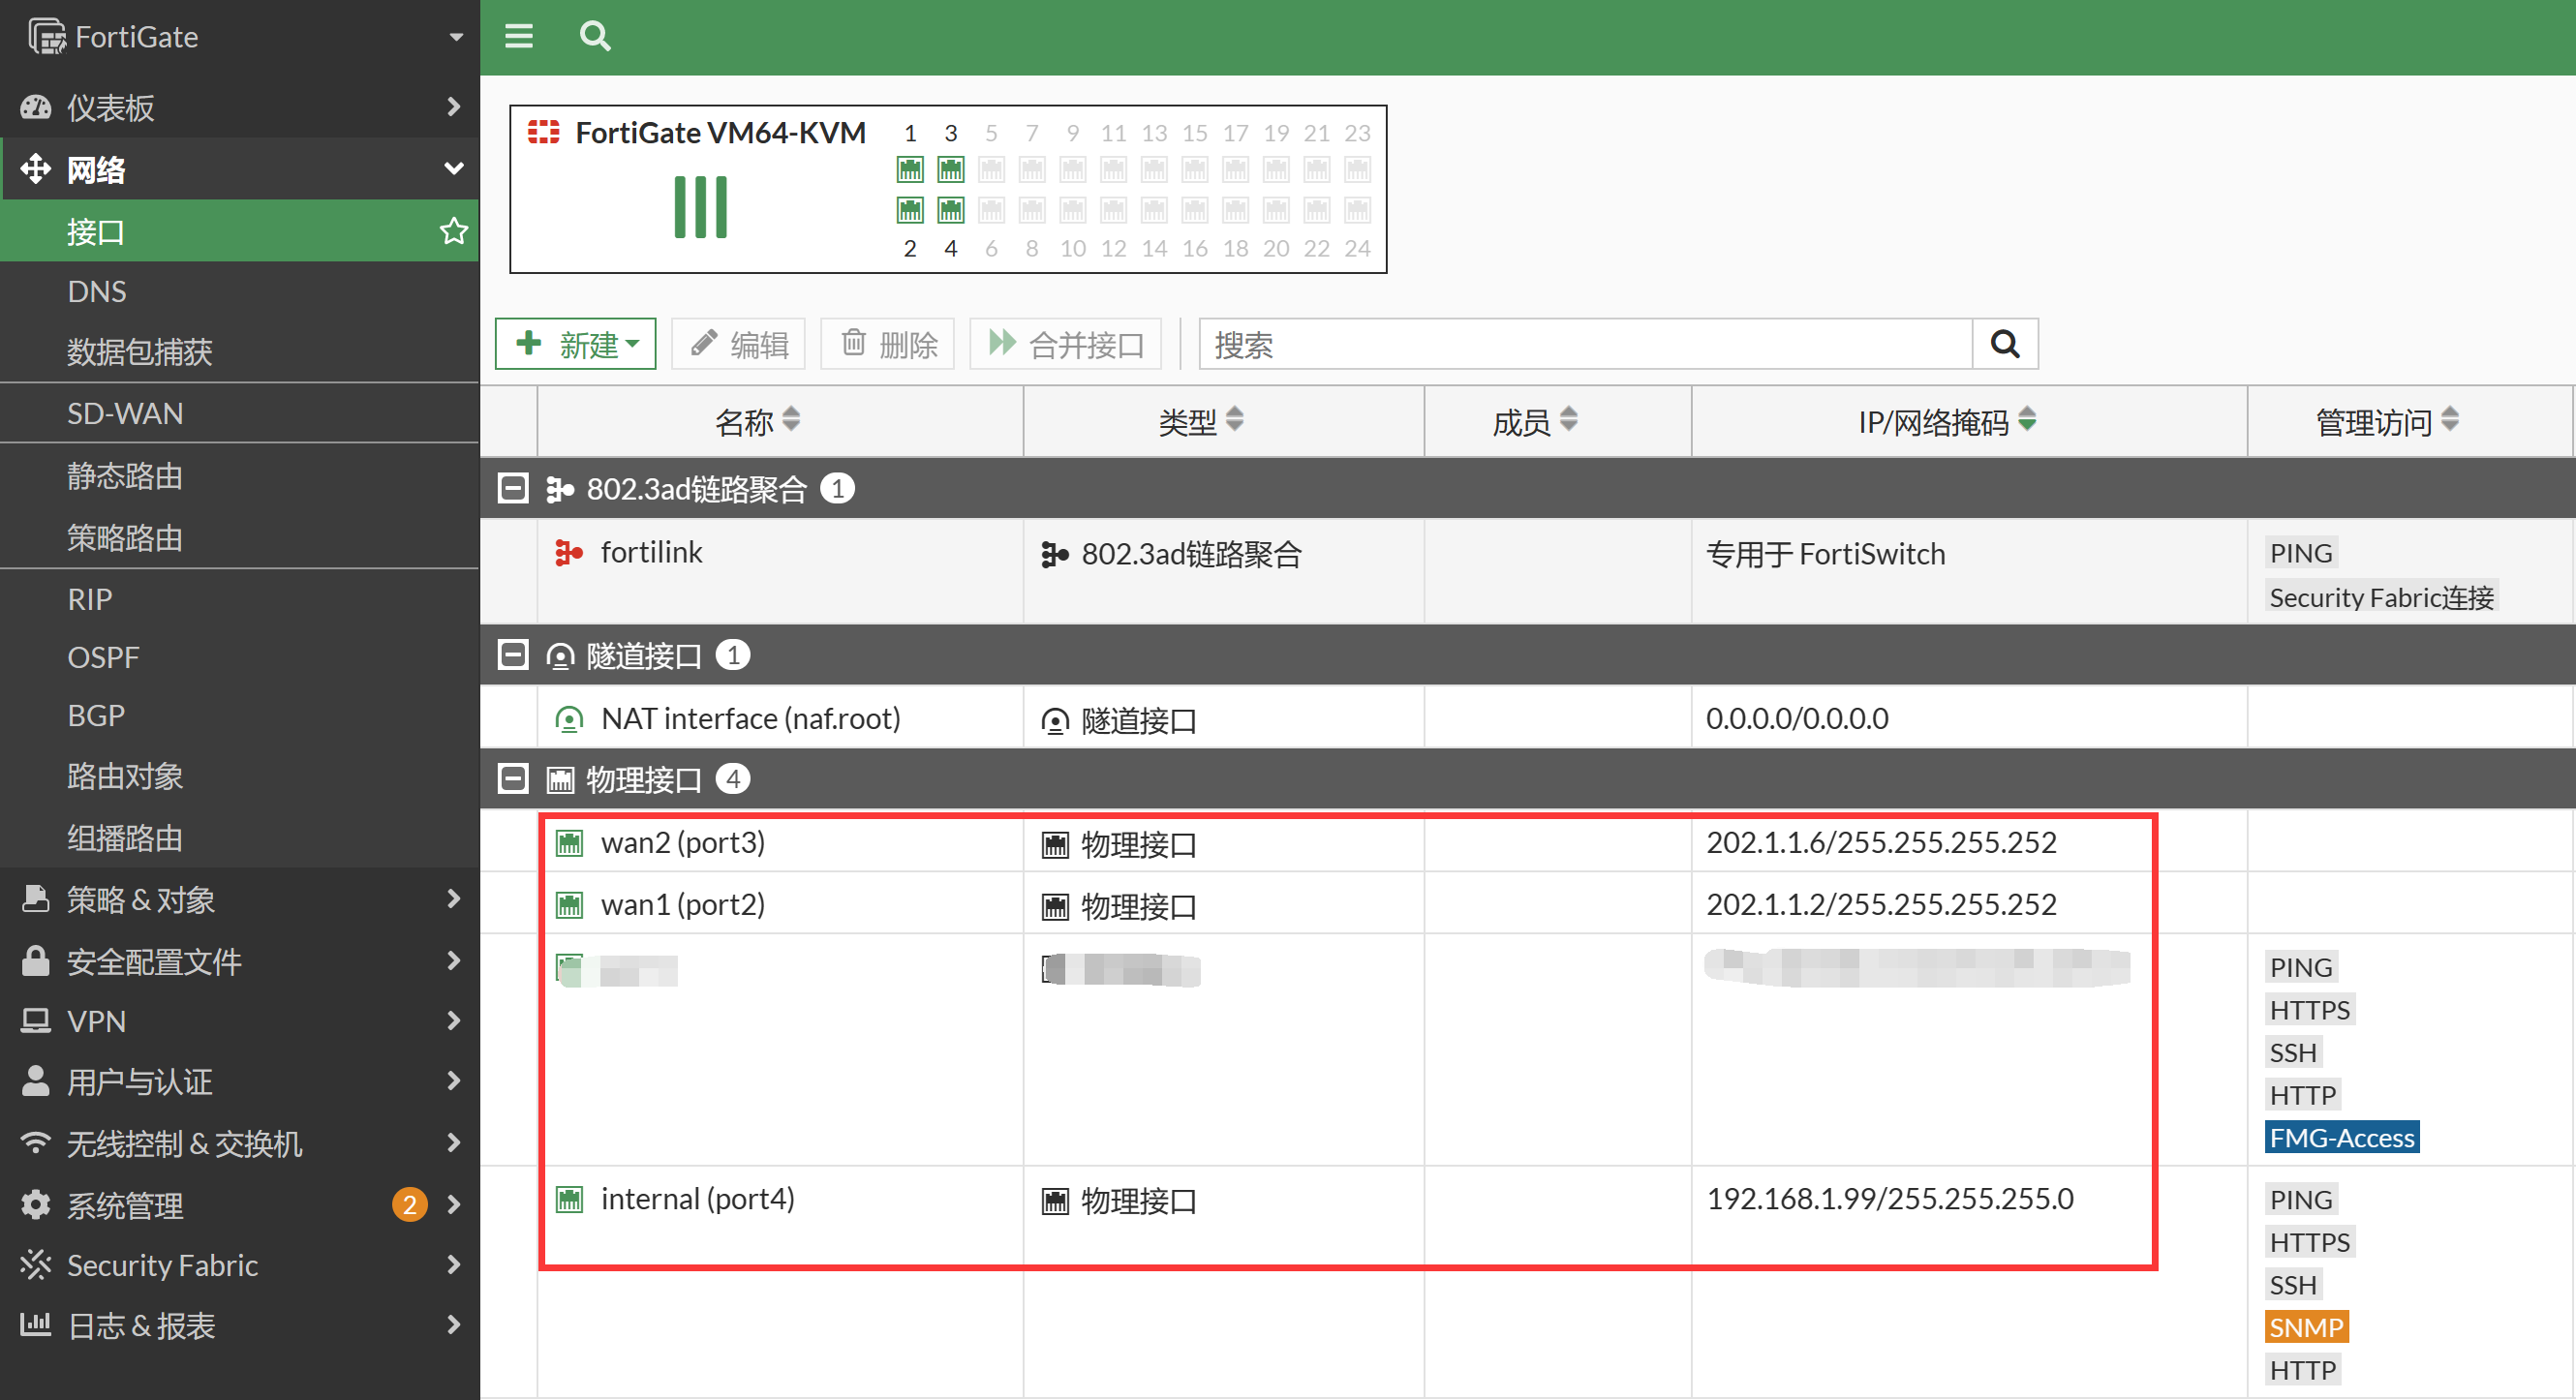
配置接口 IP,进入网络 → 接口页面,编辑 wan1(port2)、wan2(port3)internal(port4),分别配置为 202.1.1.2/30、202.1.1.6/30、192.168.1.99/24。
配置静态路由,创建电信链路(wan1)的默认路由。

config router static edit 1 set gateway 202.1.1.1 set device "port2" next end- 目的的 IP/子网掩码:由于是默认网关,使用默认的 0.0.0.0/0.0.0.0 即可
- 接口:该路由所关联的接口,wan1 口,必须正确填写,否则该路由无法工作
- 网关:下一跳 IP 地址, 即 wan1 口对端运营商设备接口的 ip 地址
- 管理距离:默认 10
- 高级选项 - 优先级:默认 1,优先级小的优先使用
- 注意:
- 要想实现两个出口线路同时工作,两条路由表的管理距离必须相同。否则路径长度长的路由条目,不会装入路由表
- 管理距离相等的同时,优先级必须相同。 如果路径相等优先级不同,则虽然两条路由都会被装入路由表,防火墙会优先采用优先级数值较小的路由工作,无法实现两条链路的流量均担
参照附件 → 命令行脚本批量转换工具说明和附件 → FortiGate 通用多运营商路由导入脚本附件章节,将联通明细路由导入 FortiGate(注意脚本中要开启允许静态路由引用地址对象)。
配置地址池,进入策略 & 对象 → IP 池,新建两个运营商的地址池。
重要
如果在 SD-WAN 中使用 ippool 的方式做 SNAT,一定要在 ippool 下配置绑定接口,防止 ippool 在 SD-WAN 成员中转换错误。
config firewall ippool
    edit xxxx
        set associated-interface port2
    next
end
重要
IPPool 配置中的外部 IP 范围不能配置为现有网络中其他设备的 IP、FortiGate 的网关 IP,也不能配置为内网客户端正常上网可能访问的 IP 地址。这是由于 FortiGate 配置 IPPool 后,IPPool 中的地址属于 FortiGate 自身的 IP 地址,所有访问该 IP 的流量经过 FortiGate 时都会被 FortiGate 引流到自身,影响正常的业务。
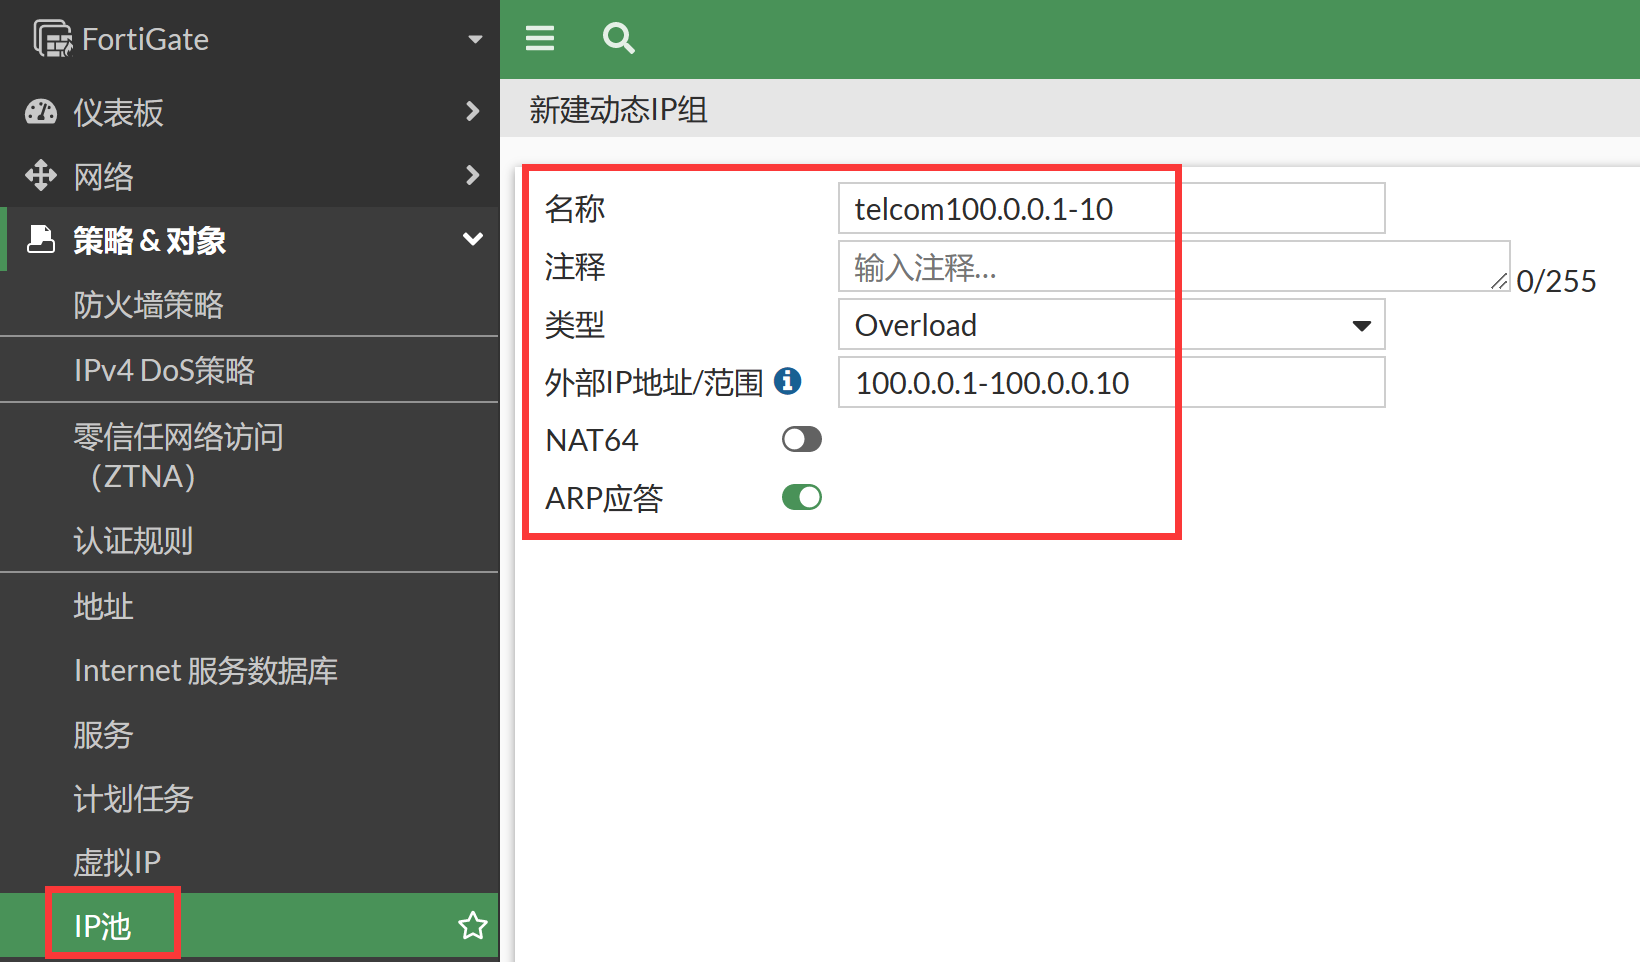
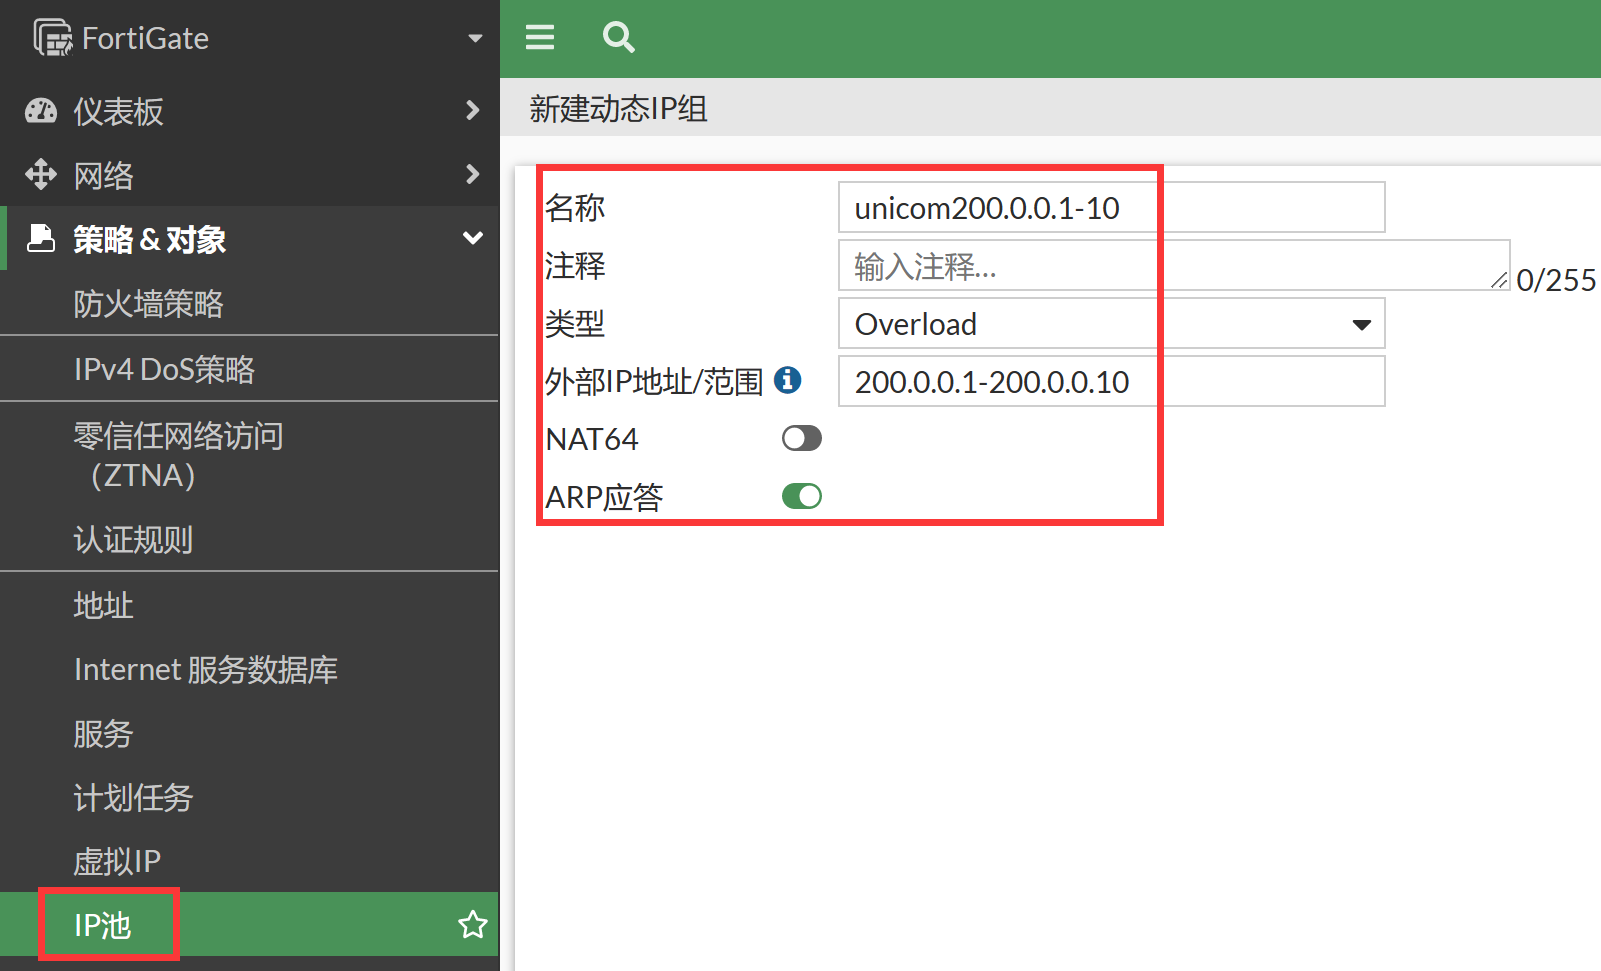
- 类型:"超载",动态的从地址池中分配
- 外部 IP 范围/子网:NAT 转换后的源地址池
- 地址解析协议回复:启用,地址池会回应 ARP 请求
config firewall ippool
    edit "telcom100.0.0.1-10"
        set startip 100.0.0.1
        set endip 100.0.0.10
    next
    edit "unicom200.0.0.1-10"
        set startip 200.0.0.1
        set endip 200.0.0.10
    next
end
配置上网放通策略,进入策略 & 对象 → 防火墙策略,新建安全策略。分别创建 internal 到 wan1 和 internal 到 wan2 的上网策略。
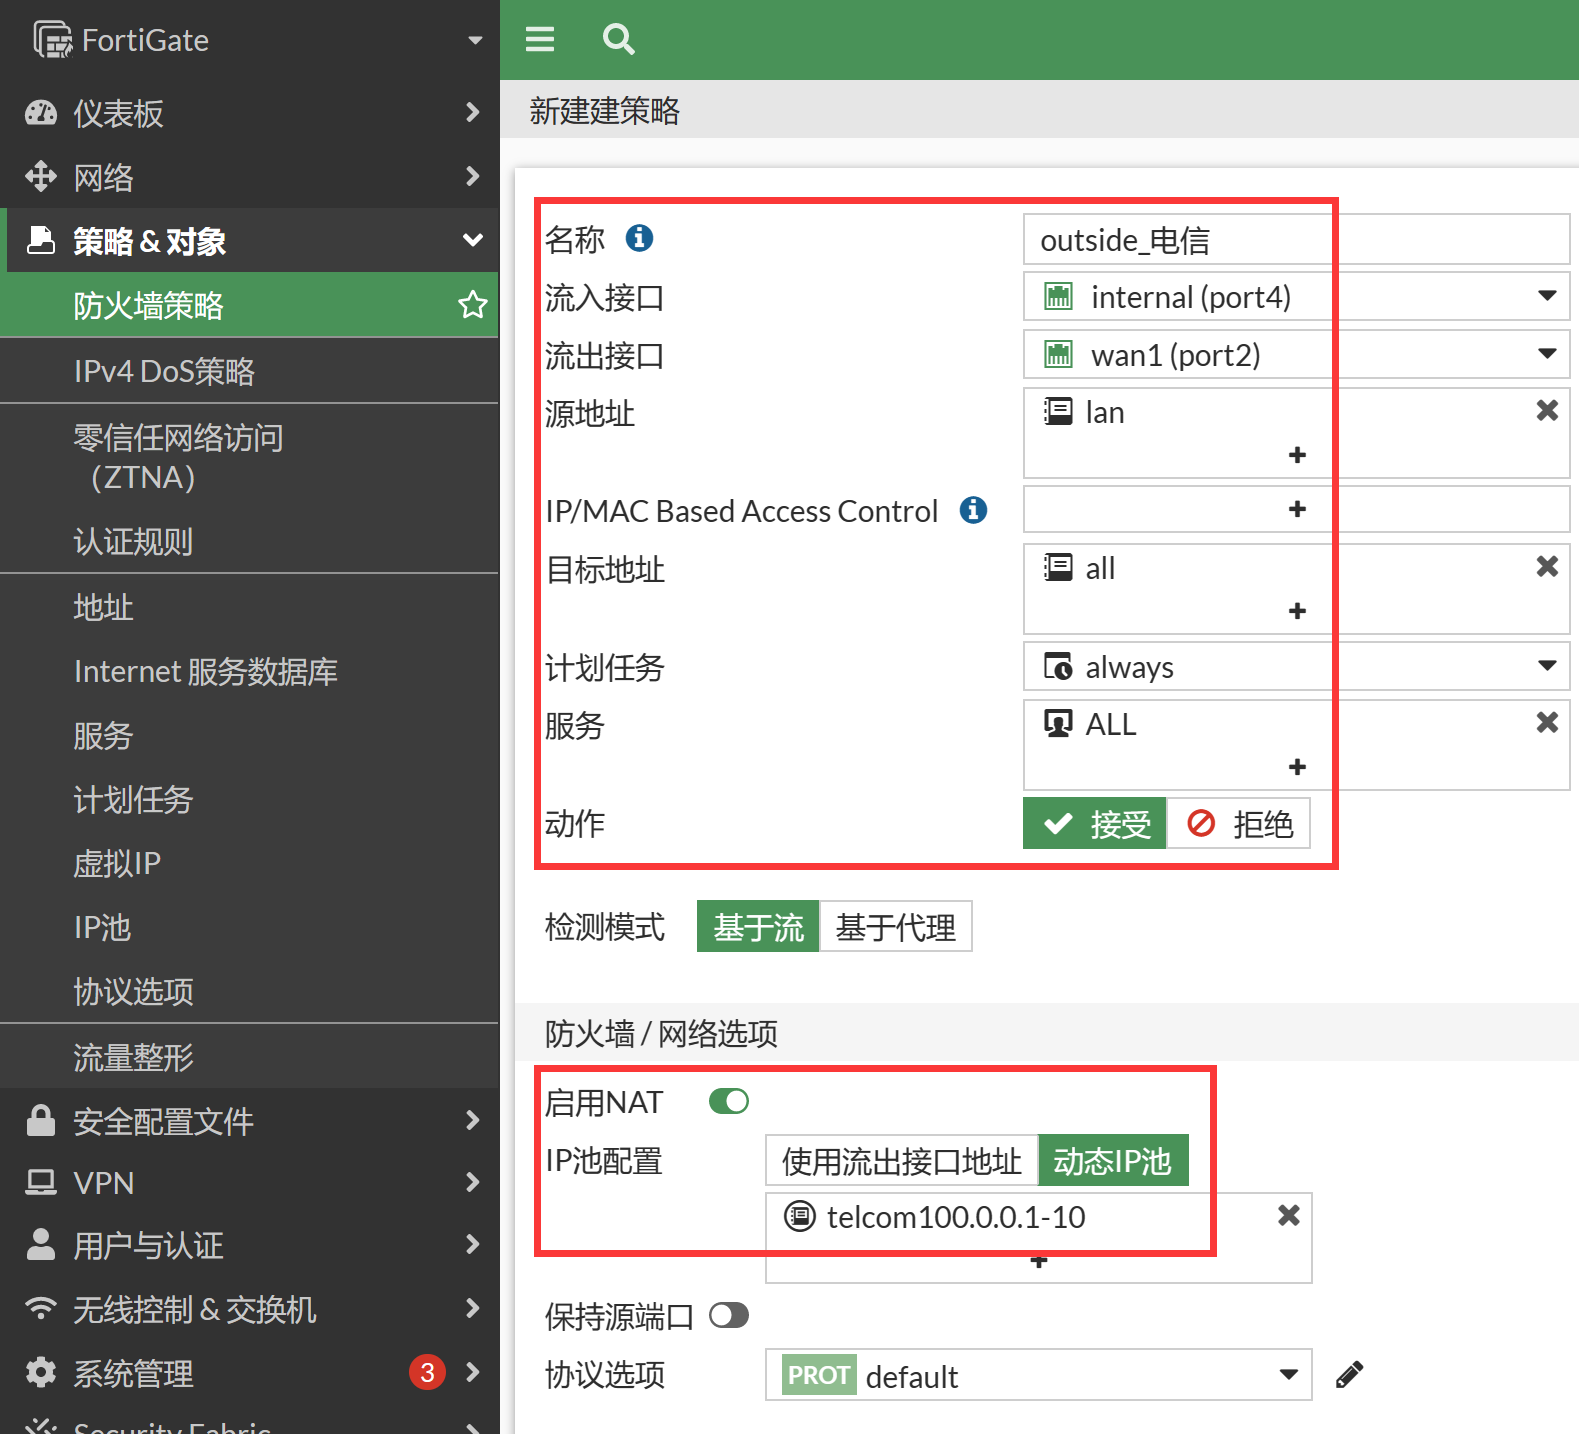
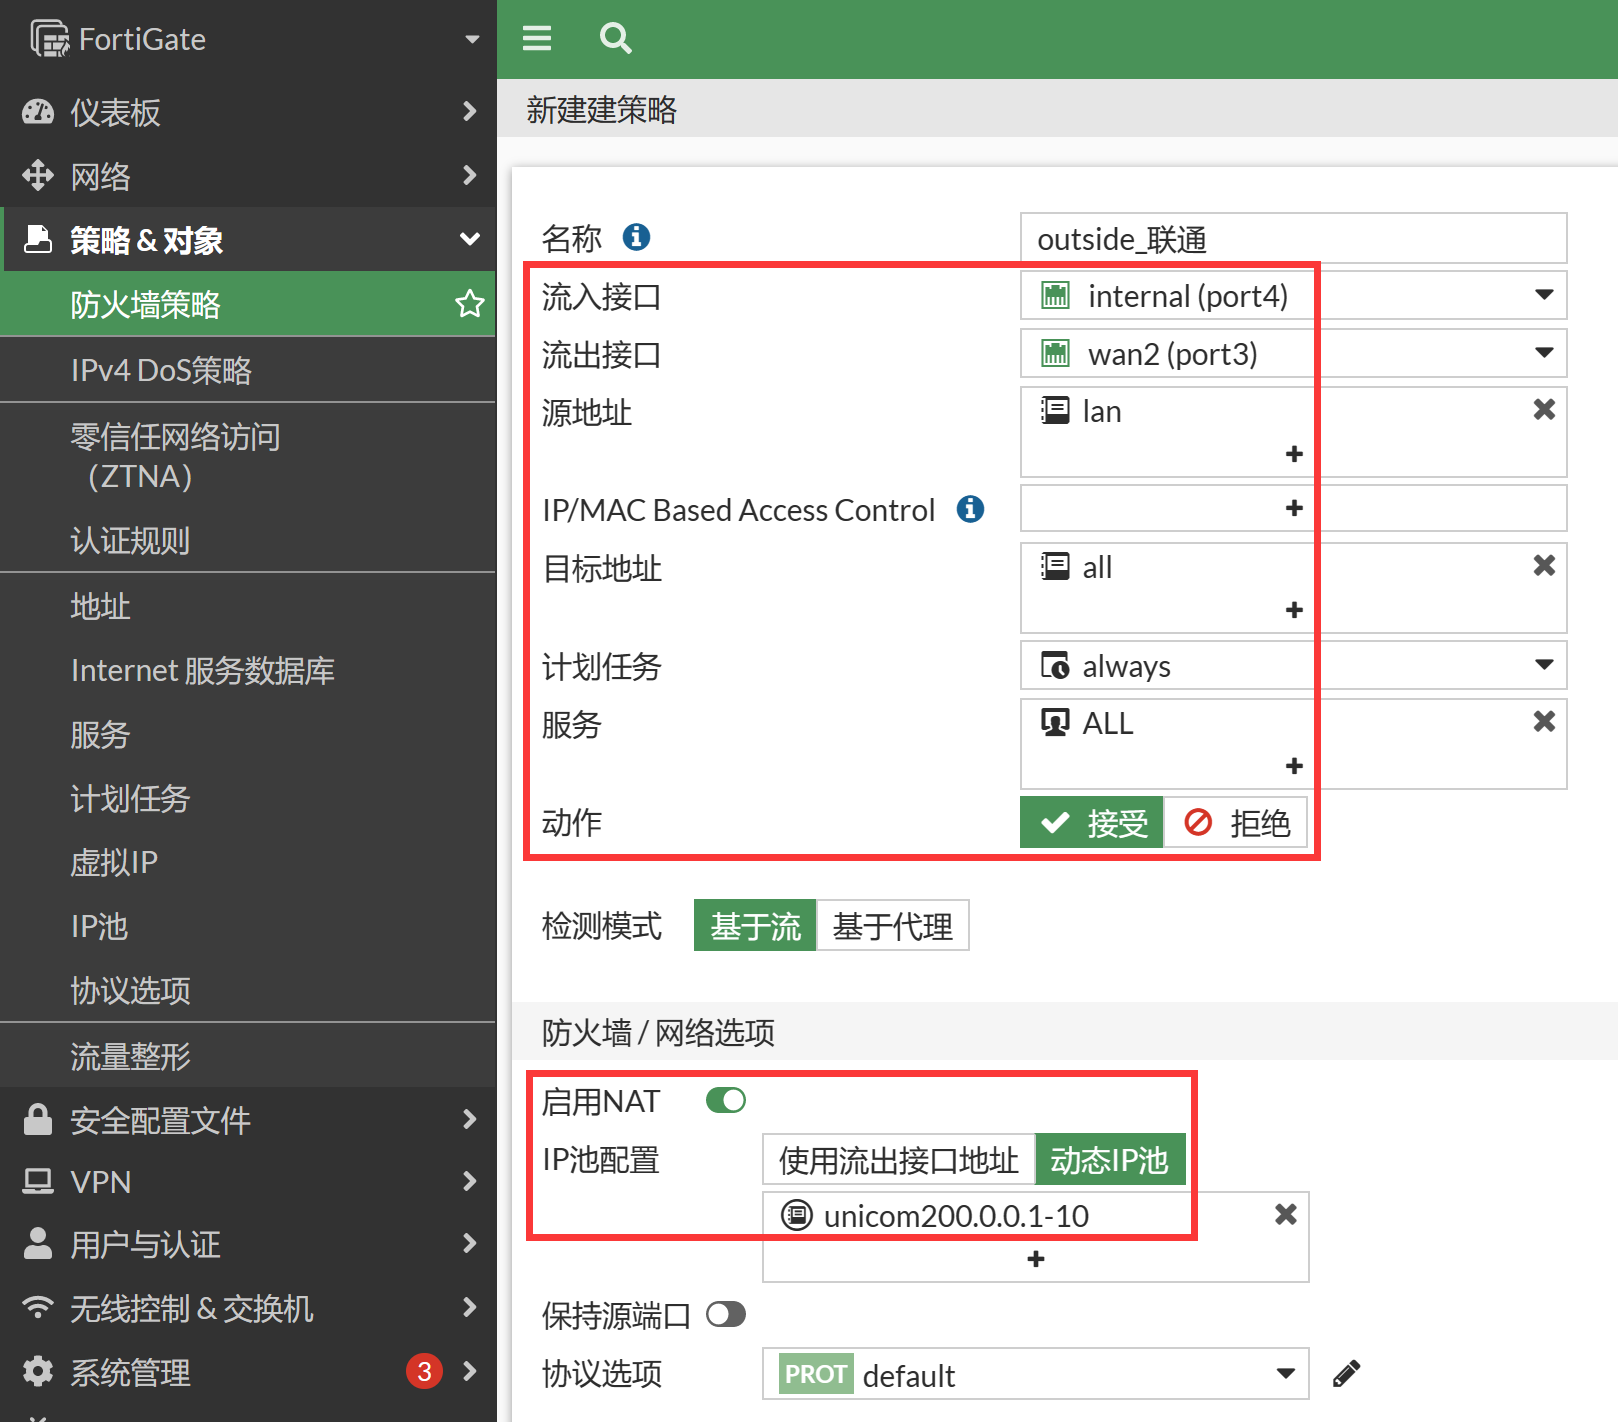
config firewall policy edit 1 set name "outside_电信" set srcintf "port4" set dstintf "port2" set action accept set srcaddr "lan" set dstaddr "all" set schedule "always" set service "ALL" set nat enable set ippool enable set poolname "telcom100.0.0.1-10" next edit 2 set name "outside_联通" set srcintf "port4" set dstintf "port3" set action accept set srcaddr "lan" set dstaddr "all" set schedule "always" set service "ALL" set nat enable set ippool enable set poolname "unicom200.0.0.1-10" next end- 流入接口:选择 internal
- 源地址:选择刚才定义的地址资源 lan 上网网段
- 流出接口:wan1 或 wan2
- 目的地址选择: all,代表所有的地址
- 时间表:always
- 服务: ALL
- 动作:ACCEPT
- NAT:选择 "启用 NAT", 勾选 "动态 IP 地址池",并选择相应的地址池进行互联网访问
- 点击确定按钮后,系统自动保存配置,策略生效
- 注意:启用 "记录允许流量(记录流日志)" 将会给系统带来额外的资源消耗,所以非必要情况下请不要启用记录日志
结果验证
客户端上网测试,通过 tracert 命令,检测去往不同运营 IP 的路径是否正确。
注意事项
1. 2. 如果在 SD-WAN 中使用 ippool 的方式做 SNAT,一定要在 ippool 下配置绑定接口,防止 ippool 在 SD-WAN 成员中转换错误。