公网接口访问限制
公网接口访问限制
为了提升网络安全性,限制来自互联网对 FortiGate 的管理访问是至关重要的。通过限制管理接口的访问范围,可以有效防止未经授权的远程登录,降低潜在的安全风险。
为什么要限制 FortiGate 的互联网访问?
- 防止未经授权的访问:公开的管理接口可能被恶意用户扫描和利用,导致未经授权的访问。
- 减少攻击面:限制管理接口的访问范围,可以减少暴露在互联网中的服务,降低被攻击的可能性。
- 遵循安全最佳实践:网络安全的基本原则之一是最小化暴露面,限制管理接口的访问是实现这一原则的重要措施。
请根据实际网络环境和安全需求,合理应用以下方法,以确保 FortiGate 的安全管理。
禁用互联网接口管理协议
重要
通过禁用外部接口(如 WAN 口)的管理协议(如 HTTP、HTTPS、SSH、Telnet、FMG-Access 等)访问,仅保留必要的管理协议(如 Ping),可以减少暴露在互联网的管理服务,降低被攻击的风险。
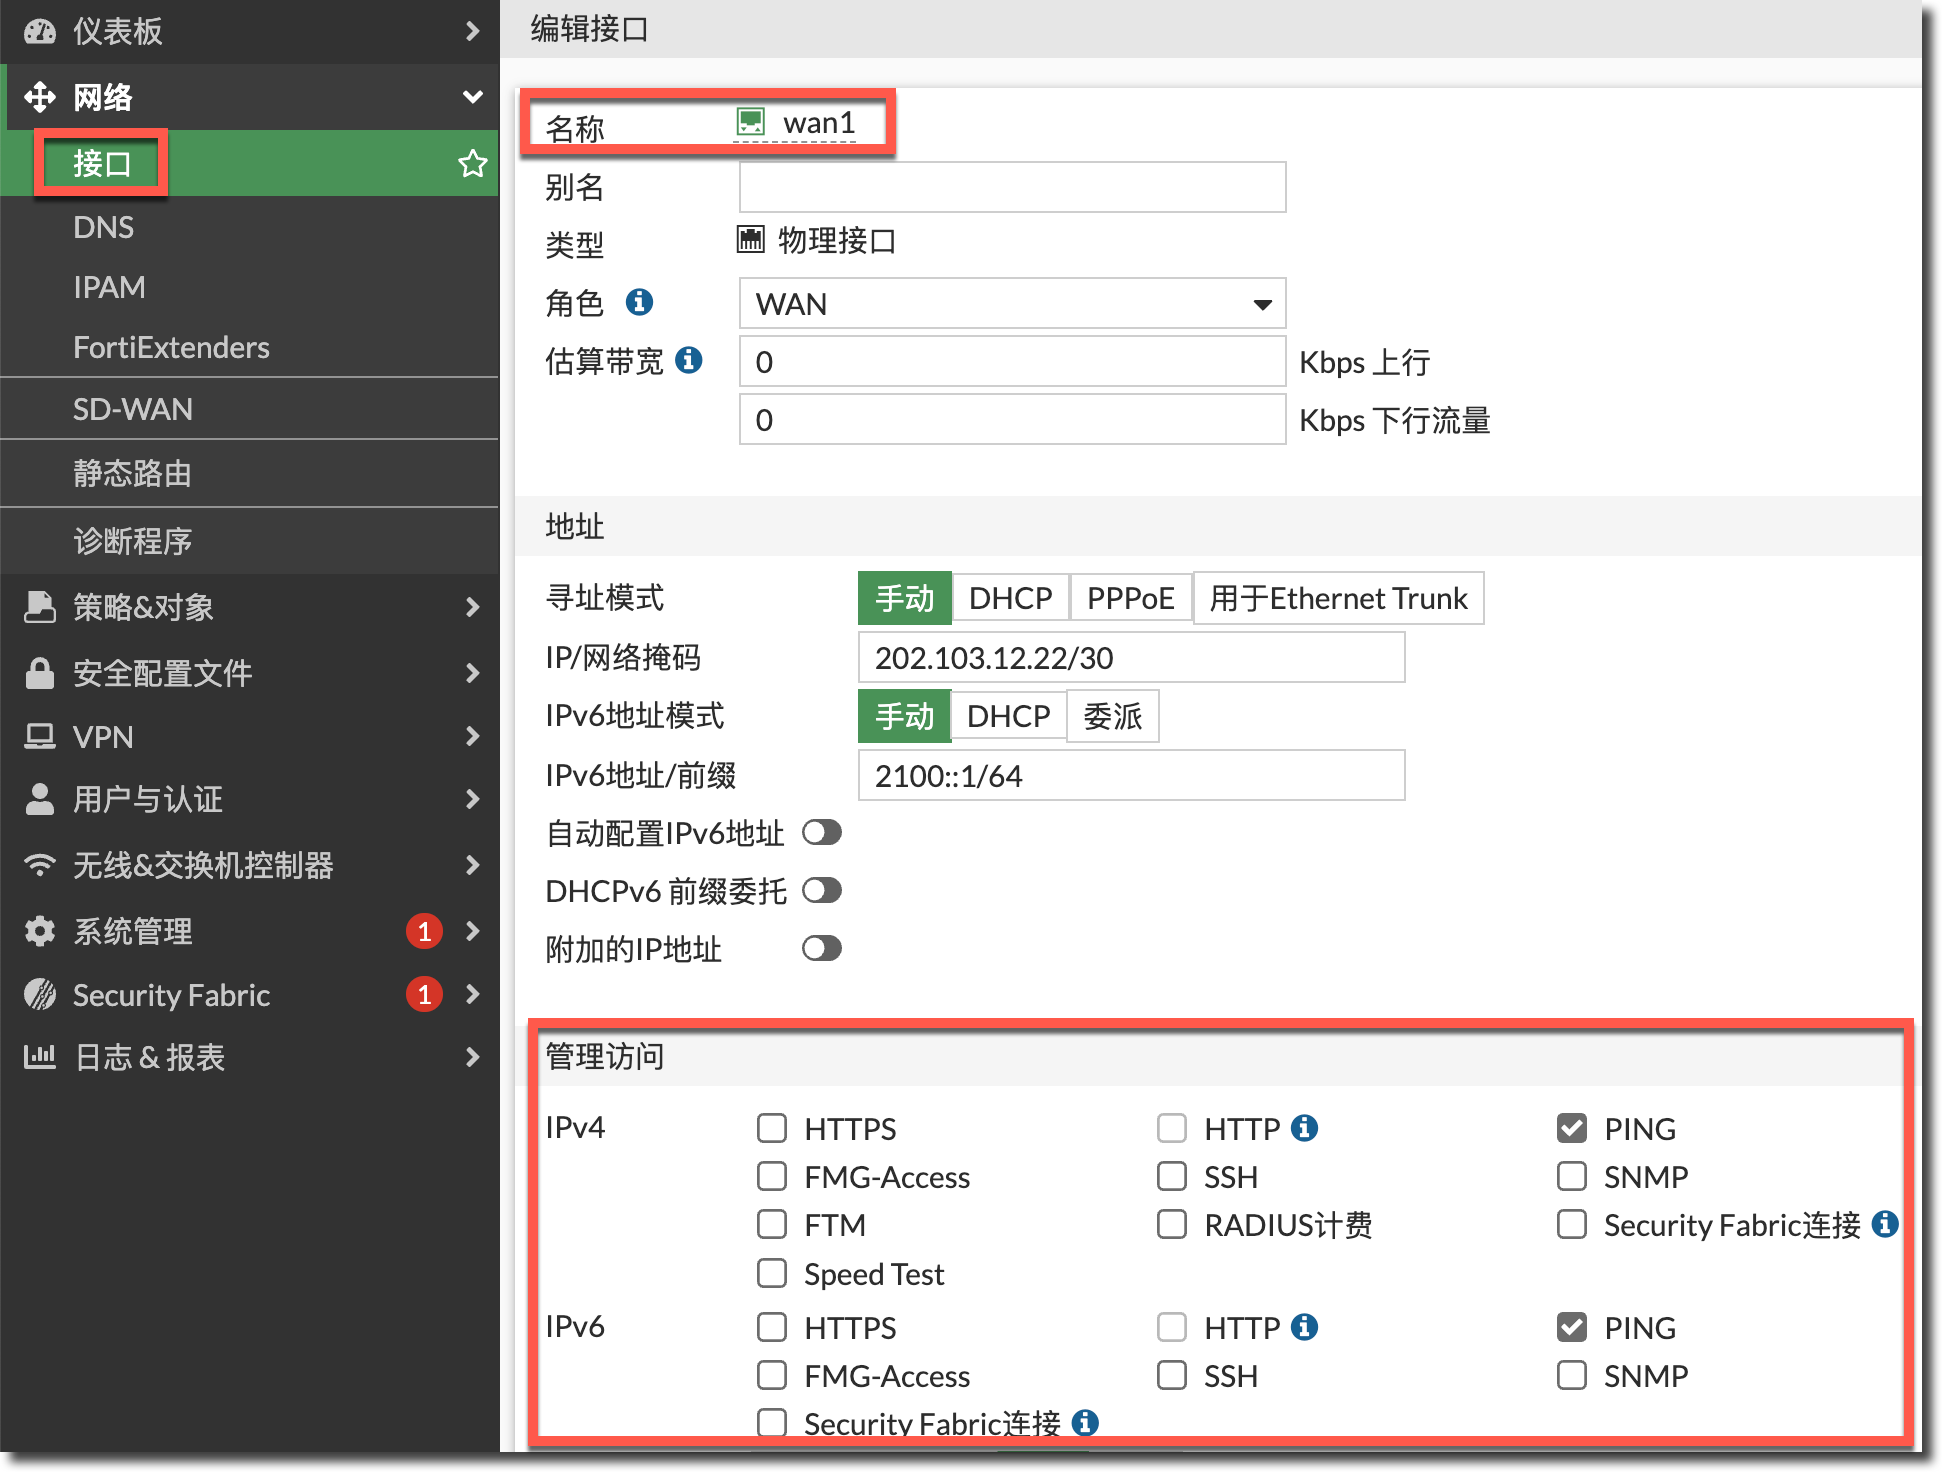
进入“网络 → 接口”页面,编辑 FortiGate 的互联网网接口(这里以 wan1 为例),在管理访问中,只开启 PING 访问,关闭其他协议的管理访问(如果 FortiGate 启用了互联网接口的 IPv6,则需要在 IPv6 的管理访问中执行相同操作)。
重要
FortiManager 通过 Internet 管理 FortiGate 时,如果是 FortiGate 主动注册到 FortiManager 的模式,不需要开启 FMG-Access 管理。
config system interface
    edit "wan1"
        set allowaccess ping
        config ipv6
            set ip6-allowaccess ping
        end
    next
end
在内网接口上开启管理协议(如 HTTPS、SSH 等)通过内网接口或 VPN 远程连接的方式管理 FortiGate。
配置 Local-in 策略
重要
Local-in 策略用于控制目标是 FortiGate 自身地址的流量,可用于限制对接口本身的访问。
关于 Local-in 策略的更多介绍可参考策略与对象 → 本地策略 → Local-in 策略章节。
如果由于实际需要,FortiGate 的外网接口必须开启 HTTPS/SSH 远程访问(或内网接口限定使用特定跳板机/VPN 客户端网段访问),可以通过 Local-in 策略指定可信任的主机 IP 地址范围,确保只有来自这些地址的连接才能进行管理访问,从而提高安全性。
config system interface
    edit "wan1"
        set allowaccess ping https ssh
        config ipv6
            set ip6-allowaccess ping https ssh
        end
    next
end
创建允许访问 FortiGate 的公网接口的源地址对象(请替换内容为您真实环境中的信任公网地址),并使用地址组引用这些地址对象。
config firewall address
    edit "60.247.121.226/32"
        set subnet 60.247.121.226 255.255.255.255
    next
    edit "123.112.245.11/32"
        set subnet 123.112.245.11 255.255.255.255
    next
    edit "39.105.115.224/29"
        set subnet 39.105.115.224 255.255.255.248
    next
end

config firewall addrgrp
    edit "Internet_Admin_Trust_List4"
        set member "39.105.115.224/29" "60.247.121.226/32" "123.112.245.11/32"
    next
end
(可选)如果 FortiGate 启用了互联网接口的 IPv6,则需要同时创建 IPv6 的地址对象/地址组。
config firewall address6
    edit "240e:88::3/128"
        set ip6 240e:88::3/128
    next
    edit "2001::/96"
        set ip6 2001::/96
    next
end

config firewall addrgrp6
    edit "Internet_Admin_Trust_List6"
        set member "2001::/96" "240e:88::3/128"
    next
end
在 FortiGate 的互联网接口(这里以 wan1 为例)上配置 Local-in 策略,禁止除源地址组外的其他地址访问 FortiGate 互联网接口的 HTTP/SSH 协议。
重要
Local-in 策略只会影响目标是 FortiGate 自身地址的流量,不会影响 DNAT 策略流量(穿越流量)。
此例中的 FortiGate 使用默认的 HTTPS 端口 443、SSH 端口 22 作为管理端口,如果您修改了默认 HTTPS/SSH 管理端口,请创建对应端口的服务对象(如下所示),然后在 Local-in 策略中的
service中引用。config firewall service custom edit GUI_HTTPS set tcp-portrange 4443 next edit Custom_SSH set tcp-portrange 2233 next end
config firewall local-in-policy
    edit 1
        set intf "wan1"
        set srcaddr "Internet_Admin_Trust_List4"
        set dstaddr "all"
        set action accept
        set service "HTTPS" "SSH"
        set schedule "always"
    next
    edit 2
        set intf "wan1"
        set srcaddr "all"
        set dstaddr "all"
        set action deny
        set service "HTTPS" "SSH"
        set schedule "always"
    next
end
重要
Local-in Policy 默认隐含策略的动作为 permit all。所以以上配置只会影响 HTTPS、SSH 的访问,不会影响其他访问 FortiGate 自身的流量(如 IPSec、SSL VPN、BGP、OSPF 等)。
(可选)如果 FortiGate 启用了互联网接口的 IPv6,则需要对应创建 IPv6 的 Local-in 策略。
config firewall local-in-policy6
    edit 1
        set intf "wan1"
        set srcaddr "Internet_Admin_Trust_List6"
        set dstaddr "all"
        set action accept
        set service "HTTPS" "SSH"
        set schedule "always"
    next
    edit 2
        set intf "wan1"
        set srcaddr "all"
        set dstaddr "all"
        set action deny
        set service "HTTPS" "SSH"
        set schedule "always"
    next
end